13 KiB
9200 - Pentesting Elasticsearch
{% hint style="success" %}
Learn & practice AWS Hacking: HackTricks Training AWS Red Team Expert (ARTE)
Learn & practice GCP Hacking:  HackTricks Training GCP Red Team Expert (GRTE)
Support HackTricks
- Check the subscription plans!
- Join the 💬 Discord group or the telegram group or follow us on Twitter 🐦 @hacktricks_live.
- Share hacking tricks by submitting PRs to the HackTricks and HackTricks Cloud github repos.
Basiese inligting
Elasticsearch is 'n gedistribueerde, oopbron soek- en analise-enjin vir alle tipes data. Dit is bekend vir sy spoed, schaalbaarheid, en eenvoudige REST API's. Gebou op Apache Lucene, is dit eerste keer vrygestel in 2010 deur Elasticsearch N.V. (nou bekend as Elastic). Elasticsearch is die kernkomponent van die Elastic Stack, 'n versameling oopbron gereedskap vir data-inname, verryking, stoor, analise, en visualisering. Hierdie stapel, algemeen bekend as die ELK Stapel, sluit ook Logstash en Kibana in, en het nou liggewig data versendingsagente genaamd Beats.
Wat is 'n Elasticsearch-indeks?
'n Elasticsearch indeks is 'n versameling van verwante dokumente wat as JSON gestoor word. Elke dokument bestaan uit sleutels en hul ooreenstemmende waardes (strings, getalle, booleans, datums, arrays, geolokasies, ens.).
Elasticsearch gebruik 'n doeltreffende datastruktuur genaamd 'n omgekeerde indeks om vinnige volle teks soektogte te fasiliteer. Hierdie indeks lys elke unieke woord in die dokumente en identifiseer die dokumente waarin elke woord voorkom.
Tydens die indekseringsproses stoor Elasticsearch die dokumente en bou die omgekeerde indeks, wat byna regte tyd soektogte moontlik maak. Die indeks API word gebruik om JSON-dokumente binne 'n spesifieke indeks by te voeg of op te dateer.
Standaard poort: 9200/tcp
Handmatige Enumerasie
Banner
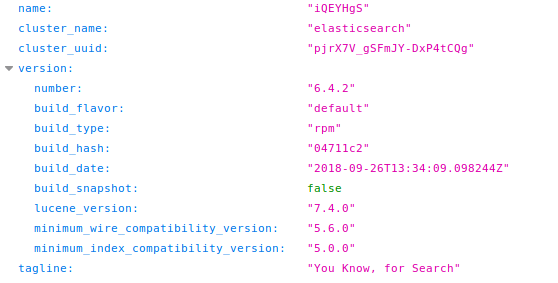
Die protokol wat gebruik word om toegang tot Elasticsearch te verkry is HTTP. Wanneer jy dit via HTTP benader, sal jy 'n paar interessante inligting vind: http://10.10.10.115:9200/
As jy daardie antwoord nie sien nie wanneer jy toegang tot / verkry, sien die volgende afdeling.
Verifikasie
Standaard het Elasticsearch nie verifikasie geaktiveer nie, so standaard kan jy alles binne die databasis benader sonder om enige geloofsbriewe te gebruik.
Jy kan verifieer dat verifikasie gedeaktiveer is met 'n versoek na:
curl -X GET "ELASTICSEARCH-SERVER:9200/_xpack/security/user"
{"error":{"root_cause":[{"type":"exception","reason":"Security must be explicitly enabled when using a [basic] license. Enable security by setting [xpack.security.enabled] to [true] in the elasticsearch.yml file and restart the node."}],"type":"exception","reason":"Security must be explicitly enabled when using a [basic] license. Enable security by setting [xpack.security.enabled] to [true] in the elasticsearch.yml file and restart the node."},"status":500}
** egter**, as jy 'n versoek na / stuur en 'n antwoord soos die volgende ontvang:
{"error":{"root_cause":[{"type":"security_exception","reason":"missing authentication credentials for REST request [/]","header":{"WWW-Authenticate":"Basic realm=\"security\" charset=\"UTF-8\""}}],"type":"security_exception","reason":"missing authentication credentials for REST request [/]","header":{"WWW-Authenticate":"Basic realm=\"security\" charset=\"UTF-8\""}},"status":401}
Dit beteken dat outentikasie geconfigureer is en jy geldige akrediteerlinge nodig het om enige inligting van Elasticsearch te verkry. Dan kan jy probeer om dit te bruteforce (dit gebruik HTTP basiese outentikasie, so enigiets wat BF HTTP basiese outentikasie kan gebruik, kan gebruik word).
Hier is 'n lys van standaard gebruikersname: elastic (superuser), remote_monitoring_user, beats_system, logstash_system, kibana, kibana_system, apm_system, _anonymous_._ Ou weergawe van Elasticsearch het die standaard wagwoord changeme vir hierdie gebruiker.
curl -X GET http://user:password@IP:9200/
Basiese Gebruiker Enumerasie
#List all roles on the system:
curl -X GET "ELASTICSEARCH-SERVER:9200/_security/role"

#List all users on the system:
curl -X GET "ELASTICSEARCH-SERVER:9200/_security/user"

#Get more information about the rights of an user:
curl -X GET "ELASTICSEARCH-SERVER:9200/_security/user/<USERNAME>"
Elastic Info
Hier is 'n paar eindpunte wat jy kan toegang via GET om inligting oor elasticsearch te verkry:
| _cat | /_cluster | /_security |
|---|---|---|
| /_cat/segments | /_cluster/allocation/explain | /_security/user |
| /_cat/shards | /_cluster/settings | /_security/privilege |
| /_cat/repositories | /_cluster/health | /_security/role_mapping |
| /_cat/recovery | /_cluster/state | /_security/role |
| /_cat/plugins | /_cluster/stats | /_security/api_key |
| /_cat/pending_tasks | /_cluster/pending_tasks | |
| /_cat/nodes | /_nodes | |
| /_cat/tasks | /_nodes/usage | |
| /_cat/templates | /_nodes/hot_threads | |
| /_cat/thread_pool | /_nodes/stats | |
| /_cat/ml/trained_models | /_tasks | |
| /_cat/transforms/_all | /_remote/info | |
| /_cat/aliases | ||
| /_cat/allocation | ||
| /_cat/ml/anomaly_detectors | ||
| /_cat/count | ||
| /_cat/ml/data_frame/analytics | ||
| /_cat/ml/datafeeds | ||
| /_cat/fielddata | ||
| /_cat/health | ||
| /_cat/indices | ||
| /_cat/master | ||
| /_cat/nodeattrs | ||
| /_cat/nodes |
Hierdie eindpunte is geneem uit die dokumentasie waar jy meer kan vind.
Ook, as jy toegang tot /_cat verkry, sal die antwoord die /_cat/* eindpunte bevat wat deur die instansie ondersteun word.
In /_security/user (as outentisering geaktiveer is) kan jy sien watter gebruiker die rol superuser het.
Indices
Jy kan alle indekse versamel deur http://10.10.10.115:9200/_cat/indices?v te benader.
health status index   uuid                   pri rep docs.count docs.deleted store.size pri.store.size
green  open   .kibana 6tjAYZrgQ5CwwR0g6VOoRg   1   0          1            0        4kb            4kb
yellow open   quotes  ZG2D1IqkQNiNZmi2HRImnQ   5   1        253            0    262.7kb        262.7kb
yellow open   bank    eSVpNfCfREyYoVigNWcrMw   5   1       1000            0    483.2kb        483.2kb
Om inligting te verkry oor watter tipe data binne 'n indeks gestoor is kan jy toegang verkry tot: http://host:9200/<index> in hierdie geval http://10.10.10.115:9200/bank
Dump indeks
As jy alle inhoud van 'n indeks wil dump, kan jy toegang verkry tot: http://host:9200/<index>/_search?pretty=true soos http://10.10.10.115:9200/bank/_search?pretty=true
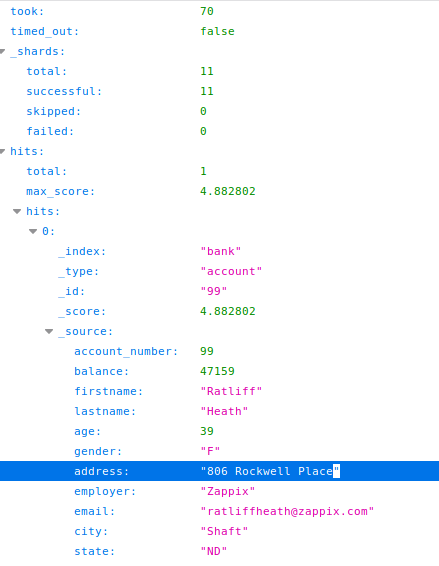
Neem 'n oomblik om die inhoud van elke dokument (invoer) binne die bankindeks en die velde van hierdie indeks wat ons in die vorige afdeling gesien het, te vergelyk.
So, op hierdie punt mag jy opgemerk het dat daar 'n veld genaamd "total" binne "hits" is wat aandui dat 1000 dokumente gevind is binne hierdie indeks, maar slegs 10 is teruggehaal. Dit is omdat daar per standaard 'n limiet van 10 dokumente is.
Maar, nou dat jy weet dat hierdie indeks 1000 dokumente bevat, kan jy almal daarvan dump deur die aantal invoere wat jy wil dump in die size parameter aan te dui: http://10.10.10.115:9200/quotes/_search?pretty=true&size=1000asd
Notas: As jy 'n groter getal aandui, sal al die invoere steeds gedump word, byvoorbeeld jy kan size=9999 aandui en dit sal vreemd wees as daar meer invoere was (maar jy moet dit nagaan).
Dump alles
Om alles te dump kan jy net na die dieselfde pad as voorheen gaan, maar sonder om enige indeks aan te dui http://host:9200/_search?pretty=true soos http://10.10.10.115:9200/_search?pretty=true
Onthou dat in hierdie geval die standaard limiet van 10 resultate toegepas sal word. Jy kan die size parameter gebruik om 'n groter hoeveelheid resultate te dump. Lees die vorige afdeling vir meer inligting.
Soek
As jy op soek is na inligting kan jy 'n raw soektog op al die indekse doen deur te gaan na http://host:9200/_search?pretty=true&q=<search_term> soos in http://10.10.10.115:9200/_search?pretty=true&q=Rockwell
As jy net op 'n indeks wil soek, kan jy dit eenvoudig specifiseer op die pad: http://host:9200/<index>/_search?pretty=true&q=<search_term>
Not dat die q parameter wat gebruik word om inhoud te soek reguliere uitdrukkings ondersteun
Jy kan ook iets soos https://github.com/misalabs/horuz gebruik om 'n elasticsearch diens te fuzz.
Skryf toestemmings
Jy kan jou skryftoestemmings nagaan deur te probeer om 'n nuwe dokument binne 'n nuwe indeks te skep deur iets soos die volgende te loop:
curl -X POST '10.10.10.115:9200/bookindex/books' -H 'Content-Type: application/json' -d'
{
"bookId" : "A00-3",
"author" : "Sankaran",
"publisher" : "Mcgrahill",
"name" : "how to get a job"
}'
Die cmd sal 'n nuwe indeks genaamd bookindex skep met 'n dokument van tipe books wat die eienskappe "bookId", "author", "publisher" en "name" het.
Let op hoe die nuwe indeks nou in die lys verskyn:
En let op die automaties geskepte eienskappe:
Outomatiese Enumerasie
Sommige gereedskap sal 'n paar van die data wat voorheen aangebied is, verkry:
msf > use auxiliary/scanner/elasticsearch/indices_enum
{% embed url="https://github.com/theMiddleBlue/nmap-elasticsearch-nse" %}
Shodan
port:9200 elasticsearch
{% hint style="success" %}
Leer & oefen AWS Hacking: HackTricks Opleiding AWS Red Team Expert (ARTE)
Leer & oefen GCP Hacking:  HackTricks Opleiding GCP Red Team Expert (GRTE)
Ondersteun HackTricks
- Kyk na die subskripsie planne!
- Sluit aan by die 💬 Discord groep of die telegram groep of volg ons op Twitter 🐦 @hacktricks_live.
- Deel hacking truuks deur PRs in te dien na die HackTricks en HackTricks Cloud github repos.


