11 KiB
安装 Burp 证书
从零开始学习 AWS 黑客技术,成为 htARTE (HackTricks AWS 红队专家)!
支持 HackTricks 的其他方式:
- 如果您想在 HackTricks 中看到您的公司广告或下载 HackTricks 的 PDF,请查看订阅计划!
- 获取官方 PEASS & HackTricks 商品
- 发现PEASS 家族,我们独家的 NFTs 收藏
- 加入 💬 Discord 群组 或 telegram 群组 或在 Twitter 🐦 上关注我 @carlospolopm。
- 通过向 HackTricks 和 HackTricks Cloud github 仓库提交 PR 来分享您的黑客技巧。
在虚拟机上
首先,您需要从 Burp 下载 Der 证书。您可以在 Proxy --> Options --> Import / Export CA certificate 中进行下载。
以 Der 格式导出证书,然后将其转换为 Android 能够理解的格式。请注意,为了在 AVD 中的 Android 机器上配置 burp 证书,您需要使用 -writable-system 选项运行此机器。
例如,您可以像这样运行它:
{% code overflow="wrap" %}
C:\Users\<UserName>\AppData\Local\Android\Sdk\tools\emulator.exe -avd "AVD9" -http-proxy 192.168.1.12:8080 -writable-system
{% endcode %}
然后,要配置burps证书,请执行:
{% code overflow="wrap" %}
openssl x509 -inform DER -in burp_cacert.der -out burp_cacert.pem
CERTHASHNAME="`openssl x509 -inform PEM -subject_hash_old -in burp_cacert.pem | head -1`.0"
mv burp_cacert.pem $CERTHASHNAME #Correct name
adb root && sleep 2 && adb remount #Allow to write on /syste
adb push $CERTHASHNAME /sdcard/ #Upload certificate
adb shell mv /sdcard/$CERTHASHNAME /system/etc/security/cacerts/ #Move to correct location
adb shell chmod 644 /system/etc/security/cacerts/$CERTHASHNAME #Assign privileges
adb reboot #Now, reboot the machine
{% endcode %}
一旦机器完成重启,burp证书将被其使用!
使用Magisc
如果您使用Magisc对设备进行了root(可能是模拟器),并且您无法按照前面的步骤安装Burp证书,因为文件系统是只读的并且您无法重新挂载为可写,还有另一种方法。
如此视频所解释,您需要:
- 安装CA证书:只需将DER Burp证书拖放到移动设备中,更改扩展名为
.crt,以便将其存储在下载文件夹中,然后转到安装证书->CA证书

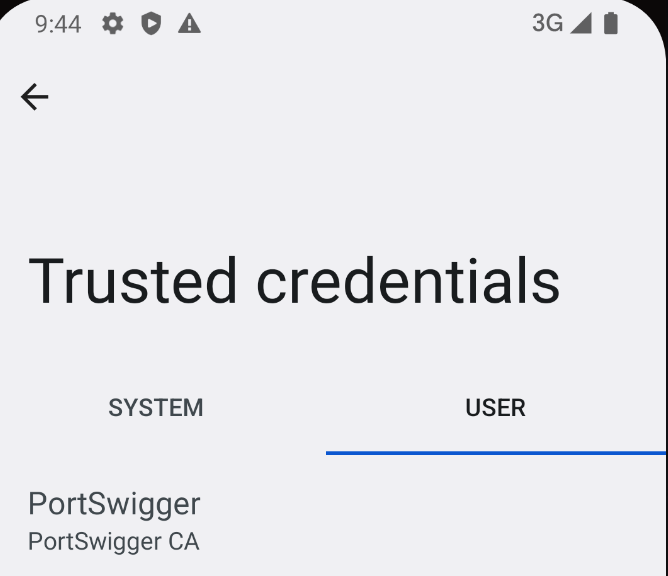
- 检查证书是否已正确存储,转到
受信任的凭据->USER

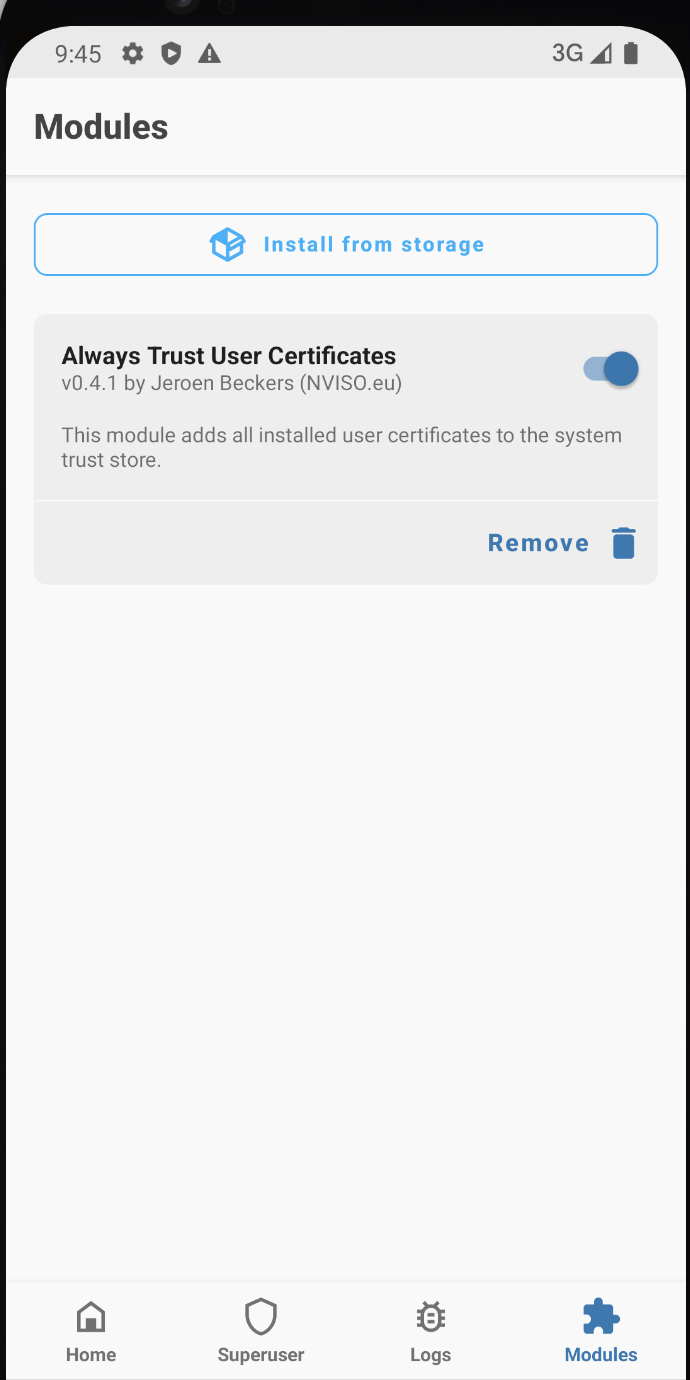
- 使其成为系统信任:下载Magisc模块MagiskTrustUserCerts(一个.zip文件),拖放到手机中,转到手机中的Magics应用的**
Modules部分,点击从存储安装,选择.zip模块并安装后重启**手机:

- 重启后,转到
受信任的凭据->SYSTEM并检查Postswigger证书是否在那里

Android 14之后
变化:
- 目前为止,系统信任的CA证书位于**
/system/etc/security/cacerts/。在标准的AOSP模拟器上,这些可以通过最小设置直接通过root访问进行修改**,立即在所有地方生效。 - 在Android 14中,系统信任的CA证书通常位于**
/apex/com.android.conscrypt/cacerts,并且/apex全部是不可变的**。 - APEX cacerts路径无法重新挂载为可写 - 重新挂载简单地失败。实际上,即使您从root shell卸载整个路径,应用程序仍然可以很好地读取您的证书。
- 在顶部挂载tmpfs目录的替代技术也不起作用 - 即使这意味着
ls /apex/com.android.conscrypt/cacerts可能什么都不返回(或者您喜欢的任何其他内容),应用程序仍然会看到相同的原始数据。 - 因为
/apex挂载是明确挂载 具有PRIVATE传播,以便在/apex路径内的所有挂载更改都不会在进程之间共享。
这是由启动操作系统的init进程完成的,然后启动Zygote进程(从父进程复制了一个新的挂载命名空间,因此包括其自己的私有/apex挂载),然后反过来启动每个应用进程,每当设备上启动应用时(他们每个人反过来又复制了同样的私有/apex挂载)。
递归重新挂载挂载点
- 您可以手动重新挂载
/apex,移除PRIVATE传播并使其可写(讽刺的是,完全移除私有传播似乎_确实_到处传播) - 您将
/apex/com.android.conscrypt的全部内容复制到其他地方 - 然后您完全卸载
/apex/com.android.conscrypt- 移除不可变地提供此模块的只读挂载 - 然后您将内容复制回来,使其直接生活在
/apex挂载中,可以进行修改(您需要快速完成此操作,因为显然您可以看到崩溃) - 这应该立即生效,但他们建议杀死
system_server(重新启动所有应用程序)以使一切恢复到一致状态
# Create a separate temp directory, to hold the current certificates
# Otherwise, when we add the mount we can't read the current certs anymore.
mkdir -p -m 700 /data/local/tmp/tmp-ca-copy

# Copy out the existing certificates
cp /apex/com.android.conscrypt/cacerts/* /data/local/tmp/tmp-ca-copy/

# Create the in-memory mount on top of the system certs folder
mount -t tmpfs tmpfs /system/etc/security/cacerts

# Copy the existing certs back into the tmpfs, so we keep trusting them
mv /data/local/tmp/tmp-ca-copy/* /system/etc/security/cacerts/

# Copy our new cert in, so we trust that too
mv $CERTIFICATE_PATH /system/etc/security/cacerts/

# Update the perms & selinux context labels
chown root:root /system/etc/security/cacerts/*
chmod 644 /system/etc/security/cacerts/*
chcon u:object_r:system_file:s0 /system/etc/security/cacerts/*

# Deal with the APEX overrides, which need injecting into each namespace:

# First we get the Zygote process(es), which launch each app
ZYGOTE_PID=$(pidof zygote || true)
ZYGOTE64_PID=$(pidof zygote64 || true)
# N.b. some devices appear to have both!

# Apps inherit the Zygote's mounts at startup, so we inject here to ensure
# all newly started apps will see these certs straight away:
for Z_PID in "$ZYGOTE_PID" "$ZYGOTE64_PID"; do
if [ -n "$Z_PID" ]; then
nsenter --mount=/proc/$Z_PID/ns/mnt -- \
/bin/mount --bind /system/etc/security/cacerts /apex/com.android.conscrypt/cacerts
fi
done

# Then we inject the mount into all already running apps, so they
# too see these CA certs immediately:

# Get the PID of every process whose parent is one of the Zygotes:
APP_PIDS=$(
echo "$ZYGOTE_PID $ZYGOTE64_PID" | \
xargs -n1 ps -o 'PID' -P | \
grep -v PID
)

# Inject into the mount namespace of each of those apps:
for PID in $APP_PIDS; do
nsenter --mount=/proc/$PID/ns/mnt -- \
/bin/mount --bind /system/etc/security/cacerts /apex/com.android.conscrypt/cacerts &
done
wait # Launched in parallel - wait for completion here

echo "System certificate injected"
通过 NSEnter 进行绑定挂载
- 首先,我们需要在某处设置一个可写目录。为了与现有方法轻松兼容,我使用
tmpfs挂载覆盖了(仍然存在的)非 APEX 系统证书目录:
mount -t tmpfs tmpfs /system/etc/security/cacerts
- 然后将您感兴趣的 CA 证书放入此目录中(例如,您可能想从现有的
/apex/com.android.conscrypt/cacerts/CA 证书目录中复制所有默认值),并适当设置权限和 SELinux 标签。 - 接着,使用
nsenter进入 Zygote 的挂载命名空间,并将此目录绑定挂载到 APEX 目录上:
nsenter --mount=/proc/$ZYGOTE_PID/ns/mnt -- \
/bin/mount --bind /system/etc/security/cacerts /apex/com.android.conscrypt/cacerts
Zygote 进程生成每个应用程序,复制其挂载命名空间以执行此操作,因此这确保了所有新启动的应用程序(从现在开始启动的所有内容)都将使用此目录。
- 然后,使用
nsenter进入每个已经运行的应用程序的命名空间,并执行相同的操作:
nsenter --mount=/proc/$APP_PID/ns/mnt -- \
/bin/mount --bind /system/etc/security/cacerts /apex/com.android.conscrypt/cacerts
或者,如果您不介意笨拙的用户体验,您应该能够在 init 本身(PID 1)上进行绑定挂载,然后运行 stop && start 软重启操作系统,重新创建所有命名空间并传播您的更改到处(但我个人确实介意笨拙的重启,所以我完全忽略了那条路线)。
从零到英雄学习 AWS 黑客技术,使用 htARTE (HackTricks AWS 红队专家)!
支持 HackTricks 的其他方式:
- 如果您想在 HackTricks 中看到您的公司广告或下载 HackTricks 的 PDF,请查看订阅计划!
- 获取 官方 PEASS & HackTricks 商品
- 发现 PEASS 家族,我们独家的 NFTs 集合
- 加入 💬 Discord 群组 或 telegram 群组 或在 Twitter 🐦 上关注我 @carlospolopm。
- 通过向 HackTricks 和 HackTricks Cloud github 仓库提交 PR 来分享您的黑客技巧。
