15 KiB
9200 - Pentesting Elasticsearch
{% hint style="success" %}
Learn & practice AWS Hacking: HackTricks Training AWS Red Team Expert (ARTE)
Learn & practice GCP Hacking:  HackTricks Training GCP Red Team Expert (GRTE)
Support HackTricks
- Check the subscription plans!
- Join the 💬 Discord group or the telegram group or follow us on Twitter 🐦 @hacktricks_live.
- Share hacking tricks by submitting PRs to the HackTricks and HackTricks Cloud github repos.
해커의 관점에서 웹 앱, 네트워크 및 클라우드를 살펴보세요
실제 비즈니스에 영향을 미치는 중요한 취약점을 찾아보고 보고하세요. 20개 이상의 맞춤형 도구를 사용하여 공격 표면을 매핑하고, 권한 상승을 허용하는 보안 문제를 찾아내며, 자동화된 익스플로잇을 사용하여 필수 증거를 수집하여 귀하의 노력을 설득력 있는 보고서로 전환하세요.
{% embed url="https://pentest-tools.com/?utm_term=jul2024&utm_medium=link&utm_source=hacktricks&utm_campaign=spons" %}
기본 정보
Elasticsearch는 분산형, 오픈 소스 검색 및 분석 엔진으로 모든 유형의 데이터를 처리합니다. 속도, 확장성, 간단한 REST API로 잘 알려져 있습니다. Apache Lucene을 기반으로 하며, 2010년에 Elasticsearch N.V. (현재 Elastic로 알려짐)에서 처음 출시되었습니다. Elasticsearch는 데이터 수집, 보강, 저장, 분석 및 시각화를 위한 오픈 소스 도구 모음인 Elastic Stack의 핵심 구성 요소입니다. 이 스택은 일반적으로 ELK 스택이라고 하며, Logstash와 Kibana를 포함하고 있으며, 현재 Beats라는 경량 데이터 전송 에이전트를 보유하고 있습니다.
Elasticsearch 인덱스란 무엇인가요?
Elasticsearch 인덱스는 JSON 형식으로 저장된 관련 문서의 모음입니다. 각 문서는 키와 해당 값(문자열, 숫자, 불리언, 날짜, 배열, 지리적 위치 등)으로 구성됩니다.
Elasticsearch는 빠른 전체 텍스트 검색을 용이하게 하기 위해 역 인덱스라는 효율적인 데이터 구조를 사용합니다. 이 인덱스는 문서 내의 모든 고유 단어를 나열하고 각 단어가 나타나는 문서를 식별합니다.
인덱싱 과정에서 Elasticsearch는 문서를 저장하고 역 인덱스를 구성하여 거의 실시간 검색을 가능하게 합니다. 인덱스 API는 특정 인덱스 내에서 JSON 문서를 추가하거나 업데이트하는 데 사용됩니다.
기본 포트: 9200/tcp
수동 열거
배너
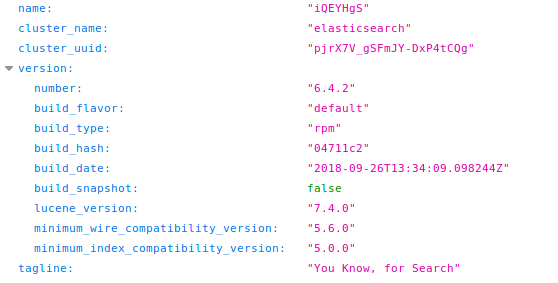
Elasticsearch에 접근하는 데 사용되는 프로토콜은 HTTP입니다. HTTP를 통해 접근하면 흥미로운 정보를 찾을 수 있습니다: http://10.10.10.115:9200/
/에 접근할 때 해당 응답이 보이지 않으면 다음 섹션을 참조하세요.
인증
기본적으로 Elasticsearch는 인증이 활성화되어 있지 않습니다, 따라서 기본적으로 자격 증명 없이 데이터베이스 내의 모든 것에 접근할 수 있습니다.
인증이 비활성화되어 있는지 확인하려면 다음 요청을 보낼 수 있습니다:
curl -X GET "ELASTICSEARCH-SERVER:9200/_xpack/security/user"
{"error":{"root_cause":[{"type":"exception","reason":"Security must be explicitly enabled when using a [basic] license. Enable security by setting [xpack.security.enabled] to [true] in the elasticsearch.yml file and restart the node."}],"type":"exception","reason":"Security must be explicitly enabled when using a [basic] license. Enable security by setting [xpack.security.enabled] to [true] in the elasticsearch.yml file and restart the node."},"status":500}
그러나, /에 요청을 보내고 다음과 같은 응답을 받으면:
{"error":{"root_cause":[{"type":"security_exception","reason":"missing authentication credentials for REST request [/]","header":{"WWW-Authenticate":"Basic realm=\"security\" charset=\"UTF-8\""}}],"type":"security_exception","reason":"missing authentication credentials for REST request [/]","header":{"WWW-Authenticate":"Basic realm=\"security\" charset=\"UTF-8\""}},"status":401}
그것은 인증이 구성되어 있으며 유효한 자격 증명이 필요하다는 것을 의미합니다. 그런 다음 브루트포스를 시도할 수 있습니다 (HTTP 기본 인증을 사용하므로 BF HTTP 기본 인증을 사용할 수 있습니다).
여기 기본 사용자 이름 목록이 있습니다: elastic (슈퍼유저), remote_monitoring_user, beats_system, logstash_system, kibana, kibana_system, apm_system, _anonymous_._ 이전 버전의 Elasticsearch는 이 사용자에 대해 기본 비밀번호 changeme를 가지고 있습니다.
curl -X GET http://user:password@IP:9200/
기본 사용자 열거
#List all roles on the system:
curl -X GET "ELASTICSEARCH-SERVER:9200/_security/role"

#List all users on the system:
curl -X GET "ELASTICSEARCH-SERVER:9200/_security/user"

#Get more information about the rights of an user:
curl -X GET "ELASTICSEARCH-SERVER:9200/_security/user/<USERNAME>"
Elastic Info
다음은 elasticsearch에 대한 정보를 얻기 위해 GET을 통해 접근할 수 있는 몇 가지 엔드포인트입니다:
| _cat | /_cluster | /_security |
|---|---|---|
| /_cat/segments | /_cluster/allocation/explain | /_security/user |
| /_cat/shards | /_cluster/settings | /_security/privilege |
| /_cat/repositories | /_cluster/health | /_security/role_mapping |
| /_cat/recovery | /_cluster/state | /_security/role |
| /_cat/plugins | /_cluster/stats | /_security/api_key |
| /_cat/pending_tasks | /_cluster/pending_tasks | |
| /_cat/nodes | /_nodes | |
| /_cat/tasks | /_nodes/usage | |
| /_cat/templates | /_nodes/hot_threads | |
| /_cat/thread_pool | /_nodes/stats | |
| /_cat/ml/trained_models | /_tasks | |
| /_cat/transforms/_all | /_remote/info | |
| /_cat/aliases | ||
| /_cat/allocation | ||
| /_cat/ml/anomaly_detectors | ||
| /_cat/count | ||
| /_cat/ml/data_frame/analytics | ||
| /_cat/ml/datafeeds | ||
| /_cat/fielddata | ||
| /_cat/health | ||
| /_cat/indices | ||
| /_cat/master | ||
| /_cat/nodeattrs | ||
| /_cat/nodes |
이 엔드포인트는 문서에서 가져온 것입니다 여기에서 더 많은 정보를 찾을 수 있습니다.
또한, /_cat에 접근하면 응답에는 인스턴스에서 지원하는 /_cat/* 엔드포인트가 포함됩니다.
/_security/user에서 (인증이 활성화된 경우) 어떤 사용자가 superuser 역할을 가지고 있는지 확인할 수 있습니다.
Indices
http://10.10.10.115:9200/_cat/indices?v에 접근하여 모든 인덱스를 수집할 수 있습니다.
health status index   uuid                   pri rep docs.count docs.deleted store.size pri.store.size
green  open   .kibana 6tjAYZrgQ5CwwR0g6VOoRg   1   0          1            0        4kb            4kb
yellow open   quotes  ZG2D1IqkQNiNZmi2HRImnQ   5   1        253            0    262.7kb        262.7kb
yellow open   bank    eSVpNfCfREyYoVigNWcrMw   5   1       1000            0    483.2kb        483.2kb
To obtain information about which kind of data is saved inside an index you can access: http://host:9200/<index> from example in this case http://10.10.10.115:9200/bank
Dump index
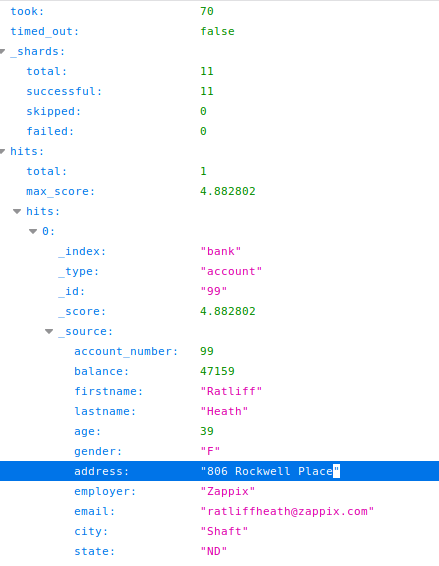
If you want to dump all the contents of an index you can access: http://host:9200/<index>/_search?pretty=true like http://10.10.10.115:9200/bank/_search?pretty=true
잠시 시간을 내어 은행 인덱스 내 각 문서(항목)의 내용과 이전 섹션에서 본 이 인덱스의 필드를 비교해 보세요.
So, at this point you may notice that there is a field called "total" inside "hits" that indicates that 1000 documents were found inside this index but only 10 were retried. This is because by default there is a limit of 10 documents.
But, now that you know that this index contains 1000 documents, you can dump all of them indicating the number of entries you want to dump in the size parameter: http://10.10.10.115:9200/quotes/_search?pretty=true&size=1000asd
참고: 더 큰 숫자를 지정하면 모든 항목이 어쨌든 덤프됩니다. 예를 들어 size=9999를 지정할 수 있으며, 더 많은 항목이 있을 경우 이상할 것입니다(하지만 확인해야 합니다).
Dump all
In order to dump all you can just go to the same path as before but without indicating any indexhttp://host:9200/_search?pretty=true like http://10.10.10.115:9200/_search?pretty=true
Remember that in this case the default limit of 10 results will be applied. You can use the size parameter to dump a bigger amount of results. Read the previous section for more information.
Search
If you are looking for some information you can do a raw search on all the indices going to http://host:9200/_search?pretty=true&q=<search_term> like in http://10.10.10.115:9200/_search?pretty=true&q=Rockwell
If you want just to search on an index you can just specify it on the path: http://host:9200/<index>/_search?pretty=true&q=<search_term>
검색 콘텐츠에 사용되는 q 매개변수는 정규 표현식을 지원합니다.
You can also use something like https://github.com/misalabs/horuz to fuzz an elasticsearch service.
Write permissions
You can check your write permissions trying to create a new document inside a new index running something like the following:
curl -X POST '10.10.10.115:9200/bookindex/books' -H 'Content-Type: application/json' -d'
{
"bookId" : "A00-3",
"author" : "Sankaran",
"publisher" : "Mcgrahill",
"name" : "how to get a job"
}'
해당 cmd는 "bookId", "author", "publisher" 및 "name" 속성을 가진 books 유형의 문서로 bookindex라는 새 인덱스를 생성합니다.
새 인덱스가 이제 목록에 나타나는지 확인하세요:
그리고 자동으로 생성된 속성을 주목하세요:
자동 열거
일부 도구는 이전에 제시된 데이터 중 일부를 얻습니다:
msf > use auxiliary/scanner/elasticsearch/indices_enum
{% embed url="https://github.com/theMiddleBlue/nmap-elasticsearch-nse" %}
Shodan
port:9200 elasticsearch
해커의 관점에서 웹 앱, 네트워크 및 클라우드를 살펴보세요
실제 비즈니스에 영향을 미치는 중요한 취약점을 찾아보고 보고하세요. 20개 이상의 맞춤형 도구를 사용하여 공격 표면을 매핑하고, 권한 상승을 허용하는 보안 문제를 찾아내며, 자동화된 익스플로잇을 사용하여 필수 증거를 수집하여 귀하의 노력을 설득력 있는 보고서로 전환하세요.
{% embed url="https://pentest-tools.com/?utm_term=jul2024&utm_medium=link&utm_source=hacktricks&utm_campaign=spons" %}
{% hint style="success" %}
AWS 해킹 배우기 및 연습하기: HackTricks Training AWS Red Team Expert (ARTE)
GCP 해킹 배우기 및 연습하기:  HackTricks Training GCP Red Team Expert (GRTE)
HackTricks 지원하기
- 구독 계획 확인하기!
- **💬 Discord 그룹 또는 텔레그램 그룹에 참여하거나 Twitter 🐦 @hacktricks_live를 팔로우하세요.
- HackTricks 및 HackTricks Cloud 깃허브 리포지토리에 PR을 제출하여 해킹 팁을 공유하세요.


