11 KiB
Install Burp Certificate
Learn AWS hacking from zero to hero with htARTE (HackTricks AWS Red Team Expert)!
Other ways to support HackTricks:
- If you want to see your company advertised in HackTricks or download HackTricks in PDF Check the SUBSCRIPTION PLANS!
- Get the official PEASS & HackTricks swag
- Discover The PEASS Family, our collection of exclusive NFTs
- Join the 💬 Discord group or the telegram group or follow me on Twitter 🐦 @carlospolopm.
- Share your hacking tricks by submitting PRs to the HackTricks and HackTricks Cloud github repos.
On a Virtual Machine
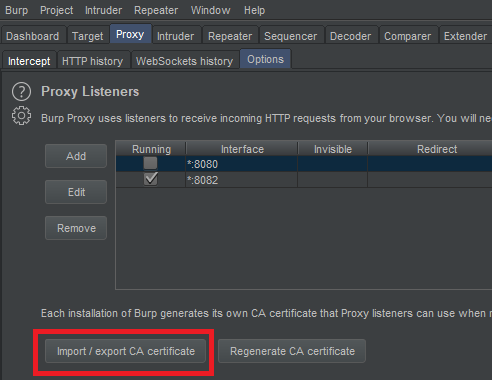
First of all you need to download the Der certificate from Burp. You can do this in Proxy --> Options --> Import / Export CA certificate
Export the certificate in Der format and lets transform it to a form that Android is going to be able to understand. Note that in order to configure the burp certificate on the Android machine in AVD you need to run this machine with the -writable-system option.
For example you can run it like:
{% code overflow="wrap" %}
C:\Users\<UserName>\AppData\Local\Android\Sdk\tools\emulator.exe -avd "AVD9" -http-proxy 192.168.1.12:8080 -writable-system
{% endcode %}
Then, to configure burps certificate do:
{% code overflow="wrap" %}
openssl x509 -inform DER -in burp_cacert.der -out burp_cacert.pem
CERTHASHNAME="`openssl x509 -inform PEM -subject_hash_old -in burp_cacert.pem | head -1`.0"
mv burp_cacert.pem $CERTHASHNAME #Correct name
adb root && sleep 2 && adb remount #Allow to write on /syste
adb push $CERTHASHNAME /sdcard/ #Upload certificate
adb shell mv /sdcard/$CERTHASHNAME /system/etc/security/cacerts/ #Move to correct location
adb shell chmod 644 /system/etc/security/cacerts/$CERTHASHNAME #Assign privileges
adb reboot #Now, reboot the machine
{% endcode %}
Once the machine finish rebooting the burp certificate will be in use by it!
Using Magisc
If you rooted your device with Magisc (maybe an emulator), and you can't follow the previous steps to install the Burp cert because the filesystem is read-only and you cannot remount it writable, there is another way.
Explained in this video you need to:
- Install a CA certificate: Just drag&drop the DER Burp certificate changing the extension to
.crtin the mobile so it's stored in the Downloads folder and go toInstall a certificate->CA certificate

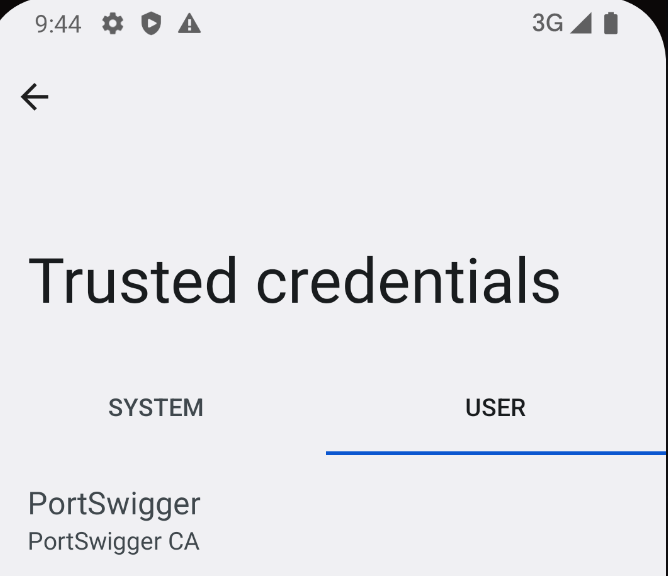
- Check that the certificate was correctly stored going to
Trusted credentials->USER

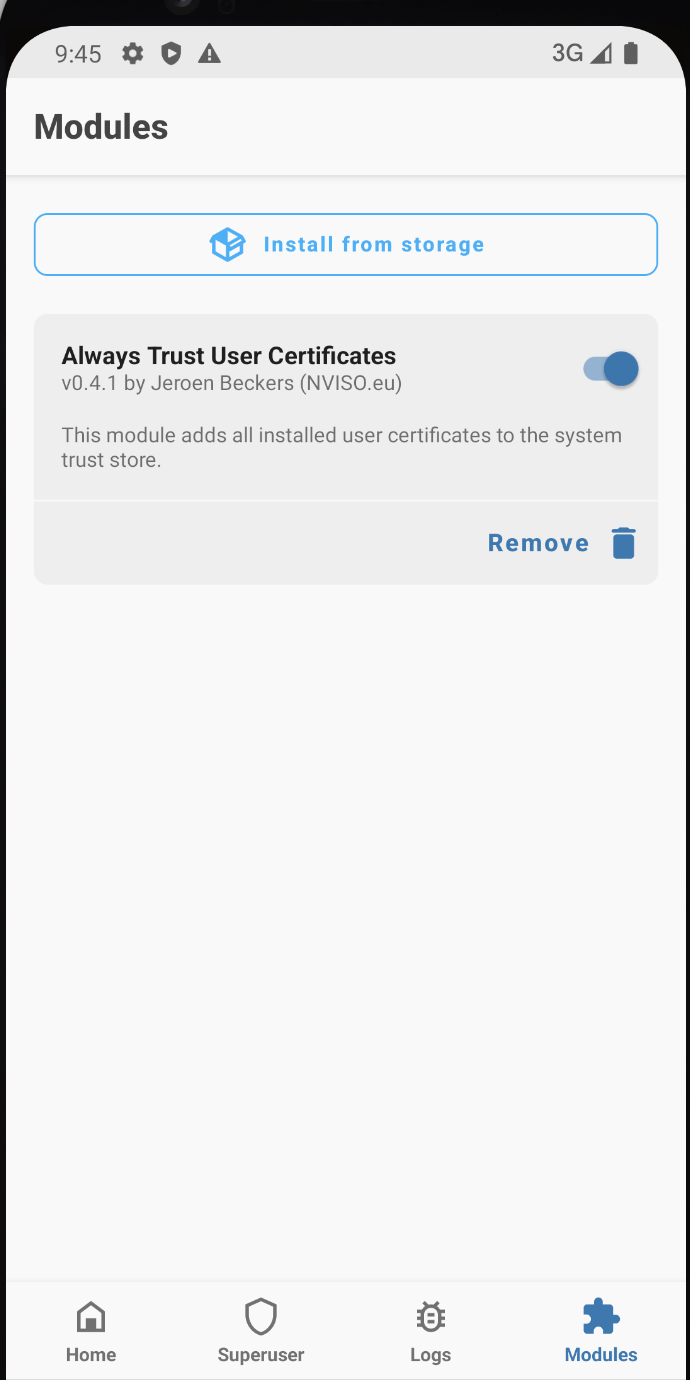
- Make it System trusted: Download the Magisc module MagiskTrustUserCerts (a .zip file), drag&drop it in the phone, go to the Magics app in the phone to the
Modulessection, click onInstall from storage, select the.zipmodule and once installed reboot the phone:

- After rebooting, go to
Trusted credentials->SYSTEMand check the Postswigger cert is there

Post Android 14
Changes:
- Until now, system-trusted CA certificates lived in
/system/etc/security/cacerts/. On a standard AOSP emulator, those could be modified directly with root access with minimal setup, immediately taking effect everywhere. - In Android 14, system-trusted CA certificates will generally live in
/apex/com.android.conscrypt/cacerts, and all of/apexis immutable. - That APEX cacerts path cannot be remounted as rewritable - remounts simply fail. In fact, even if you unmount the entire path from a root shell, apps can still read your certificates just fine.
- The alternative technique of mounting a tmpfs directory over the top also doesn't work - even though this means that
ls /apex/com.android.conscrypt/cacertsmight return nothing (or anything else you like), apps will still see the same original data.- Because the
/apexmount is explicitly mounted with PRIVATE propagation, so that all changes to mounts inside the/apexpath are never shared between processes.
- Because the
That's done by the init process which starts the OS, which then launches the Zygote process (with a new mount namespace copied from the parent, so including its own private /apex mount), which then in turn starts each app process whenever an app is launched on the device (who each in turn then copy that same private /apex mount).
Recursively remounting mountpoints
- You can remount
/apexmanually, removing the PRIVATE propagation and making it writable (ironically, it seems that entirely removing private propagation does propagate everywhere) - You copy out the entire contents of
/apex/com.android.conscryptelsewhere - Then you unmount
/apex/com.android.conscryptentirely - removing the read-only mount that immutably provides this module - Then you copy the contents back, so it lives into the
/apexmount directly, where it can be modified (you need to do this quickly, as apparently you can see crashes otherwise) - This should take effect immediately, but they recommend killing
system_server(restarting all apps) to get everything back into a consistent state
# Create a separate temp directory, to hold the current certificates
# Otherwise, when we add the mount we can't read the current certs anymore.
mkdir -p -m 700 /data/local/tmp/tmp-ca-copy

# Copy out the existing certificates
cp /apex/com.android.conscrypt/cacerts/* /data/local/tmp/tmp-ca-copy/

# Create the in-memory mount on top of the system certs folder
mount -t tmpfs tmpfs /system/etc/security/cacerts

# Copy the existing certs back into the tmpfs, so we keep trusting them
mv /data/local/tmp/tmp-ca-copy/* /system/etc/security/cacerts/

# Copy our new cert in, so we trust that too
mv $CERTIFICATE_PATH /system/etc/security/cacerts/

# Update the perms & selinux context labels
chown root:root /system/etc/security/cacerts/*
chmod 644 /system/etc/security/cacerts/*
chcon u:object_r:system_file:s0 /system/etc/security/cacerts/*

# Deal with the APEX overrides, which need injecting into each namespace:

# First we get the Zygote process(es), which launch each app
ZYGOTE_PID=$(pidof zygote || true)
ZYGOTE64_PID=$(pidof zygote64 || true)
# N.b. some devices appear to have both!

# Apps inherit the Zygote's mounts at startup, so we inject here to ensure
# all newly started apps will see these certs straight away:
for Z_PID in "$ZYGOTE_PID" "$ZYGOTE64_PID"; do
    if [ -n "$Z_PID" ]; then
        nsenter --mount=/proc/$Z_PID/ns/mnt -- \
            /bin/mount --bind /system/etc/security/cacerts /apex/com.android.conscrypt/cacerts
    fi
done

# Then we inject the mount into all already running apps, so they
# too see these CA certs immediately:

# Get the PID of every process whose parent is one of the Zygotes:
APP_PIDS=$(
    echo "$ZYGOTE_PID $ZYGOTE64_PID" | \
    xargs -n1 ps -o 'PID' -P | \
    grep -v PID
)

# Inject into the mount namespace of each of those apps:
for PID in $APP_PIDS; do
    nsenter --mount=/proc/$PID/ns/mnt -- \
        /bin/mount --bind /system/etc/security/cacerts /apex/com.android.conscrypt/cacerts &
done
wait # Launched in parallel - wait for completion here

echo "System certificate injected"
Bind-mounting through NSEnter
-
First, we need set up a writable directory somewhere. For easy compatibility with the existing approach, I'm doing this with a
tmpfsmount over the (still present) non-APEX system cert directory:mount -t tmpfs tmpfs /system/etc/security/cacerts -
Then you place the CA certificates you're interested in into this directory (e.g. you might want copy all the defaults out of the existing
/apex/com.android.conscrypt/cacerts/CA certificates directory) and set permissions & SELinux labels appropriately. -
Then, use
nsenterto enter the Zygote's mount namespace, and bind mount this directory over the APEX directory:nsenter --mount=/proc/$ZYGOTE_PID/ns/mnt -- \ /bin/mount --bind /system/etc/security/cacerts /apex/com.android.conscrypt/cacertsThe Zygote process spawns each app, copying its mount namespace to do so, so this ensures all newly launched apps (everything started from now on) will use this.
-
Then, use
nsenterto enter each already running app's namespace, and do the same:nsenter --mount=/proc/$APP_PID/ns/mnt -- \ /bin/mount --bind /system/etc/security/cacerts /apex/com.android.conscrypt/cacertsAlternatively, if you don't mind the awkward UX, you should be able to do the bind mount on
inititself (PID 1) and then runstop && startto soft-reboot the OS, recreating all the namespaces and propagating your changes everywhere (but personally I do mind the awkward reboot, so I'm ignoring that route entirely).
Learn AWS hacking from zero to hero with htARTE (HackTricks AWS Red Team Expert)!
Other ways to support HackTricks:
- If you want to see your company advertised in HackTricks or download HackTricks in PDF Check the SUBSCRIPTION PLANS!
- Get the official PEASS & HackTricks swag
- Discover The PEASS Family, our collection of exclusive NFTs
- Join the 💬 Discord group or the telegram group or follow me on Twitter 🐦 @carlospolopm.
- Share your hacking tricks by submitting PRs to the HackTricks and HackTricks Cloud github repos.
