14 KiB
9200 - Pentesting Elasticsearch
{% hint style="success" %}
Learn & practice AWS Hacking: HackTricks Training AWS Red Team Expert (ARTE)
Learn & practice GCP Hacking:  HackTricks Training GCP Red Team Expert (GRTE)
Support HackTricks
- Check the subscription plans!
- Join the 💬 Discord group or the telegram group or follow us on Twitter 🐦 @hacktricks_live.
- Share hacking tricks by submitting PRs to the HackTricks and HackTricks Cloud github repos.
Basic information
Elasticsearch는 분산형, 오픈 소스 검색 및 분석 엔진으로 모든 유형의 데이터를 처리합니다. 속도, 확장성, 간단한 REST API로 잘 알려져 있습니다. Apache Lucene을 기반으로 하며, 2010년에 Elasticsearch N.V. (현재 Elastic로 알려짐)에서 처음 출시되었습니다. Elasticsearch는 데이터 수집, 보강, 저장, 분석 및 시각화를 위한 오픈 소스 도구 모음인 Elastic Stack의 핵심 구성 요소입니다. 이 스택은 일반적으로 ELK Stack이라고 하며, Logstash와 Kibana를 포함하고 있으며, 현재 Beats라는 경량 데이터 전송 에이전트를 가지고 있습니다.
What is an Elasticsearch index?
Elasticsearch 인덱스는 관련 문서의 모음으로 JSON 형식으로 저장됩니다. 각 문서는 키와 해당 값(문자열, 숫자, 불리언, 날짜, 배열, 지리적 위치 등)으로 구성됩니다.
Elasticsearch는 빠른 전체 텍스트 검색을 용이하게 하기 위해 역 인덱스라는 효율적인 데이터 구조를 사용합니다. 이 인덱스는 문서 내의 모든 고유 단어를 나열하고 각 단어가 나타나는 문서를 식별합니다.
인덱싱 과정에서 Elasticsearch는 문서를 저장하고 역 인덱스를 구성하여 거의 실시간 검색을 가능하게 합니다. 인덱스 API는 특정 인덱스 내에서 JSON 문서를 추가하거나 업데이트하는 데 사용됩니다.
기본 포트: 9200/tcp
Manual Enumeration
Banner
Elasticsearch에 접근하는 데 사용되는 프로토콜은 HTTP입니다. HTTP를 통해 접근하면 흥미로운 정보를 찾을 수 있습니다: http://10.10.10.115:9200/
/에 접근할 때 해당 응답이 보이지 않으면 다음 섹션을 참조하세요.
Authentication
기본적으로 Elasticsearch는 인증이 활성화되어 있지 않습니다, 따라서 기본적으로 자격 증명 없이 데이터베이스 내의 모든 것에 접근할 수 있습니다.
인증이 비활성화되어 있는지 확인하려면 다음 요청을 보낼 수 있습니다:
curl -X GET "ELASTICSEARCH-SERVER:9200/_xpack/security/user"
{"error":{"root_cause":[{"type":"exception","reason":"Security must be explicitly enabled when using a [basic] license. Enable security by setting [xpack.security.enabled] to [true] in the elasticsearch.yml file and restart the node."}],"type":"exception","reason":"Security must be explicitly enabled when using a [basic] license. Enable security by setting [xpack.security.enabled] to [true] in the elasticsearch.yml file and restart the node."},"status":500}
그러나, /에 요청을 보내고 다음과 같은 응답을 받으면:
{"error":{"root_cause":[{"type":"security_exception","reason":"missing authentication credentials for REST request [/]","header":{"WWW-Authenticate":"Basic realm=\"security\" charset=\"UTF-8\""}}],"type":"security_exception","reason":"missing authentication credentials for REST request [/]","header":{"WWW-Authenticate":"Basic realm=\"security\" charset=\"UTF-8\""}},"status":401}
그것은 인증이 구성되어 있으며 유효한 자격 증명이 필요하다는 것을 의미합니다. 그런 다음, 브루트포스를 시도할 수 있습니다 (HTTP 기본 인증을 사용하므로 BF HTTP 기본 인증을 사용할 수 있습니다).
여기 기본 사용자 이름 목록이 있습니다: elastic (슈퍼유저), remote_monitoring_user, beats_system, logstash_system, kibana, kibana_system, apm_system, _anonymous_._ 이전 버전의 Elasticsearch는 이 사용자에 대해 기본 비밀번호 changeme를 가지고 있습니다.
curl -X GET http://user:password@IP:9200/
기본 사용자 열거
#List all roles on the system:
curl -X GET "ELASTICSEARCH-SERVER:9200/_security/role"

#List all users on the system:
curl -X GET "ELASTICSEARCH-SERVER:9200/_security/user"

#Get more information about the rights of an user:
curl -X GET "ELASTICSEARCH-SERVER:9200/_security/user/<USERNAME>"
Elastic Info
다음은 elasticsearch에 대한 정보를 얻기 위해 GET을 통해 접근할 수 있는 몇 가지 엔드포인트입니다:
| _cat | /_cluster | /_security |
|---|---|---|
| /_cat/segments | /_cluster/allocation/explain | /_security/user |
| /_cat/shards | /_cluster/settings | /_security/privilege |
| /_cat/repositories | /_cluster/health | /_security/role_mapping |
| /_cat/recovery | /_cluster/state | /_security/role |
| /_cat/plugins | /_cluster/stats | /_security/api_key |
| /_cat/pending_tasks | /_cluster/pending_tasks | |
| /_cat/nodes | /_nodes | |
| /_cat/tasks | /_nodes/usage | |
| /_cat/templates | /_nodes/hot_threads | |
| /_cat/thread_pool | /_nodes/stats | |
| /_cat/ml/trained_models | /_tasks | |
| /_cat/transforms/_all | /_remote/info | |
| /_cat/aliases | ||
| /_cat/allocation | ||
| /_cat/ml/anomaly_detectors | ||
| /_cat/count | ||
| /_cat/ml/data_frame/analytics | ||
| /_cat/ml/datafeeds | ||
| /_cat/fielddata | ||
| /_cat/health | ||
| /_cat/indices | ||
| /_cat/master | ||
| /_cat/nodeattrs | ||
| /_cat/nodes |
이 엔드포인트는 문서에서 가져온 것입니다 여기에서 더 많은 정보를 찾을 수 있습니다.
또한, /_cat에 접근하면 응답에는 인스턴스에서 지원하는 /_cat/* 엔드포인트가 포함됩니다.
/_security/user에서 (인증이 활성화된 경우) 어떤 사용자가 superuser 역할을 가지고 있는지 확인할 수 있습니다.
Indices
http://10.10.10.115:9200/_cat/indices?v에 접근하여 모든 인덱스를 수집할 수 있습니다.
health status index   uuid                   pri rep docs.count docs.deleted store.size pri.store.size
green  open   .kibana 6tjAYZrgQ5CwwR0g6VOoRg   1   0          1            0        4kb            4kb
yellow open   quotes  ZG2D1IqkQNiNZmi2HRImnQ   5   1        253            0    262.7kb        262.7kb
yellow open   bank    eSVpNfCfREyYoVigNWcrMw   5   1       1000            0    483.2kb        483.2kb
To obtain 정보를 얻으려면 어떤 종류의 데이터가 인덱스에 저장되어 있는지 http://host:9200/<index>에 접근할 수 있습니다. 이 경우 http://10.10.10.115:9200/bank
덤프 인덱스
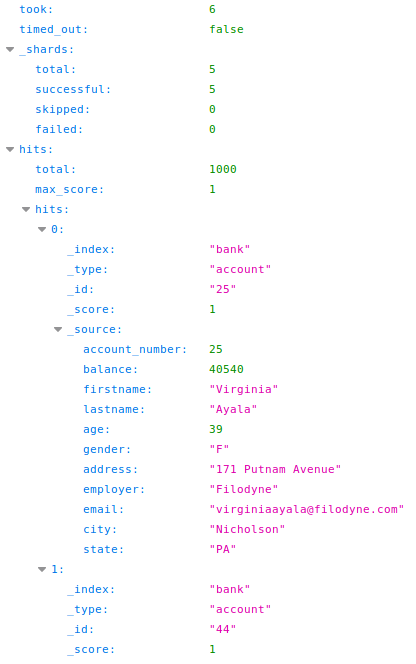
모든 내용을 덤프하려면 인덱스의 모든 내용을 덤프하려면 http://host:9200/<index>/_search?pretty=true에 접근할 수 있습니다. 예를 들어 http://10.10.10.115:9200/bank/_search?pretty=true
은행 인덱스 내 각 문서(항목)의 내용을 비교하고 이전 섹션에서 본 이 인덱스의 필드를 확인해 보세요.
따라서 이 시점에서 "hits" 내에 "total"이라는 필드가 있어 이 인덱스 내에서 1000개의 문서가 발견되었지만 10개만 검색되었다는 것을 알 수 있습니다. 이는 기본적으로 10개의 문서에 제한이 있기 때문입니다.
하지만 이제 이 인덱스에 1000개의 문서가 포함되어 있다는 것을 알았으므로, 모두 덤프할 수 있습니다. 원하는 항목 수를 size 매개변수에 지정하여 덤프할 수 있습니다: http://10.10.10.115:9200/quotes/_search?pretty=true&size=1000asd
참고: 더 큰 숫자를 지정하면 모든 항목이 어쨌든 덤프됩니다. 예를 들어 size=9999를 지정할 수 있으며, 더 많은 항목이 있을 경우 이상할 것입니다(하지만 확인해야 합니다).
모두 덤프
모두 덤프하려면 이전과 동일한 경로로 가되 인덱스를 지정하지 않고 http://host:9200/_search?pretty=true에 접근하면 됩니다. 예를 들어 http://10.10.10.115:9200/_search?pretty=true
이 경우 기본 10개의 결과 제한이 적용됩니다. size 매개변수를 사용하여 더 많은 결과를 덤프할 수 있습니다. 더 많은 정보는 이전 섹션을 참조하세요.
검색
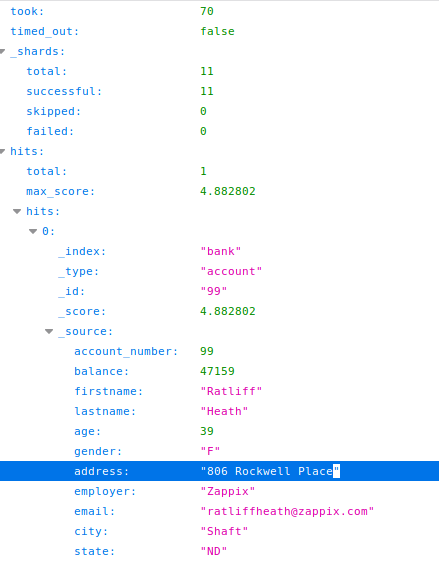
정보를 찾고 있다면 모든 인덱스에서 원시 검색을 수행할 수 있습니다. http://host:9200/_search?pretty=true&q=<search_term>에 접근하면 됩니다. 예를 들어 http://10.10.10.115:9200/_search?pretty=true&q=Rockwell
인덱스에서만 검색하려면 경로에 인덱스를 지정하면 됩니다: http://host:9200/<index>/_search?pretty=true&q=<search_term>
검색 콘텐츠에 사용되는 q 매개변수는 정규 표현식을 지원합니다.
Elasticsearch 서비스를 퍼징하기 위해 https://github.com/misalabs/horuz와 같은 것을 사용할 수도 있습니다.
쓰기 권한
새 인덱스 내에 새 문서를 생성하려고 시도하여 쓰기 권한을 확인할 수 있습니다. 다음과 같은 명령을 실행해 보세요:
curl -X POST '10.10.10.115:9200/bookindex/books' -H 'Content-Type: application/json' -d'
{
"bookId" : "A00-3",
"author" : "Sankaran",
"publisher" : "Mcgrahill",
"name" : "how to get a job"
}'
해당 cmd는 "bookId", "author", "publisher" 및 "name" 속성을 가진 books 유형의 문서로 bookindex라는 새 인덱스를 생성합니다.
새 인덱스가 이제 목록에 나타나는지 확인하세요:
그리고 자동으로 생성된 속성을 주목하세요:
자동 열거
일부 도구는 이전에 제시된 데이터 중 일부를 얻습니다:
msf > use auxiliary/scanner/elasticsearch/indices_enum
{% embed url="https://github.com/theMiddleBlue/nmap-elasticsearch-nse" %}
Shodan
port:9200 elasticsearch
{% hint style="success" %}
AWS 해킹 배우기 및 연습하기: HackTricks Training AWS Red Team Expert (ARTE)
GCP 해킹 배우기 및 연습하기:  HackTricks Training GCP Red Team Expert (GRTE)
HackTricks 지원하기
- 구독 계획 확인하기!
- **💬 Discord 그룹 또는 텔레그램 그룹에 참여하거나 Twitter 🐦 @hacktricks_live를 팔로우하세요.
- HackTricks 및 HackTricks Cloud 깃허브 리포에 PR을 제출하여 해킹 팁을 공유하세요.


