7.8 KiB
iOS Burp Suite Configuration
{% hint style="success" %}
Learn & practice AWS Hacking: HackTricks Training AWS Red Team Expert (ARTE)
Learn & practice GCP Hacking:  HackTricks Training GCP Red Team Expert (GRTE)
Support HackTricks
- Check the subscription plans!
- Join the 💬 Discord group or the telegram group or follow us on Twitter 🐦 @hacktricks_live.
- Share hacking tricks by submitting PRs to the HackTricks and HackTricks Cloud github repos.

Use Trickest to easily build and automate workflows powered by the world's most advanced community tools.
Get Access Today:
{% embed url="https://trickest.com/?utm_source=hacktricks&utm_medium=banner&utm_campaign=ppc&utm_content=burp-configuration-for-ios" %}
Installing the Burp Certificate on iOS Devices
For secure web traffic analysis and SSL pinning on iOS devices, the Burp Suite can be utilized either through the Burp Mobile Assistant or via manual configuration. Below is a summarized guide on both methods:
Automated Installation with Burp Mobile Assistant
The Burp Mobile Assistant simplifies the installation process of the Burp Certificate, proxy configuration, and SSL Pinning. Detailed guidance can be found on PortSwigger's official documentation.
Manual Installation Steps
- Proxy Configuration: Start by setting Burp as the proxy under the iPhone's Wi-Fi settings.
- Certificate Download: Navigate to
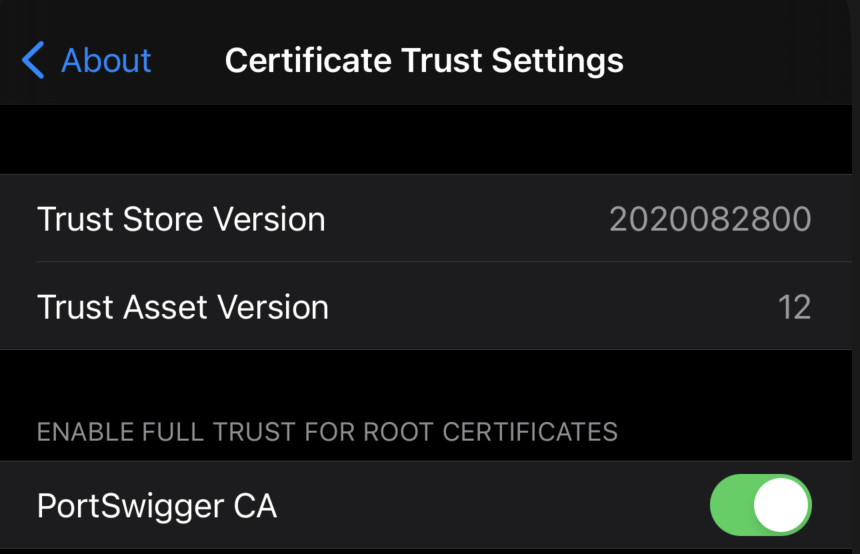
http://burpon your device's browser to download the certificate. - Certificate Installation: Install the downloaded profile via Settings > General > VPN & Device Management, then enable trust for the PortSwigger CA under Certificate Trust Settings.
Configuring an Interception Proxy
The setup enables traffic analysis between the iOS device and the internet through Burp, requiring a Wi-Fi network that supports client-to-client traffic. If unavailable, a USB connection via usbmuxd can serve as an alternative. PortSwigger's tutorials provide in-depth instructions on device configuration and certificate installation.
Advanced Configuration for Jailbroken Devices
For users with jailbroken devices, SSH over USB (via iproxy) offers a method to route traffic directly through Burp:
-
Establish SSH Connection: Use iproxy to forward SSH to localhost, allowing connection from the iOS device to the computer running Burp.
iproxy 2222 22 -
Remote Port Forwarding: Forward the iOS device's port 8080 to the computer's localhost to enable direct access to Burp's interface.
ssh -R 8080:localhost:8080 root@localhost -p 2222 -
Global Proxy Setting: Lastly, configure the iOS device's Wi-Fi settings to use a manual proxy, directing all web traffic through Burp.
Full Network Monitoring/Sniffing
Monitoring of non-HTTP device traffic can be efficiently conducted using Wireshark, a tool capable of capturing all forms of data traffic. For iOS devices, real-time traffic monitoring is facilitated through the creation of a Remote Virtual Interface, a process detailed in this Stack Overflow post. Prior to beginning, installation of Wireshark on a macOS system is a prerequisite.
The procedure involves several key steps:
- Initiate a connection between the iOS device and the macOS host via USB.
- Ascertain the iOS device's UDID, a necessary step for traffic monitoring. This can be done by executing a command in the macOS Terminal:
$ rvictl -s <UDID>
Starting device <UDID> [SUCCEEDED] with interface rvi0
- Post-identification of the UDID, Wireshark is to be opened, and the "rvi0" interface selected for data capture.
- For targeted monitoring, such as capturing HTTP traffic related to a specific IP address, Wireshark's Capture Filters can be employed:
Burp Cert Installation in Simulator
- Export Burp Certificate
In Proxy --> Options --> Export CA certificate --> Certificate in DER format
- Drag and Drop the certificate inside the Emulator
- Inside the emulator go to Settings --> General --> Profile --> PortSwigger CA, and verify the certificate
- Inside the emulator go to Settings --> General --> About --> Certificate Trust Settings, and enable PortSwigger CA
Congrats, you have successfully configured the Burp CA Certificate in the iOS simulator
{% hint style="info" %} The iOS simulator will use the proxy configurations of the MacOS. {% endhint %}
MacOS Proxy Configuration
Steps to configure Burp as proxy:
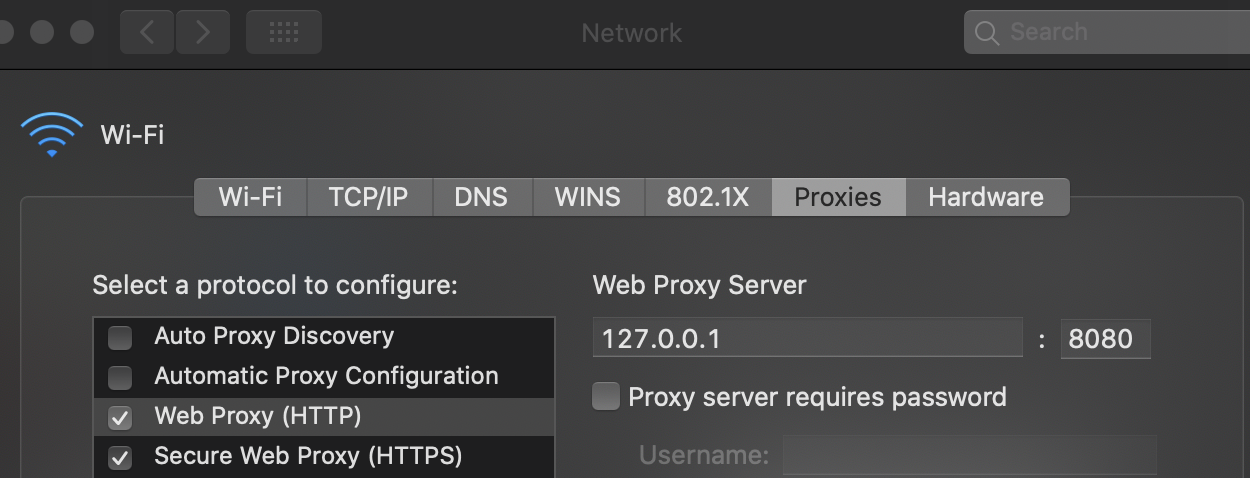
- Go to System Preferences --> Network --> Advanced
- In Proxies tab mark Web Proxy (HTTP) and Secure Web Proxy (HTTPS)
- In both options configure 127.0.0.1:8080
- Click on Ok and the in Apply

Use Trickest to easily build and automate workflows powered by the world's most advanced community tools.
Get Access Today:
{% embed url="https://trickest.com/?utm_source=hacktricks&utm_medium=banner&utm_campaign=ppc&utm_content=burp-configuration-for-ios" %}
{% hint style="success" %}
Learn & practice AWS Hacking: HackTricks Training AWS Red Team Expert (ARTE)
Learn & practice GCP Hacking:  HackTricks Training GCP Red Team Expert (GRTE)
Support HackTricks
- Check the subscription plans!
- Join the 💬 Discord group or the telegram group or follow us on Twitter 🐦 @hacktricks_live.
- Share hacking tricks by submitting PRs to the HackTricks and HackTricks Cloud github repos.


