8.8 KiB
Burp Suite Configuration for iOS
HackTricks in 🐦 Twitter 🐦 - 🎙️ Twitch Wed - 18.30(UTC) 🎙️ - 🎥 Youtube 🎥
- Do you work in a cybersecurity company? Do you want to see your company advertised in HackTricks? or do you want to have access to the latest version of the PEASS or download HackTricks in PDF? Check the SUBSCRIPTION PLANS!
- Discover The PEASS Family, our collection of exclusive NFTs
- Get the official PEASS & HackTricks swag
- Join the 💬 Discord group or the telegram group or follow me on Twitter 🐦@carlospolopm.
- Share your hacking tricks by submitting PRs to the hacktricks repo and hacktricks-cloud repo.
Use Trickest to easily build and automate workflows powered by the world's most advanced community tools.
Get Access Today:
{% embed url="https://trickest.com/?utm_campaign=hacktrics&utm_medium=banner&utm_source=hacktricks" %}
Burp Cert Installation in physical iOS
You can install Burp Mobile Assistant for help installing the Burp Certificate, configure the proxy and perform SSL Pinning.
Or you can manually follow the next steps:
- Configure Burp as the iPhone proxy in _Settings** --> **Wifi** --> **Click the network** --> **Proxy_
- Access
http://burpand download the certificate - Access Setting --> Profile Downloaded and Install it (you will be asked your code)
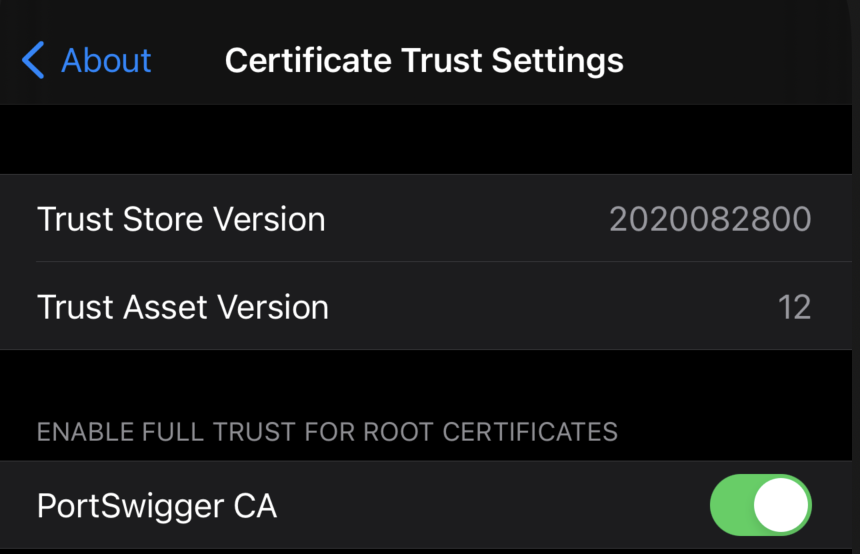
- Access Settings --> General --> About --> Certificate Trust Settings and enable PortSwigger CA
Setting up an Interception Proxy via localhost
Setting up Burp to proxy your traffic is pretty straightforward. We assume that both your iOS device and host computer are connected to a Wi-Fi network that permits client-to-client traffic. If client-to-client traffic is not permitted, you can use usbmuxd to connect to Burp via USB.
PortSwigger provides a good tutorial on setting up an iOS device to work with Burp and a tutorial on installing Burp's CA certificate to an iOS device.
Using Burp via USB on a Jailbroken Device
When doing dynamic analysis, it's interesting to use the SSH connection to route our traffic to Burp that is running on our computer. Let's get started:
First we need to use iproxy to make SSH from iOS available on localhost.
$ iproxy 2222 22
waiting for connection
The next step is to make a remote port forwarding of port 8080 on the iOS device to the localhost interface on our computer to port 8080.
ssh -R 8080:localhost:8080 root@localhost -p 2222
You should now be able to reach Burp on your iOS device. Open Safari on iOS and go to 127.0.0.1:8080 and you should see the Burp Suite Page. This would also be a good time to install the CA certificate of Burp on your iOS device.
The last step would be to set the proxy globally on your iOS device:
- Go to Settings -> Wi-Fi
- Connect to any Wi-Fi (you can literally connect to any Wi-Fi as the traffic for port 80 and 443 will be routed through USB, as we are just using the Proxy Setting for the Wi-Fi so we can set a global Proxy)
- Once connected click on the small blue icon on the right side of the connect Wi-Fi
- Configure your Proxy by selecting Manual
- Type in 127.0.0.1 as Server
- Type in 8080 as Port
Full Network Monitoring/Sniffing
If you need to monitor something different from HTTP communications you can sniff all the device traffic with wireshark.
You can remotely sniff all traffic in real-time on iOS by creating a Remote Virtual Interface for your iOS device. First make sure you have Wireshark installed on your macOS host computer.
- Connect your iOS device to your macOS host computer via USB.
- You would need to know the UDID of your iOS device, before you can start sniffing. Open the Terminal on macOS and enter the following command, filling in the UDID of your iOS device.
$ rvictl -s <UDID>
Starting device <UDID> [SUCCEEDED] with interface rvi0
- Launch Wireshark and select "rvi0" as the capture interface.
- Filter the traffic with Capture Filters in Wireshark to display what you want to monitor (for example, all HTTP traffic sent/received via the IP address 192.168.1.1).
ip.addr == 192.168.1.1 && http
The documentation of Wireshark offers many examples for Capture Filters that should help you to filter the traffic to get the information you want.
Burp Cert Installation in Simulator
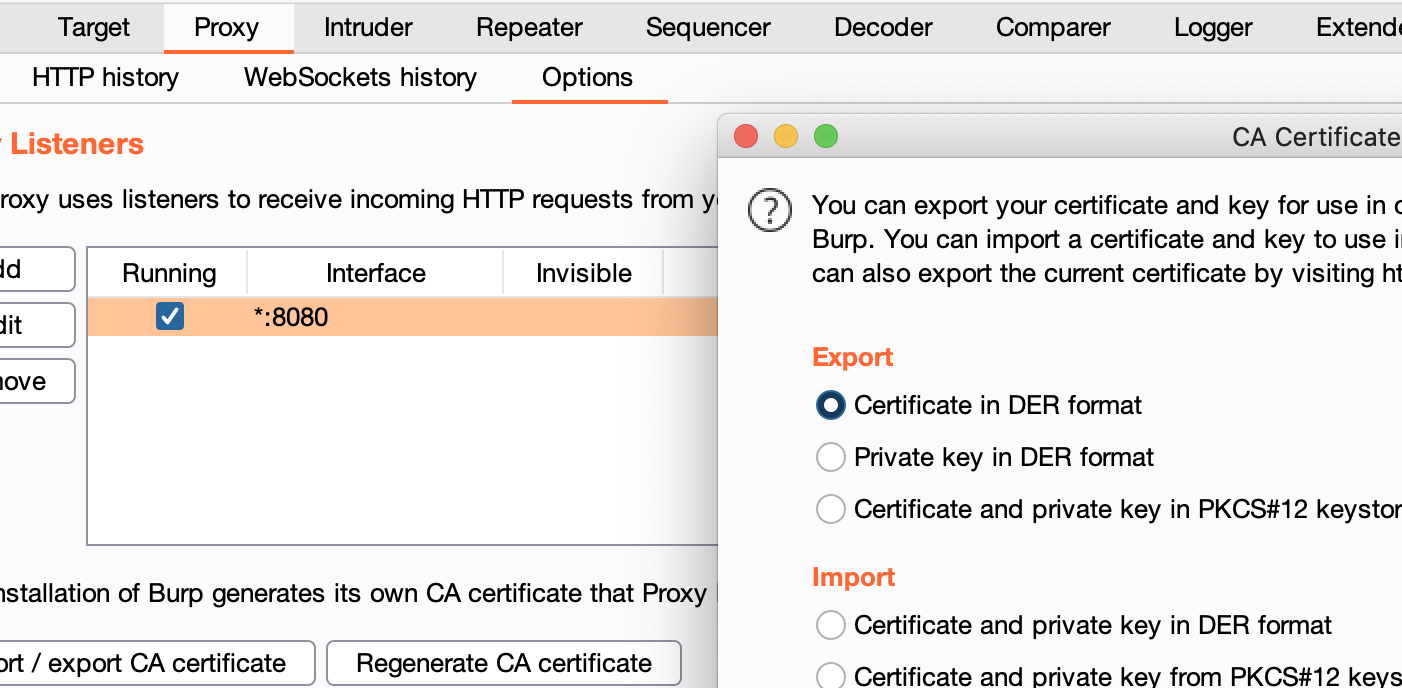
- Export Burp Certificate
In Proxy --> Options --> Export CA certificate --> Certificate in DER format
- Drag and Drop the certificate inside the Emulator
- Inside the emulator go to Settings --> General --> Profile --> PortSwigger CA, and verify the certificate
- Inside the emulator go to Settings --> General --> About --> Certificate Trust Settings, and enable PortSwigger CA
Congrats, you have successfully configured the Burp CA Certificate in the iOS simulator
{% hint style="info" %} The iOS simulator will use the proxy configurations of the MacOS. {% endhint %}
MacOS Proxy Configuration
Steps to configure Burp as proxy:
- Go to System Preferences --> Network --> Advanced
- In Proxies tab mark Web Proxy (HTTP) and Secure Web Proxy (HTTPS)
- In both options configure 127.0.0.1:8080
- Click on Ok and the in Apply
Use Trickest to easily build and automate workflows powered by the world's most advanced community tools.
Get Access Today:
{% embed url="https://trickest.com/?utm_campaign=hacktrics&utm_medium=banner&utm_source=hacktricks" %}
HackTricks in 🐦 Twitter 🐦 - 🎙️ Twitch Wed - 18.30(UTC) 🎙️ - 🎥 Youtube 🎥
- Do you work in a cybersecurity company? Do you want to see your company advertised in HackTricks? or do you want to have access to the latest version of the PEASS or download HackTricks in PDF? Check the SUBSCRIPTION PLANS!
- Discover The PEASS Family, our collection of exclusive NFTs
- Get the official PEASS & HackTricks swag
- Join the 💬 Discord group or the telegram group or follow me on Twitter 🐦@carlospolopm.
- Share your hacking tricks by submitting PRs to the hacktricks repo and hacktricks-cloud repo.


